Assigning keys in Space
Overview
Keys assigned to users are encoded with the access information relevant to the specific user. For this reason, you must set up and configure user profiles before assigning keys to these users. Access permission data on keys can be read and encoded using an encoder. See Ethernet encoders for relevant information on encoders.
When you assign a key to a user, the Update key and Cancel key buttons are added to the User information screen, and you can use them to update or cancel the assigned key. See Updating keys and Canceling keys for more information. From the User information screen you can also see:
- The period for which the key is valid, which is displayed in the Valid until information field.
- The key status. For example, you can see if a key update is required or if the key has expired.
The status of keys is also displayed with the corresponding key status icon in the Key status column on the Users screen. In the same way, the period for which keys are valid is displayed in the Key expiration column on the Users screen too.
Assigning a physical key
To assign user keys, do the following:
- Select Cardholders > Users. The Users screen is displayed.
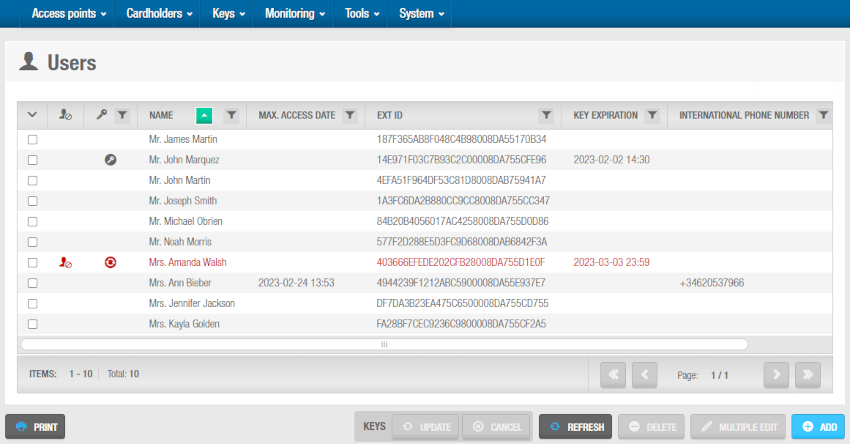 'Users' screen
- Click the name of the user to whom you want to assign a key. The User information screen is displayed.
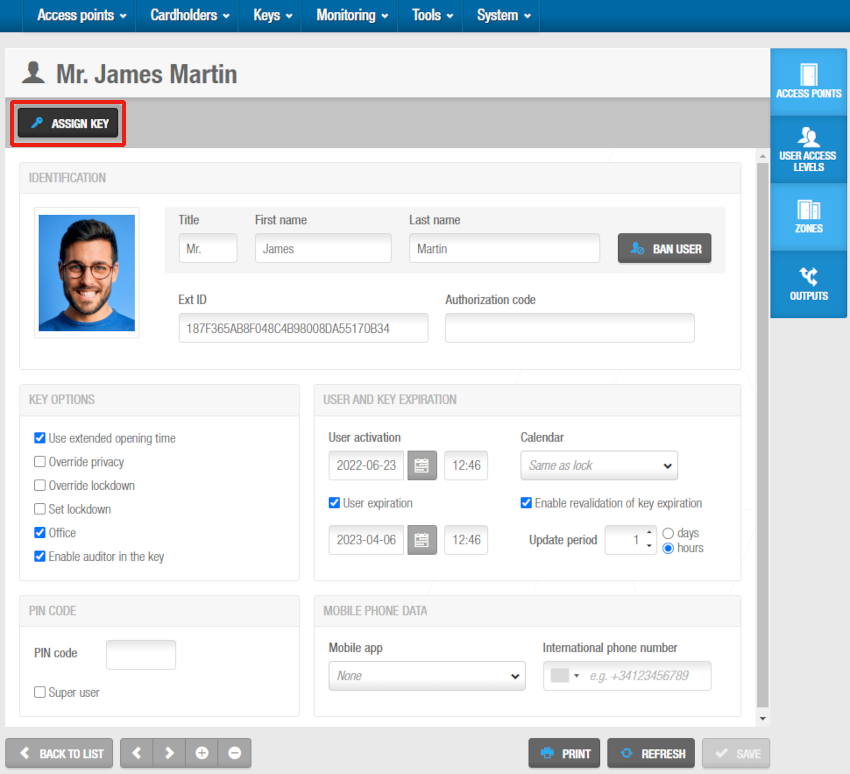 'Assign key' button in the 'User' information screen
- Click Assign key. The Assign key dialog box is displayed. The start date and date of expiry of the key are displayed in this dialog box.
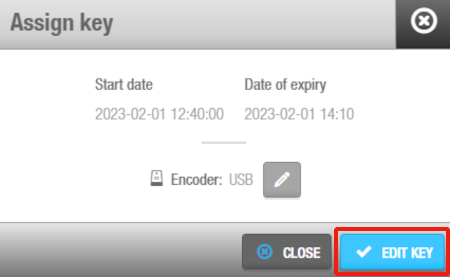 'Assign key' dialog box
Click Edit key. A pop-up asking you to place the key on the encoder is displayed.
Place the key on the encoder when the LED light begins to flash. Once the user access information is transferred to the key, a pop-up confirming that the operation was successful is displayed.
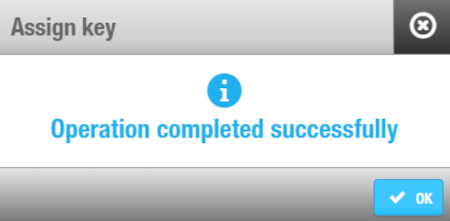 'Assign key' confirmation pop-up
- Remove the key and click OK.
Assigning a JustIN Mobile key
JustIN Mobile key access data is sent over the air (OTA) to the user's mobile phone.
Your installation's locks have to be equipped with Salto Bluetooth Low Energy readers to be able to use JustIN Mobile keys.
This feature is license-dependent, which means that the functionality will not be enabled in your Salto installation unless it is covered by your selected license options. See Registering and licensing Space for more information.
To use a JustIN key, your installation users must first download the Salto JustIN Mobile app from the Apple App Store or the Google Play Store, depending on whether they have an iPhone or an Android phone.
JustIN Mobile digital keys - on iOS and Android mobiles using Bluetooth Low Energy - have some limitations when compared to physical keys in Space. Those digital keys do not support data on Tracks, Wiegand application, Free assignment lockers, Antipassback, Last rejection or Audit on key. Meanwhile Android devices that use NFC do support those features.
Once users have downloaded the JustIN Mobile app, they should follow the instructions for registration on their own phones. However, JustIN Mobile users can register once they have been assigned a key. See also the JustIN Mobile user guide for more information.
To assign a digital key, follow the steps below:
Select Cardholders > Users. The Users screen is displayed.
Click the name of the user to whom you want to assign a key. The User information screen is displayed.
Type the phone number including the + sign and the country code in the International phone number field. Make sure you leave no spaces in the number. You can also click on the down arrow and select the country the mobile phone line is from.
Select JustIN Mobile from the Mobile app drop-down menu.
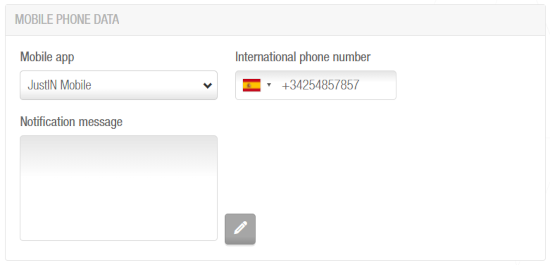 'Mobile phone data' panel
- Click Assign key. The data is sent to the user's mobile phone.
JustIN Mobile only supports a revalidation of key expiration of 7 days. See User and key expiration for more information on user and key expiration options.
The data sent over the air (OTA) to a user's mobile phone has to be encrypted. To do so, a Salto Ethernet encoder must be used as a dongle. From the encoder information screen, select the Enable dongle mode option. The user's mobile phone has to be online in order to receive the access data information.
See the JustIN Mobile app user guide for more details on how to use the JustIN Mobile digital key.
Assigning keys automatically
You can configure the system to assign keys to users automatically by using the User tab in General options. See Automatic key assignment for more information. This option is useful in university installations, for example, where thousands of new users (students) arrive at the start of each academic year. The automatic key assignment functionality means that users do not have to wait in line to have their key encoded. Instead, their key is assigned automatically when it is presented to an SVN wall reader, or an encoder with a running update reader.
See Ethernet encoders for more information. Keys can be also assigned automatically when they are presented to an online access point. In this case, the Enable key update option must be activated in the corresponding Door information screens. See Configuring doors for more information.
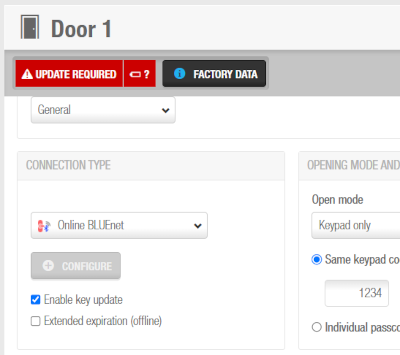 Enable key update in the 'Door' information screen to allow the automatic assignment of keys when they are presented to an online access point
The automatic key assignment functionality is license-dependent. See Registering and licensing Space for more information.
For security purposes, when you cancel keys that have been assigned automatically, you cannot use them for automatic key assignment again. Instead, you must assign these keys manually. See Assigning keys for more information.
Assigning a JustIN mSVN app key
The JustIN mSVN mobile application is used to update existing user keys using NFC. Only Android phones are compatible with this feature. The cards can only be Desfire Evolution 1 and have to be formatted with specific requirements in order to be updatable by the JustIN mSVN app.
When the JustIN Mobile app is downloaded, the user should follow their phone instructions for registration.
To format the Desfire key, do the following:
- Go to System > SAM & Issuing options. In Active keys, select Desfire and click the pencil.
Click the Read SAM card button to read the Salto SAM key (Salto Application Media). The SAM keys will be represented by dots and won't be shown for security reasons.
Ensure the emission type is AES.
Ensure Updatable by NFC is checked.
Click Save.
Once the SAM keys are in the system, you can now assign the card to the user.
Go to Cardholders > User. In the Mobile phone data panel, type the phone number in the International phone number field. Click on the down arrow and select the country the mobile phone line is from. You can also type the sign '+', the country code and then the phone number.
In Mobile app, select JustIN mSVN from the drop-down menu. JustIN mSVN must be selected before the key is assigned. If the user key was assigned before, you have to cancel the key and re-assign it after selecting JustIN mSVN. See Canceling keys for more information about how to cancel a user key.
 Type the phone number in the 'Mobile phone data' panel
- Make sure the key expiration is 7 days or less.
The system won't allow a key expiration higher than 7 days.
Assign the user key.
The system will send updates directly to the mobile phone. JustIN mSVN can then be used to update the user key. The white key on the blue background circle has to be tapped and the key presented on the back of the mobile phone.
The updates sent over the air (OTA) to the user's mobile phone have to be encrypted. To do so, a Salto Ethernet encoder is used as dongle. See the Enable dongle mode option in the Ethernet encoders section for more information.
The mobile phone has to be online in order to receive the access data information and the NFC feature has to be enabled.
 Back
Back
