Zones in Space
Overview
A zone is a specified group of access points that are grouped together to make them easier to manage in the system. For example, a zone could be the doors on the first floor, all the lockers in the gym area, or all the doors in the financial services area.
When an offline access point is added to a zone, the access point must then be updated with the information using a 'PPD'.
A combination of 64,000 doors + high zones and 96 low zones can be created in the system (regardless of whether the doors are online or offline). For example, if the system contains 50,000 doors then you could create until 14,000 zones.
Maximum key memory is typically about 230 bytes but depending on the key technology, it may be smaller. Creating a zone saves memory space on a key because it does not have to store large amounts of individual access point permission details. Instead, it just needs to store the permission information relating to one or more zone entries.
Creating zones
To create a zone, perform the following steps:
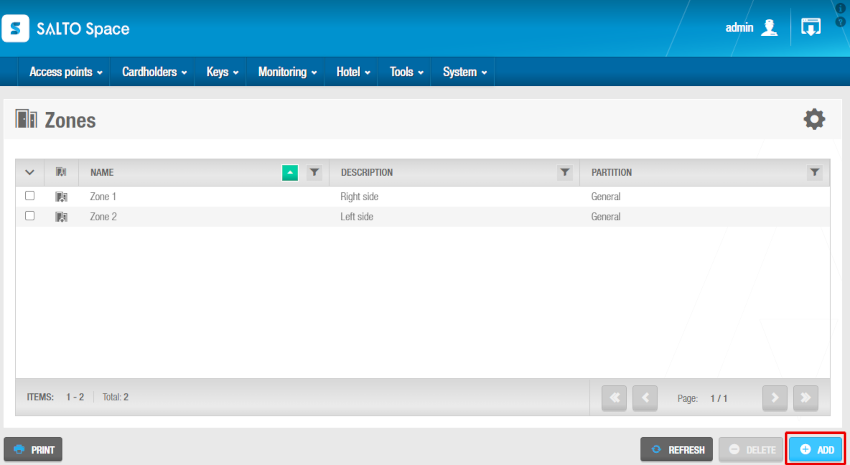
- Select Access points > Zones. The Zones screen is displayed.
 Zones screen
- Click Add. The Zone information screen is displayed.
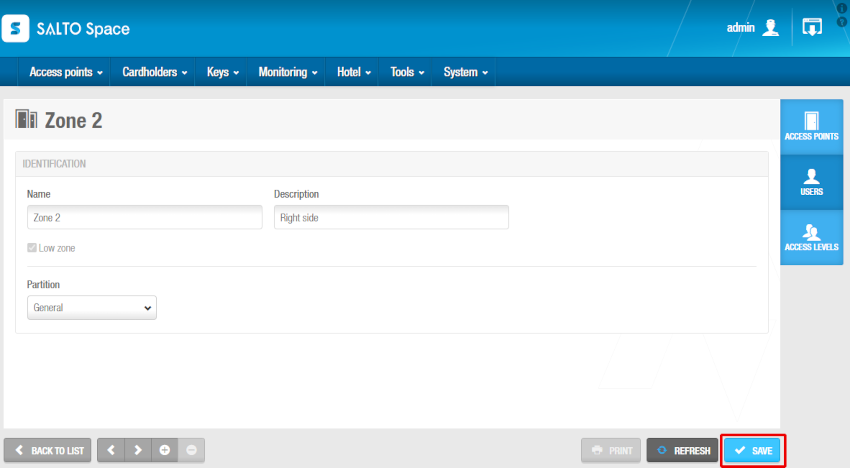
 Zone information screen
Type a name for the zone in the Name field and a description for the zone in the Description field.
Select Low zone if appropriate. See Configuring zones for more information about this option.
Select Is a GAT Net lockers zone if appropriate. When you choose this option, the Low zone is not selectable. See Configuring zones for more information about this option.
Select the relevant 'partition' from the Partition drop-down list, if required. See Partitions for more information.
Note that the partitions functionality is license-dependent. See Registering and licensing Space for more information.
Select Is free assignment zone if appropriate. The Is free assignment zone option only applies to lockers. See Configuring zones and Free assignment zones for more information about this option.
Click Save.
If required, you can activate the Ext ID field that appears on the Zone information screen by adding the SHOW_EXT_ID parameter on System > General options > Advanced. See Advanced tab for more information.
Configuring zones
The following table describes the different options for configuring zones:
| Option | Description |
|---|---|
| Low zone | Zones are classified as high or low according to the way the zone information is stored on a lock. You can create up to 96 low zones and a combination of high zones and door, a total of 65,439. A door can belong to a maximum of 116 zones, 96 of these being low zones and 20 being high zones for locks. When you have created 96 low zones, a message informs you that you must then create high zones. After you select the Low zone checkbox and save, you cannot change this value. If you need to create a high zone, you can delete the low zone and create a new high zone. High and low zones work in the same way so you generally create low zones until limits are reached. |
| Is a GAT Net lockers zone | When you select this checkbox and save, this zone can be associated only to GAT Net lockers as access points (Online GAT Net). This is not a data-on-card system but an online allowlist, so any changes on GAT Net locker zones do not result in affected user keys being marked as pending update. |
| Is free assignment zone | Select this checkbox if you are creating a locker zone where users can choose any locker from a number of available lockers. To activate this option, you must enable the FREE_ASSIGNMENT_LOCKER advanced parameter in General options. See Free assignment zones for more information. |
| Group #1/#2 | To activate additional locker zone options, you must enable the FREE_ASSIGNMENT_LOCKER and FAL_MULTIPLE advanced parameters in Space General options. When you enable the FAL_MULTIPLE parameter, the Group#1 and Group#2 options are displayed on the Zone information screen. You must select the Is free assignment zone checkbox before you can select a group option. See Free assignment zones for more information. |
Associating zones
After you have created a zone, you must associate access points, users, and/or access levels with the specified zone. The following sections describe how to associate zones with the various components.
Access points
See About Access points for more information.
To associate a zone with an access point, perform the following steps:
Select Access points > Zones. The Zones screen is displayed.
Click the zone that you want to associate with an access point. The Zone information screen is displayed.
Click Access points in the sidebar. The Access points dialog box is displayed. Note that the dialog box will be blank if you have not yet associated an access point with this particular zone.
Click Add. The Add dialog box, showing a list of access points, is displayed.
Select the required access point and click Save & Close. The zone is now associated with the access point.
To dissociate a zone from an access point:
Select Access points > Zones. The Zones screen is displayed.
Click the zone that you want to disassociate from an access point. The Zone information screen is displayed.
Click Access points in the sidebar. The Access points dialog box is displayed.
Select the access point to be deleted .
Click Delete and confirm the Warning dialog box. The zone is now dissociated from the access point.
Users
You must associate a user with a zone to allow that user to unlock the access points contained in the zone.
To associate a user with a zone, perform the following steps:
Select Access points > Zones. The Zones screen is displayed.
Click the zone that you want to associate with a user. The Zone information screen is displayed.
Click Users in the sidebar. The Users dialog box is displayed. Note that the dialog box will be blank because you have not yet associated a user with this particular zone.
Click Add. The Add dialog box, showing a list of users, is displayed.
Select the required user and click Save & Close. The selected user now has access to that zone.
To select or modify the user timetable for that zone:
Select Access points > Zones. The Zone screen is displayed.
Click the zone in which you want to modify the user timetable. The Zone information screen is displayed.
Click Users in the sidebar. The User dialog box is displayed.
Select the user to be modified and click on the Edit button. The Edit dialog box is displayed.
Make the required changes and save them.
To dissociate a zone from a user:
Select Access points > Zones. The Zone screen is displayed.
Click the zone that you want to disassociate from a user. The Zone information screen is displayed.
Click User in the sidebar. The User dialog box is displayed.
Select the user to be deleted.
Click Delete and confirm the Warning dialog box. The zone is now dissociated from the user.
Access levels
See User access levels, Visitor access levels, and Guest access levels for information about how to create and configure access levels.
To associate a zone with an access level, perform the following steps:
Select Access points > Zones. The Zones screen is displayed.
Click on the zone that you want to associate with an access level. The Zone information screen is displayed.
Click on Access levels in the sidebar. The Access levels dialog box is displayed. Note that the dialog box will be blank if you have not yet associated an access level with this particular zone.
Click Add. The Add dialog box, showing a list of access levels, is displayed.
Select the required access level and click Save & Close. The selected access level is now associated to that zone.
To select or modify the access level timetable for that zone:
Select Access points > Zones. The Zone screen is displayed.
Click the zone in which you want to modify the access level timetable. The Zone information screen is displayed.
Click Access levels in the sidebar. The Access levels dialog box is displayed.
Select the access level to be modified and click on the Edit button. The Edit dialog box is displayed.
Make the required changes and save them.
To dissociate a zone from an access level:
Select Access points > Zones. The Zones screen is displayed.
Click on the zone that you want to dissociate from an access level. The Zone information screen is displayed.
Click on Access levels in the sidebar. The Access levels dialog box is displayed.
Select the access level to be deleted.
Click Delete and confirm the Warning dialog box. The zone is now dissociated from the access level.
Free assignment zones
A free assignment zone is an area where users are free to choose any locker. They do not have pre-assigned individual lockers.
Free assignment zones are generally created and configured in the following order:
Free assignment zone parameters enabled and added. The admin operator enables the required parameters and options in General options. See below for more information about this.
New zone created and defined as a free assignment zone. The admin operator creates a zone in Space and selects the Is free assignment zone checkbox. See Creating zones for information about how to create zones.
New lockers created and defined as free assignment lockers. The admin operator creates lockers and selects the Is free assignment locker checkbox.
Lockers added to the zone. The admin operator adds the free assignment locker to the free assignment zone.
Keys can be programmed in two ways for lockers:
| Program | Description |
|---|---|
| Static keys | Used when users have permission to access a specific locker. |
| Dynamic keys | Used in free assignment zones where users can select any locker in the area. |
There are a number of General options configuration tasks associated with free assignment zones:
To designate an area as a free assignment zone, you must enable the FREE_ASSIGNMENT_LOCKER parameter. See Advanced tab for more information.
To activate additional locker zone options, you must enable the FAL_MULTIPLE advanced parameter. See Advanced tab for more information. This allows users to access lockers within two different free assignment zones using the same key.
To limit the amount of time for which free assignment lockers can be used, select the Time-limited occupancy checkbox in System > General options > Access points.
 Back
Back
