Users in Space
Overview
A user is typically a member of staff or a person who needs access to and within your installation on a regular basis. They are differentiated from other cardholders by the fact that they generally need everyday, rather than occasional, access. They also tend to have a greater level of access than other types of cardholders, such as visitors.
Creating users
To create a user, do the following:
- Select Cardholders > Users. The Users screen is displayed.
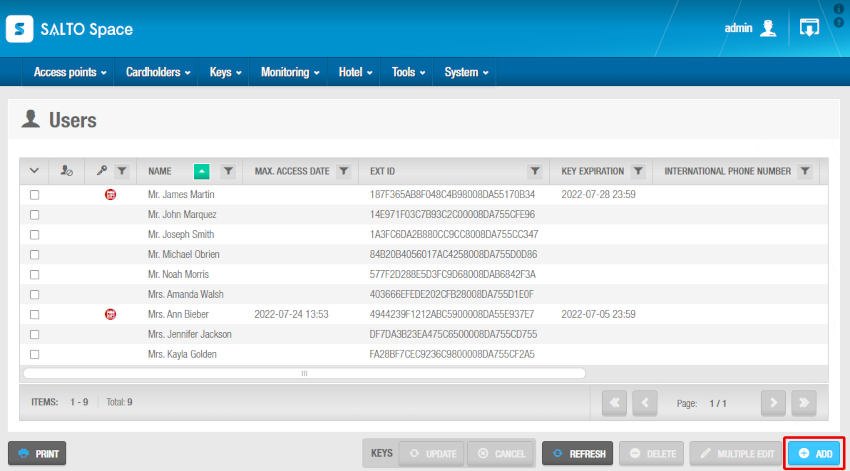 Users screen
- Click on Add. The User information screen is displayed.
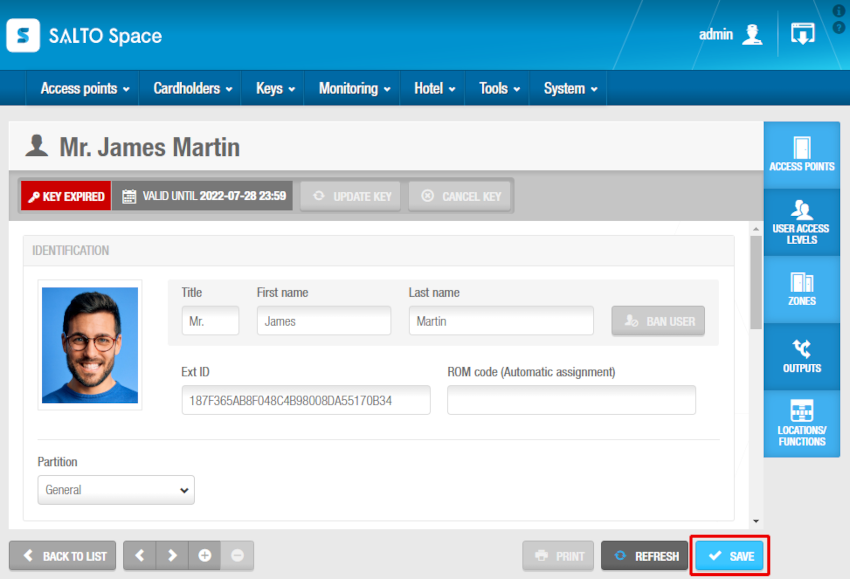 User information screen
- Type a title, first name and last name for the user in the Identification panel.
You can activate system restrictions for user names by enabling the INHIBIT_USER_NAME_CHANGE parameter in System > General options > Advanced. If you enable this parameter, you cannot edit the Title, First name, and Last name fields on the User information screen if you have assigned a key to the user at any point. An error pop-up message is displayed when you try to save any changes to these fields. This ensures that the audit trail data for users is accurate. See Advanced tab for more information.
See Configuring users for more information on the Identification panel features.
- Select the relevant partition from the Partition drop-down list, if required. See Partitions for more information.
Note that the partitions functionality is license-dependent. See Registering and licensing Space for more information.
- Select the appropriate configuration and management options in the User information screen panels:
- Identification
- Key options
- User and key expiration
- Passcode
- Face recognition
- Mobile phone data
- Dormitory door
- Limited occupancy group
- Card printing template
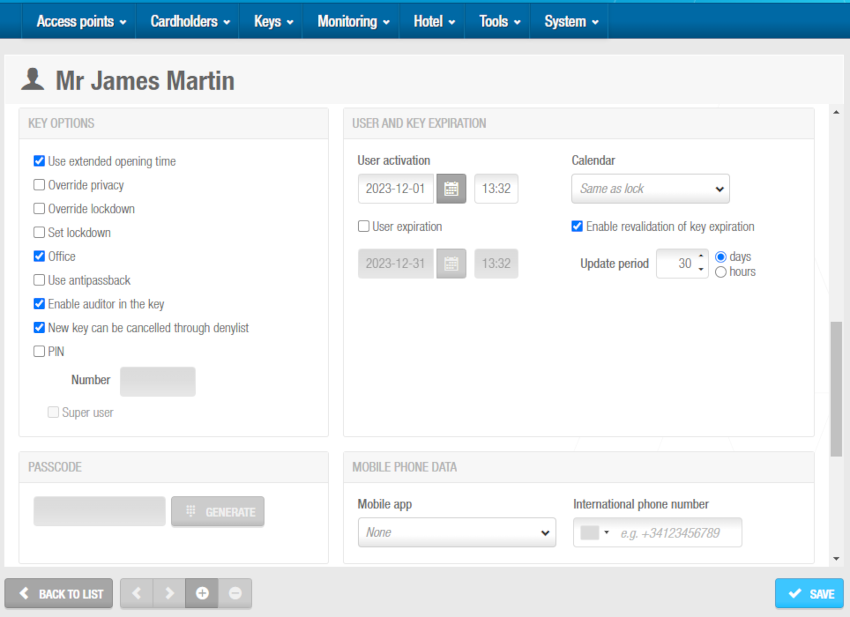 Configuration options in 'User' information screen
- Click Save.
You can edit multiple users at once by using the Multiple edit option. The Multiple edit button is enabled when you select more than one entry on the Users screen. This allows you to enter the appropriate identification and configuration details on the Multiple edit screen. The details are then applied to all the selected users. See Configuring users for more information about the configuration settings for users.
In the case of a hotel, when adding a reservation, you must create guests as users. Follow the steps in the reservations section to complete the process.
Adding additional information
If required, you can add up to five general purpose fields to the User information screens. These fields allow you to add extra data, for example, a passport number or car registration number. To activate a general purpose field, you must select an Enable field checkbox in System > General options > User. You can then name the field in accordance with the information that you want to capture.
Assigning keys
After you have created and configured a user, you can click Assign key on the User information screen to assign them a key. See Assigning keys and Automatic key assignment for more information. When you assign keys to users, different icons are displayed in the Key status column on the Users screen, depending on the key status. See Key status icons for more information. The key status is also displayed on the User information screen. The period for which keys are valid is shown on the User information screen and also in the Key expiration column on the Users screen.
The Assign key button is available on the User information screen after a user profile has been created and saved. You can also assign a key from the Users screen. When selecting a user, the Assign button displays at the bottom of the screen.
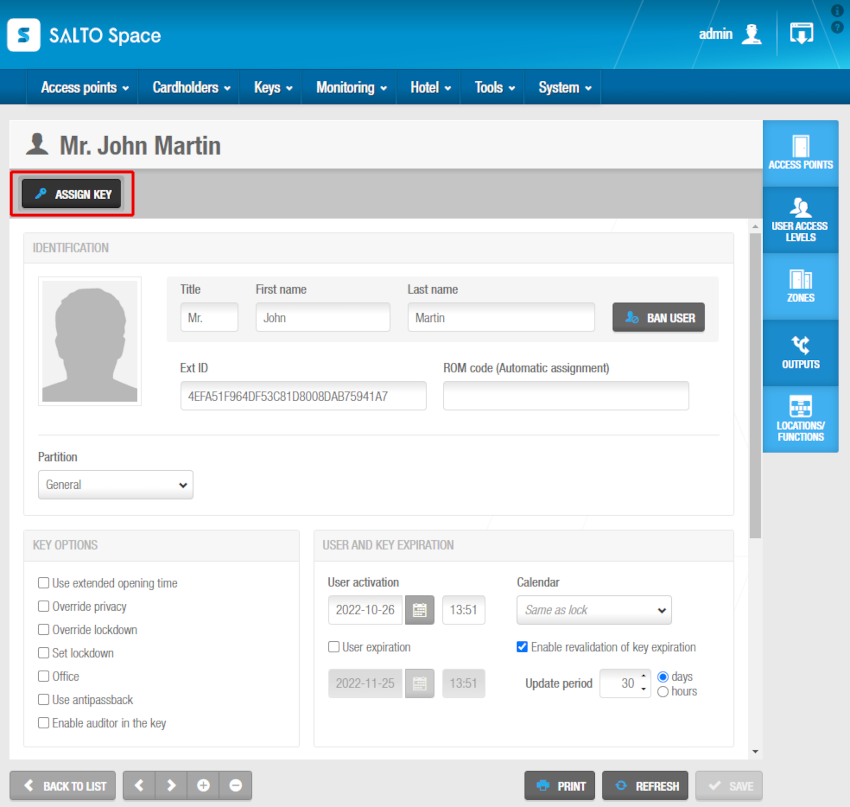 'Assign key' button
Banning users
After you have created and configured a user, you can, if necessary, ban a user from accessing any part of your Space installation by invalidating their key. For example, a user who is a member of staff can be banned while they are on vacation. Unbanning the user when they return from vacation restores their original access data to their key (after presenting the key to a wall reader or an online lock).
Banning users is different from canceling keys. A user's key can be canceled, for example, if a user loses their key. See Canceling keys for more information. The denylist is a record of canceled keys. Banned users are not added to the denylist. See Denylists for more information.
To ban a user, do the following:
Select Cardholders > Users. The Users screen is displayed.
Click on the user that you want to ban. The User information screen is displayed.
Click on the Ban user button and confirm the action in the Warning dialog box. The user is banned now.
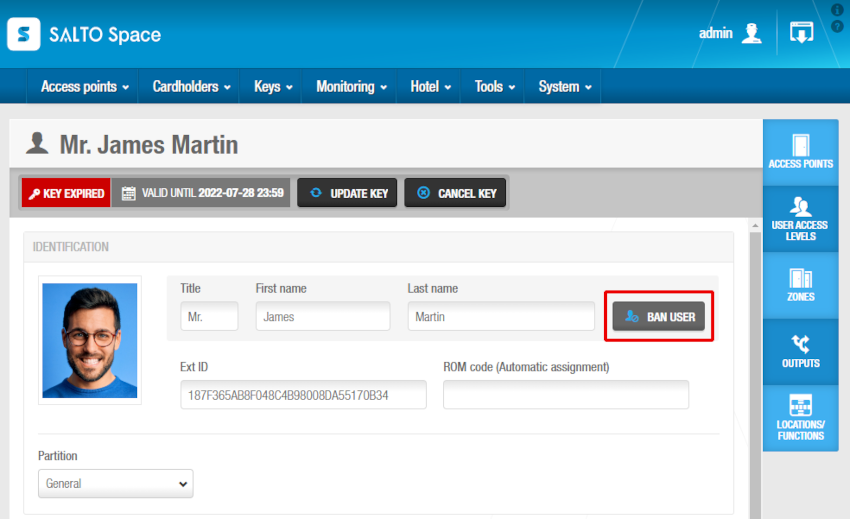 'Ban user' button
To unban a user, do the following:
Select Cardholders > Users. The Users screen is displayed.
Click on the user that you want to unban. The User information screen is displayed.
Click on the Unban user button and confirm the action in the Warning dialog box. The user is unbanned now.
Adding user images
You can add images to user profiles in Space to identify users. You can select these images from a local file on your computer or you can take them using a webcam.
If you are using a webcam, consider seeing the Space webapp section within the Space systems admin guide for information on installation requirements.
Image requirements:
Images cannot be more than 200 KB in size.
Compatible image formats: JPEG and PNG.
To add a user image, follow the steps below:
Select Cardholders > Users. The Users screen is displayed.
Click the user to which you want to add an image. The User information screen is displayed.
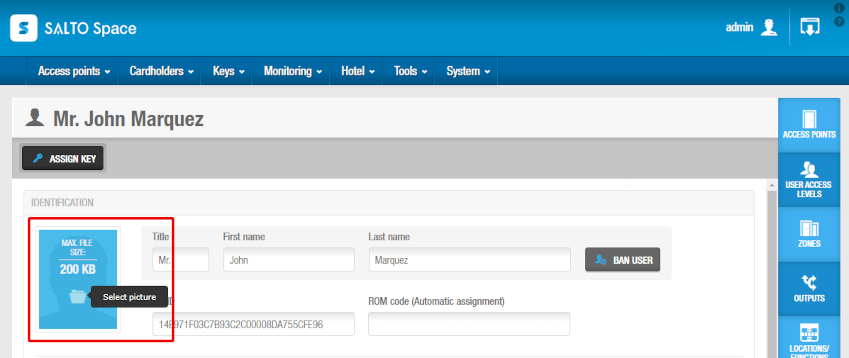 'Select picture' icon
- Hover the mouse pointer over the image in the Identification panel and click the Select picture icon. The Select source dialog box is displayed.
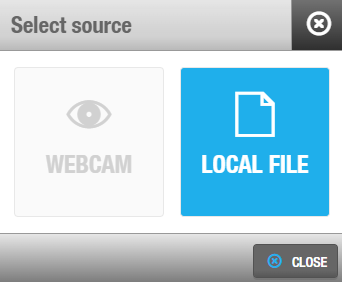 'Select source' dialog box
You can select the image from a local file by selecting the Local file option or it can be also taken from a webcam by selecting the Webcam option. Select the appropriate image and click Open. The selected image is displayed on the User information screen.
Click Save.
You can hover the mouse pointer over the image and click the Remove picture icon to remove it if required.
User pictures can also be imported through Automatic CSV file synchronization, Automatic database table synchronization and Manual synchronization.
Printing user profiles
You can print user profiles by clicking on Print on the User information screen. See Exporting data in Space for more information. Date and Signature fields are automatically included when you print user profiles. For example, you can ask users to sign and date these to confirm receipt of their keys.
Deleting users
You can delete any user by selecting the checkbox of the required user on the Users screen and clicking on Delete or by entering the User information screen and clicking on the minus (-) button at the bottom left of the screen. This deletes their profile, and they are no longer displayed on the Users screen. If the deleted user had an assigned key, his key will be canceled through the same process.
A banned user cannot be deleted. You have to unban them first.
Reports on calculation on working hours
This report selection allows to have a working hour report according to the selected users.
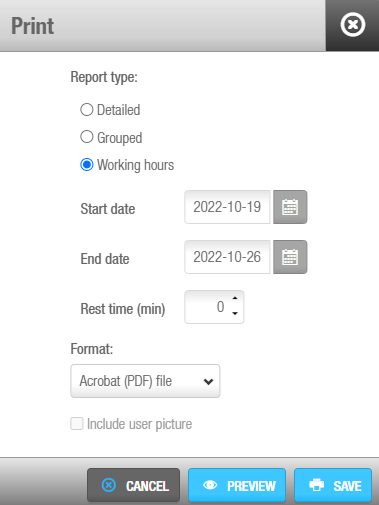 'Print' dialog box - Working hours report
You can get a report of a working hour period according to the first and last event of the user in any door per day.
Configuring users
Identification
The Identification panel defines the user's details. Most of the fields in this panel are described in Creating users.
Generally, the system does not allow you to create two cardholders with the same name. You can make user names unique by changing the default format for user IDs in General options. See Configuring user IDs for more information.
Other fields within the Identification panel, which display may vary depending on your needs and your Space license, are the following:
Ext ID: You can show/hide this field by adding the SHOW_EXT_ID parameter in System > General options > Advanced. See Advanced tab for more information. The Ext ID field displays a unique identifier for the user, automatically generated by the system. You can amend this identifier if required.
ROM code: You can show/hide this field by selecting the checkbox Hide ROM code for automatic key assignment in System > General options > Users. The ROM field is generally filled in by synchronization but it can also be filled in manually. This code is used for automatic key assignment.
Note that the automatic key assignment functionality is license-dependent. See Registering and licensing Space for more information.
If you do not have access to this in your licensing options, the ROM field is not displayed. When you read keys or export audit trail data, you must enable the SHOW_ROM_CODE parameter in System > General options > Advanced to control the display of ROM codes. See Advanced tab for more information.
Wiegand code: You can show/hide this field by selecting the checkbox Wiegand code in System > General options > Users > Tracks of user key. See Wiegand format and Tracks of user key for more information. Only Wiegand interface is supported and requires a third-party ROM-code reader. The user access is based on an allowlist of ROM codes at the Salto DB. CU42X0 are required. See Advanced tab for more information.
Authorization code: When a third-party reader is used - instead of the Salto wall reader, an authorization code is required. It must be entered in the user information screen, and you can show/hide this field by selecting the checkbox Show authorization code in System > General options > General.
General purpose fields: You can also add and name up to five general purpose fields. See Adding additional information for more information.
Key options
The Key options panel defines the user access details.
| Option | Description |
|---|---|
| Use extended opening time | Allows extended door opening times if a user has a disability and requires a longer access time when entering a door. |
| Override privacy | Allows the user access to a door that has been locked from the inside. |
| Override lockdown | Allows the user to open a door closed by lockdown. Note that this option applies to both online doors and offline doors that have AMOK locks. See Lockdown areas for more information. |
| Set lockdown | Allows the user to enable or disable the lockdown mode on a door. This is done by presenting a valid key to the door's inside reader. This option only applies to offline doors that have AMOK locks. See Lockdown areas for more information. |
| Office | Allows the user to set doors to Office mode. See Opening modes and Timed periods for more information. |
| Use antipassback | Ensures that a user cannot enter through the same door multiple times until they have first exited the door (or until a specified time period has passed). This is to prevent the same key being used by a number of different users. See Enabling antipassback and Access points tab for more information. The antipassback functionality is license-dependent. See Registering and licensing Space for more information. |
| Audit openings in the key | Allows an audit trail of the user's access point activity to be written to their key. If this option is disabled, the locks will not write any audit information to the key. You must also enable this feature on the required access points by selecting the Audit on keys option. See Door options for more information. |
| New key can be cancelled through denylist | Ensures that the user's key is sent to the denylist if it is canceled. To activate this option, you must enable the MORE_THAN_64K_USERS parameter in System > General options > Advanced. This checkbox is selected by default for users. If you clear the checkbox, the user's key is not sent to the denylist when canceled. See Advanced tab for more information. |
| PIN | The PIN option defines the user's PIN code options. In addition to a key, a PIN code may sometimes be required for users to gain access to certain parts of the installation. PIN code disabled: Disables the PIN code. This denies a user entry to access points that require a PIN code. Super user: Allows a user access using only their key when the door is in Key + PIN mode. See Opening modes and Timed periods for more information. PIN code enabled: Enables user access using a card and a PIN code. PIN: Defines the PIN code. This option is only available if you select the PIN code enabled option. Confirmation: Confirms the PIN code. This option is only available if you select the PIN code enabled option. |
User and key expiration
The User and key expiration panel defines the key activation period.
| Option | Description |
|---|---|
| User activation | Defines the date and time upon which the user's key becomes functional and they will be granted access permissions. By default, the activation date is the day on which the user's key is encoded. |
| User expiration | Defines the long-term expiration date of the user's data and access permissions. Keys assigned to a user will never exceed this date. Note that you can choose not to assign an expiration date to a user. This means that they can revalidate their card when required. |
| Calendar | Defines which calendar is applied to the user. See Calendars for more information. |
| Enable revalidation of key expiration | Enables the user's key to be revalidated at any time even when the key has not expired. For example, if the user's update period is seven days, the key is revalidated for another seven days every time the user presents their key to an SVN wall reader even if has been revalidated the day before. |
| Update period | Defines the time period between user validations. If this is set to zero days (and not to zero hours because, in that case, the key will no longer be valid), the user's key expires at 00:00 on the same day that it is updated. However, the key can still be updated each day. If 30 days is selected, the user's key will be valid for 30 days and will need to be revalidated once that time period has expired. You can change the default update period by amending the value in the Default expiration period field in System > General options > Users in Space. See Users tab for more information. |
Passcode
Passcodes, available in Space since version 6.7, allow users to access doors equipped with compatible keypads using a unique 6-digit code assigned directly to them, without needing a physical or digital key. This feature is intended for locks like the Salto DBolt Touch. Passcodes differ from PINs, as PINs are used in conjunction with user keycards for additional authentication, whereas passcodes can be used for access on their own. See Key options for more information on PINs.
Passcodes in Space are six-digit codes randomly generated by the software - you cannot enter a custom code. "Guessable" values (for example, 123456, 999999) are prevented by the system.
To assign a new passcode:
- Press the Generate button beside the Passcode field in the user's profile. A six-digit code will be displayed.
- You can show or hide the passcode by clicking the Show/Hide passcode (eye) icon.
- Use the Copy to clipboard option to share the code with the user via a secure channel (for example, email, WhatsApp).
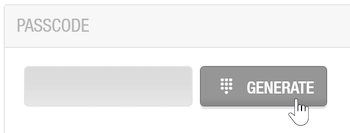 Passcode option
If a user's passcode is compromised, clear the current passcode by clicking the Clear button. This button then becomes the Generate button, allowing you to generate a new passcode. The previously assigned passcode becomes invalid for that user.
Passcodes are transmitted to online locks via BLUEnet. For offline locks, a PPD with firmware version 02.23 or higher is required to update the lock with passcode information.
Important considerations for passcodes:
Configuration and system requirements:
- For passcodes to function, the door must be assigned directly to the user. Passcodes will not work if access is granted only through either a zone or an access level. See Access points for more information on assigning doors directly.
- For offline locks, ensure your PPD firmware is version 02.23 or higher to transmit passcode data. Any changes to passcodes or access assignments for offline locks require an update via PPD.
Lock memory and auditing:
- A lock's memory can store a maximum of 200 passcodes at any given time. In the event that this limit is exceeded in the database for a given lock, only the first 200 passcodes (sorted by user name) will be loaded onto the lock's memory. The rest will not be loaded, and no error will be shown. This limitation applies to both offline and online doors.
- Passcodes are associated directly with a single user, enabling accurate auditing of access events, even for offline locks, as the passcode data is stored in the access point's memory.
Device compatibility:
- Passcodes are only functional on compatible Salto hardware. For example, the DBolt Touch or the XS4 One S Keypad model.
- If you're unsure whether your device supports passcodes, check with your usual Salto contact.
- Always check for minimum firmware requirements for these devices to ensure compatibility.
Operational notes:
- To use a passcode, the keypad on the lock typically needs to be activated (for example, by pressing a designated area, often a white square, to illuminate the numbers).
- There's a default keypad lockout policy: after 3 incorrect passcode attempts, the keypad is typically disabled for 90 seconds. This policy can be adjusted in System > General options > Access points (changes require updating the locks). See Keypad configuration for more information on configuring keypad settings.
Face recognition
The facial recognition functionality is intended to be used with the Salto XS4 Face system for face authentication. A user stands in front of the device composed of the XS4 Face CU (control unit) and the XS4 Face C (camera) and shows their face to gain access. For more information on how to install Salto XS4 Face, see the specific XS4 Face user guide.
Note that the face recognition functionality is license-dependent. See Registering and licensing Space for more information.
You can enable this feature from the Face recognition tab within General options.
To enroll a user in the facial recognition feature, follow the steps below:
- Click the Enroll button located in the Face recognition panel in the User information screen.
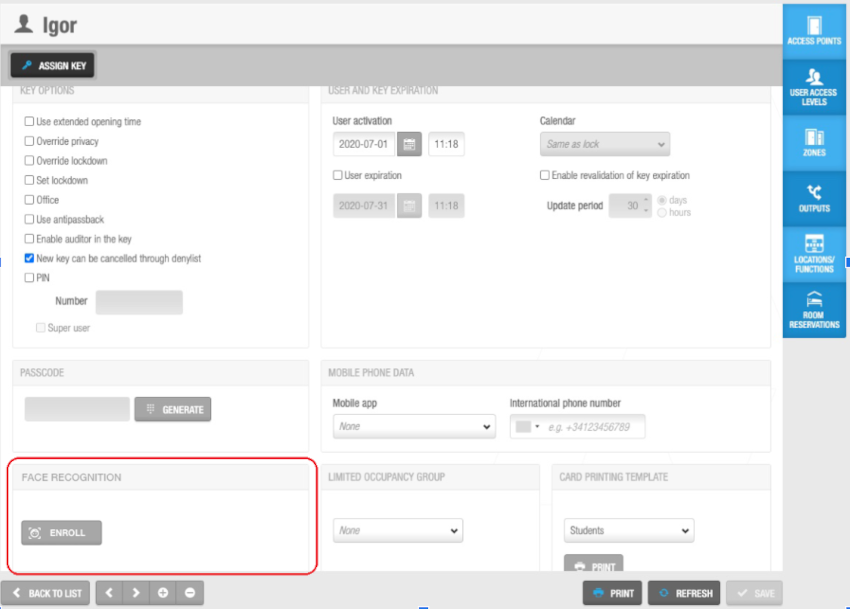 'Face recognition' panel in the 'User' information screen
- A dialog box requesting the operator to input an email address displays. An enrollment request will be sent to that email address.
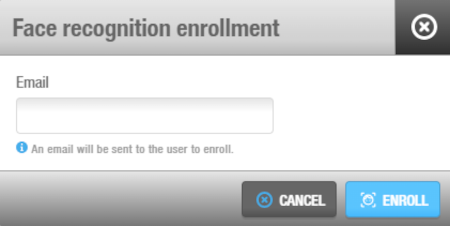 'Face recognition enrollment' dialog box
The user should follow the instructions described in the enrollment request.
Once the user is enrolled, the email address will appear on the Face recognition panel and the Enroll button toggles to Disenroll. To disable the face recognition feature, click on this button.
Enrollment statuses
The status of the enrollment process displays under the email and the Disenroll button. The possible statuses are as follows:
| Status message | Description |
|---|---|
| Disenrollment failed | There was a problem disenrolling this user. Please try again later. |
| Disenrolled | This user has been disenrolled successfully. Their biometrics have been removed from the system and they will need to re-enrol to use it again. |
| Email notification error | There was a problem with the email entered. Please try again or use a different email. |
| Pending activation | The enrollment has been assigned to the user at the database level but that user hasn't yet been enrolled in the face recognition system. |
| Pending user receiving notification | The user has not yet received the email notification that's been sent to allow them to enroll. |
| Pending user's consent | The user has not yet given their consent in the XS4 Face application. Or perhaps they haven't uploaded a photo yet. |
| Unknown status | The enrollment status is unknown. |
| User consent withdrawn | The user has either not given their consent, or they have withdrawn their consent for face recognition using the XS4 Face application. |
| User enrolled | The user has been enrolled successfully and is ready to use the system. |
| User photo doesn't match criteria | The picture provided for the enrollment is not valid. The user has provided a photo that doesn't meet the requirements for face recognition. |
Mobile phone data
The Mobile Phone Data panel defines what mobile application the user will use and their mobile phone number.
| Option | Description |
|---|---|
| Mobile app: JustIN Mobile | Defines the mobile application the user will use. JustIN Mobile allows the use of a mobile phone as a key. The communication between the reader and the phone is Bluetooth or/and NFC, depending on the device. |
| Mobile app: JustIN mSVN | Defines the mobile application the user will use. JustIN mSVN allows the user to use the mobile phone as a mobile key updater. Note that this option is only compatible with DESFire EV1 keys and Android phones. |
The user's mobile phone number has to be entered in the International phone number field. You can select the area code in the drop-down list or type it manually according to the country the mobile phone line is from.
Limited occupancy group
You can add a user to a limited occupancy group by selecting the required group in the Limited occupancy group panel. Limited occupancy groups are used to manage restricted car parks, for example. See Creating limited occupancy groups for more information.
Dormitory door
The Dormitory door panel is displayed on the User information screen when the DORM_KEYPAD advanced parameter is enabled. This option is used when locks are provided with keypads. You can use it in a student dormitory or residence, for example.
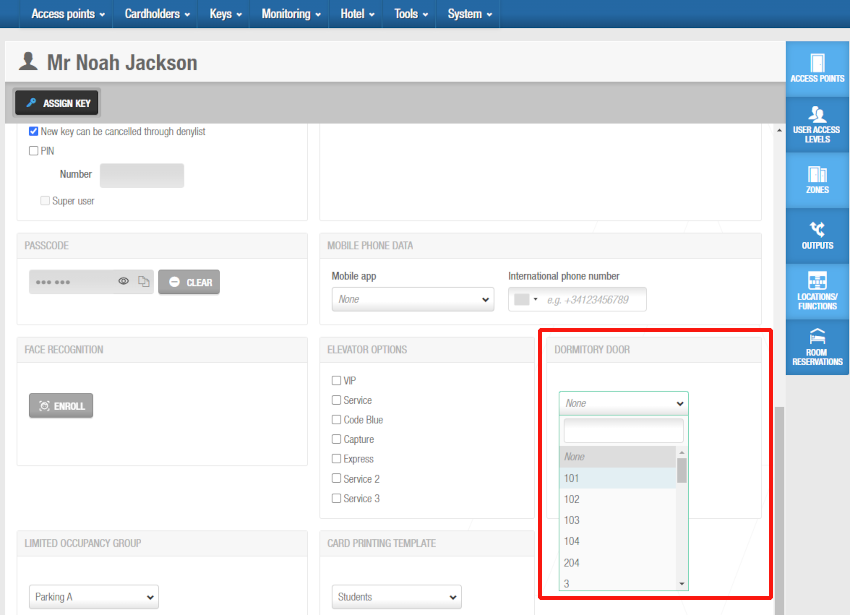 Select the door on which you want to activate the 'Dorm keypad' option
Select the corresponding door on which you want to activate this option for the current user. When selected, the user keys automatically update lock keypads with changes to the keypad code when the key is presented to the lock.
Card printing template
You can create card templates for different users in your organization. For example, you could create one template for day staff and a different template for night staff. When you create card printing templates, they are added to the Card printing template drop-down list. The template that you select in the Card printing template panel is used when you print the user's keycard. To print the card, select the appropriate template from the drop-down list and click the Print button.
Card printing templates must be created in Space under Tools > Card printing. See Card printing and Using card printing templates for more information.
This functionality is license-dependent. See Registering and licensing Space for more information.
Associating users
After you have created a user, you must associate access points, user access levels, zones, outputs, and locations/functions with the specified user. The following sections describe how to associate users with the various components.
Access points
See Access Points for definitions and information about how to create and configure access points.
You would generally only associate individual users with access points if they do not belong to a user access level. User access levels allow you to group users with the same access permissions for easier access management. See User access levels for more information. However, there may be cases where you need to give individual users access to doors or zones that are not associated with their user access level.
To associate a user with an access point, do the following:
Select Cardholders > Users. The Users screen is displayed.
Click on the user name that you want to associate with an access point. The User information screen is displayed.
Click on Access points in the sidebar. The Access points dialog box is displayed. Note that the dialog box will be blank if you have not yet associated a user with this particular access point.
Click on Add. The Add dialog box, showing a list of access points, is displayed.
Select the required access point in the left-hand panel, and the timetable and the days period in the right-hand panel. Same as key is selected by default. It means the user will have access to the access point while the key is valid. Select Use the following days period if you want the user to have access to that specific access point only during a period of time. Select a Start date and an End date.
Click on Save & Close. The user is now associated with the access point.
To modify an access points's timetable or days period, from the Access points dialog box of the specific user, do the following:
Select the access point to be edited and then click on Edit.
Modify the Timetable and Days period selection and save the changes.
To dissociate an access point from a user, from the Access points dialog box of the specific user, do the following:
Select the access point to be deleted.
Click on Delete and confirm the action in the Warning dialog box.
See Cardholder timetables for more information.
User access levels
See User access levels for a definition and information about how to create and configure a user access level.
To associate a user with a user access level, do the following:
Select Cardholders > Users. The Users screen is displayed.
Click on the user name that you want to associate with a user access level. The User information screen is displayed.
Click on User access levels in the sidebar. The User access levels dialog box is displayed. Note that the dialog box will be blank if you have not yet associated a user access level with this particular user.
Click on Add. The Add dialog box, showing a list of user access levels, is displayed.
Select the required user access level in the left-hand panel and the days period in the right-hand panel. Same as key is selected by default. It means the user will have access to the access level while the key is valid. Select Use the following days period if you want the user to have access to that specific access level only during a period of time. Select a Start date and an End date.
Click on Save & Close. The user access level is now associated with the user.
To modify an access level's days period, from the User access levels dialog box of the specific user, do the following:
Select the access level to be edited and then click on Edit.
Modify the Days period selection and save the changes.
To dissociate an access level from a user, from the User access levels dialog box of the specific user, do the following:
Select the access level to be deleted.
Click on Delete and confirm the action in the Warning dialog box.
If the access date to the access level is later than the key expiration, the user will be denied access. In this case, the key validity takes precedence over the Access level access.
Zones
See Zones for a definition and information about how to create and configure a zone.
To associate a user with a zone, do the following:
Select Cardholders > Users. The Users screen is displayed.
Click on the user name that you want to associate with a zone. The User information screen is displayed.
Click Zones in the sidebar. The Zones dialog box is displayed. Note that the dialog box will be blank if you have not yet associated a zone with this particular user.
Click Add. The Add dialog box, showing a list of zones, is displayed.
Select the required zone in the left-hand panel, and the timetable and the days period in the right-hand panel. Same as key is selected by default. It means the user will have access to the zone while the key is valid. Select Use the following days period if you want the user to have access to that specific zone only during a period of time. Select a Start date and an End date.
Click on Save & Close. The zone is now associated with the user.
To modify a zone's timetable or days period, from the User access levels dialog box of the specific user, do the following:
Select the zone to be edited and then click on Edit.
Modify the Timetable and Days period selection and save the changes.
To dissociate a zone from a user, from the Zone dialog box of the specific user, do the following:
Select the zone to be deleted.
Click on Delete and confirm the action in the Warning dialog box.
If the access date to the zone is later than the key expiration, the user will be denied access. In this case, the key validity takes precedence over the Zone access.
Outputs
See Outputs for a definition and information about how to create and configure an output.
To associate a user with an output, follow the steps below:
Select Cardholders > Users. The Users screen is displayed.
Click on the user name that you want to associate with an output. The User information screen is displayed.
Click on Outputs in the sidebar. The Outputs dialog box is displayed. Note that the dialog box will be blank if you have not yet associated an output with this particular user.
Click Add. The Add dialog box, showing a list of outputs, is displayed.
Select the required output.
Click on Save & Close. The output is now associated with the user.
Locations/Functions
The locations and functions functionality is license-dependent. See Registering and licensing Space for more information.
To associate a user with a location/function, follow the steps below:
Select Cardholders > Users. The Users screen is displayed.
Click the user that you want to associate with a location/function. The User information screen is displayed.
Click Locations/Functions in the sidebar. The Locations/Functions dialog box is displayed.
Note that the dialog box will be blank if you have not yet created a location or a function. See Locations and Functions for information about how to create and associate a location and a function.
See Locations/Functions tab for information about adding groupings for locations and functions.
Click on Edit. The Edit dialog box is displayed.
Select the required locations and functions in the corresponding panels of the dialog box.
Click Save. The user is now associated with the selected locations and functions.
For systems with a lot of functions and/or locations it's possible to filter by Location or Function name and also by status Selected or Unselected.
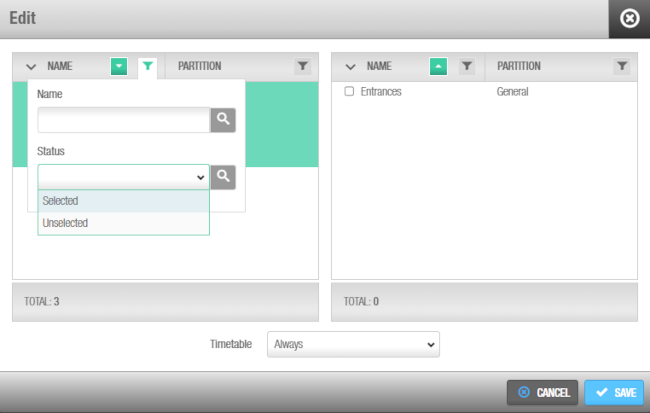 You can filter by location or function name in the 'Edit' dialog box
 Back
Back
