Creating scheduled jobs in Space
Overview
Creating scheduled jobs refers to creating custom jobs. This functionality differs from default scheduled jobs in that default scheduled jobs are preset system jobs. You can create the following types of scheduled job on the system:
- Automatic CSV file synchronization
- Automatic database table synchronization
- Automatic audit trail exports
- Automatic entity exports
- Automatic users inactivity exportation
When you create a job, it is displayed on the Scheduled jobs screen. The following sections describe how to create these jobs.
Both the synchronization and the export functionalities are license-dependent. See Registering and licensing Space for more information.
Automatic CSV file synchronization
CSV file synchronization allows you to synchronize user data from external system files with Space. For example, in a university installation, you can synchronize with the data in a student record system. You use data from a CSV or a text file to create entries and populate specified fields in Space. This means you can automatically transfer data from other systems (rather than entering the same data manually in Space).
The SALTO_Data_Sync document contains more information about CSV file synchronization. If you don't already have this document, contact your Salto partner or tech support team to receive a copy of it.
The automatic CVS file synchronization process consists of four steps:
- Step one: Job configuration
- Step two: Mapping configuration
- Step three:Schedule
- Step four: Confirmation
Step one: Job configuration
To complete step one:
Select Tools > Scheduled jobs. The Scheduled jobs screen is displayed.
Click Add. The Add scheduled job dialog box is displayed.
Select CSV file synchronization from the drop-down list.
Click OK. The Job configuration screen is displayed.
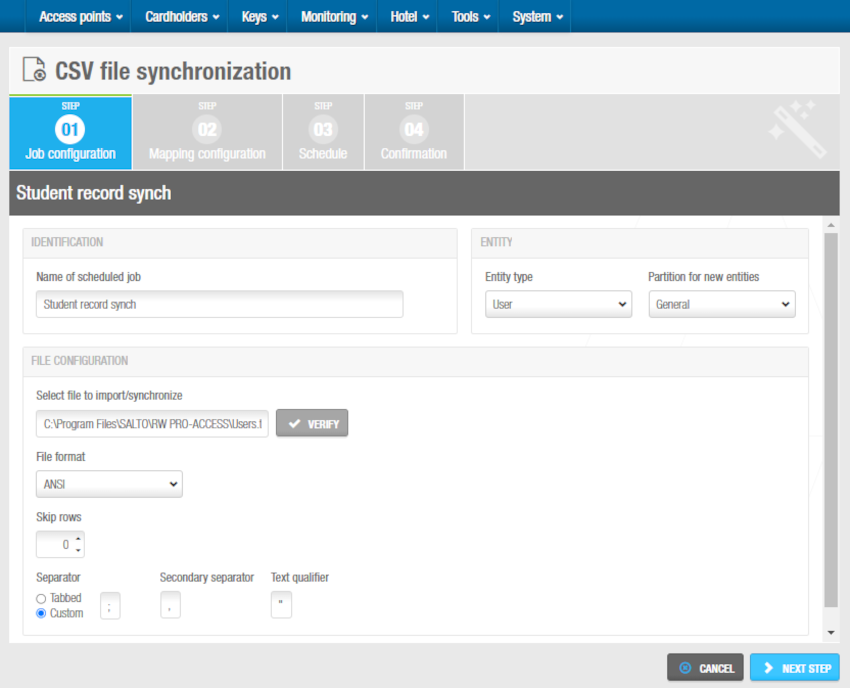 CSV job configuration
Type a name for the job in the Name of scheduled job field.
Type the name of the file that you want to import in the Select file to import/synchronize field. You can click Verify to verify the file directory exists and is correct.
Select the appropriate format from the File format drop-down list.
Select the required number of rows by using the up and down arrows in the Skip rows field. This specifies the row in the file where you want to begin importing data. For example, table headers in the import file can be skipped.
Select either the Tabbed or Custom option. With these options, users can define how the data fields in the import file are separated. The Secondary separator and Text qualifier fields are automatically populated but you can change the characters in these fields if required. The secondary separator is used to separate list items, such as each access level ID in the file. The text qualifier is used for text fields that contain spaces.
Select the Entity type to import. Depending on your license, you can select the following entities: User, Door, Zone, User access level, Operator, Locker and Visitor.
The content of the fields may vary depending on if you are importing users, doors, user access levels or zones. For example, if you are synchronizing or importing doors, the fields will be those found in the door list.
Select a partition from the Partition drop-down list if required.
Click Next step. The Mapping configuration screen is displayed.
Step two: Mapping configuration
To complete this step:
Click Add on the Mapping configuration screen. The number 1 is displayed in the Source fields column.
Click the arrow on the right-hand side of the entry to view the Destination fields drop-down list. The [Do not import] option is selected by default. The destination fields are the targeted Space options.
The SALTO_Data_Sync document contains more information about these fields. If you don't already have this document, contact your Salto partner or tech support team to receive a copy of it.
- Select the destination field to which you want to map the data from the source field. The selected option is displayed in the Destination fields column.
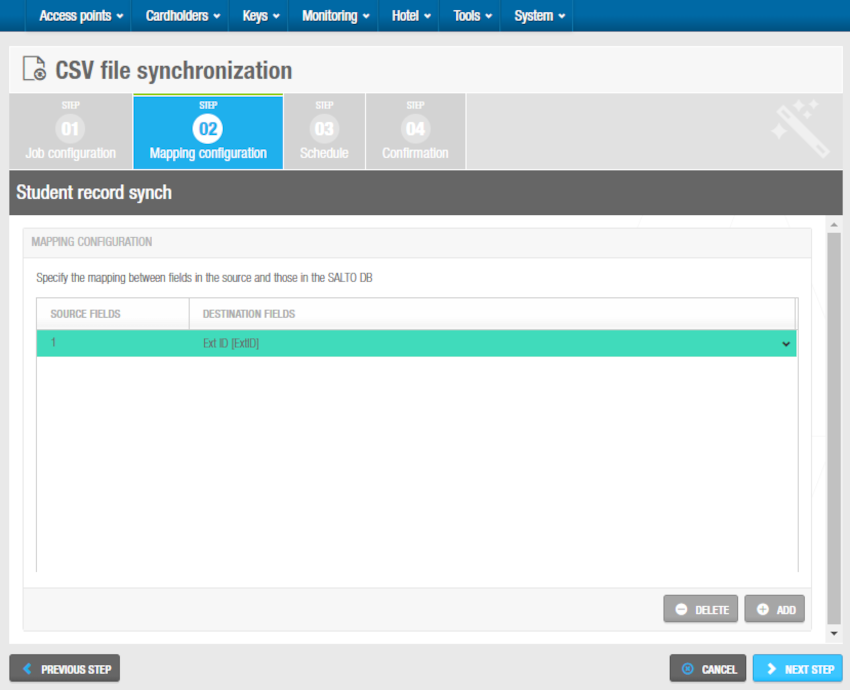 CSV mapping configuration
- Repeat steps 1, 2, and 3 until you have specified the mapping between all the appropriate source and destination fields and the order of all the fields contained in the file. If the file contains data that you don't want to import to Space, you have to configure a relation for them anyway, selecting Don't import as their destination.
You must select the Ext ID option as one of the destination fields to proceed to the next step. The extension ID is a unique ID that is used to identify any entity, such as users, in the system. Selecting this option ensures that the file data is associated with the appropriate entities, such as users.
- Click Next step. The Schedule screen is displayed.
Step three: Schedule
You can schedule CSV file synchronization to occur as frequently as required, for example, every 24 hours or 15 minutes. All the schedule steps for the jobs described in this section are done in the same way. See Step two: Schedule for more information and a description of the procedure you should follow.
Step four: Confirmation
All the confirmation steps for the jobs described in this section are done in the same way. See Step three: Confirmation for more information and a description of the procedure you should follow.
Automatic database table synchronization
Database table synchronization allows you to synchronize user data from external databases with the Salto Space database. For example, in a university installation, you can synchronize with the data in a human resources database. You can access data stored in an external database and use it to create entries and populate specified fields in Space. This means you can automatically transfer data from other databases (rather than entering the same data manually in Space).
The Salto_User_Sync_Staging_Table document contains more information about database table synchronization. If you don't already have this document, contact your Salto partner or tech support team to receive a copy of it.
The automatic database table synchronization process consists of the following steps:
- Step one: Job configuration
- Step two: Mapping configuration
- Step three: Schedule
- Step four: Confirmation
Step one: Job configuration
To complete Step one:
Select System > Scheduled jobs. The Scheduled jobs screen is displayed.
Click Add. The Add scheduled job dialog box is displayed.
Select DB table synchronization from the drop-down list.
Click OK. The Job configuration screen is displayed.
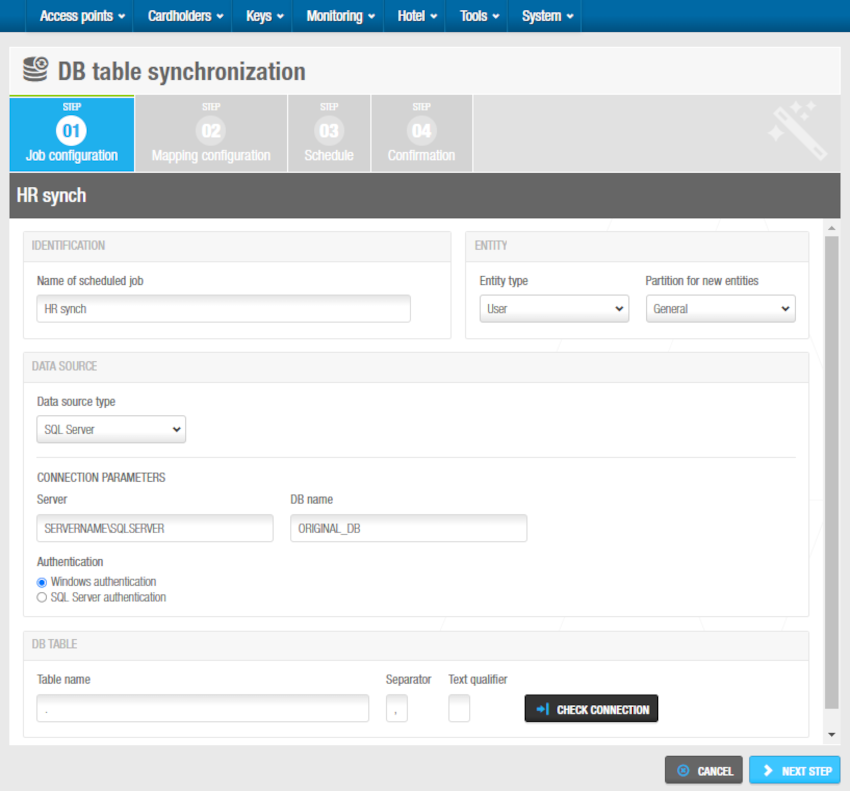 DB table job configuration
Type a name for the job in the Name of scheduled job field.
Select the appropriate data source type from the Data source type drop-down list. The available options SQL server, Oracle and ODBC data sources.
Enter the required information in the fields in the Connection parameters panel. The information you must enter in the Connection parameters panel varies depending on which option you select from the Data source type drop-down list. Type the name of the database table in the Table name field. The Separator field is automatically populated but you can change the character in this field if required.
Select the Entity type to import. Depending on your license, you can select the following entities: User, Door, Zone, User access level, Operator, Locker and Visitor.
The content of the fields may vary depending on if you are importing users, doors, user access level or zones. For example, if you are synchronizing or importing doors, the fields will be those found in the door list.
Select a partition from the Partition drop-down list if required. See Partitions for more information about partitions. The data is only imported to the partition you select.
Click Next step. The Mapping configuration screen is displayed.
Step two: Mapping configuration
To complete this step:
Click Add on the Mapping configuration screen. The number 1 is displayed in the Source fields column.
Click the arrow on the right-hand side of the entry to view the Destination fields drop-down list. The [Do not import] option is selected by default. The destination fields are the available Salto Space database fields to which you can import data. Once imported into the Salto Space database, the information is then displayed in the appropriate field in Space.
The Salto_User_Sync_Staging_Table document contains more information about these fields. If you don't already have this document, contact your Salto partner or tech support team to receive a copy of it.
- Select the destination field to which you want to map the data from the source field. The selected option is displayed in the Destination fields column.
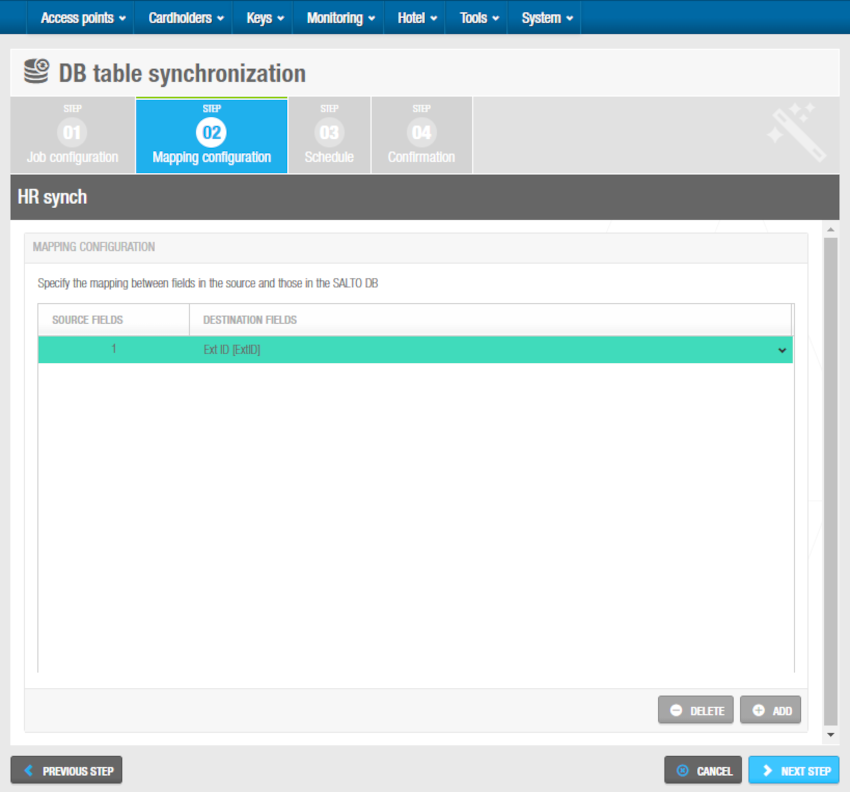 DB table mapping configuration
- Repeat steps 1, 2, and 3 until you have specified the mapping between all the appropriate source and destination fields and the order of the fields. You must select the following options as destination fields to proceed to the next step:
- Ext ID
- Control field (to be processed by Salto)
- Control field (processed date/time)
- Control field (error code)
- Control field (error message)
The system uses these fields to write a report after database table synchronization occurs. If all of these options are not selected, the synchronization job cannot be performed.
- Click Next step. The Schedule screen is displayed.
Step three: Schedule
All the schedule steps for the jobs described in this section are done in the same way. See Step two: Schedule for more information and a description of the procedure you should follow.
Step four: Confirmation
All the confirmation steps for the jobs described in this section are done in the same way. See Step three: Confirmation for more information and a description of the procedure you should follow.
Automatic audit trail exports
You can export audit trail data from the Salto Space database as a CSV file. This allows you to use the data in another system, for example, a time recording system.
When you export audit trail data, you can still access the data in Space as it is not removed. However, when you purge the audit trail, the data is permanently removed from the audit trail and the database.
The SaltoAutomaticExportOfAuditTrail document contains more information about exporting audit trail data. If you don't already have this document, contact your Salto partner or tech support team to receive a copy of it.
The automatic audit trail export process consists of five steps:
- Step one: Job configuration
- Step two: Field configuration
- Step three: Mapping configuration
- Step four: Schedule
- Step five: Confirmation
Step one: Job configuration
To complete step one:
Select Tools > Scheduled jobs. The Scheduled jobs screen is displayed.
Click Add. The Add scheduled job dialog box is displayed.
Select Audit trail export from the drop-down list.
Click OK. The Job configuration screen is displayed.
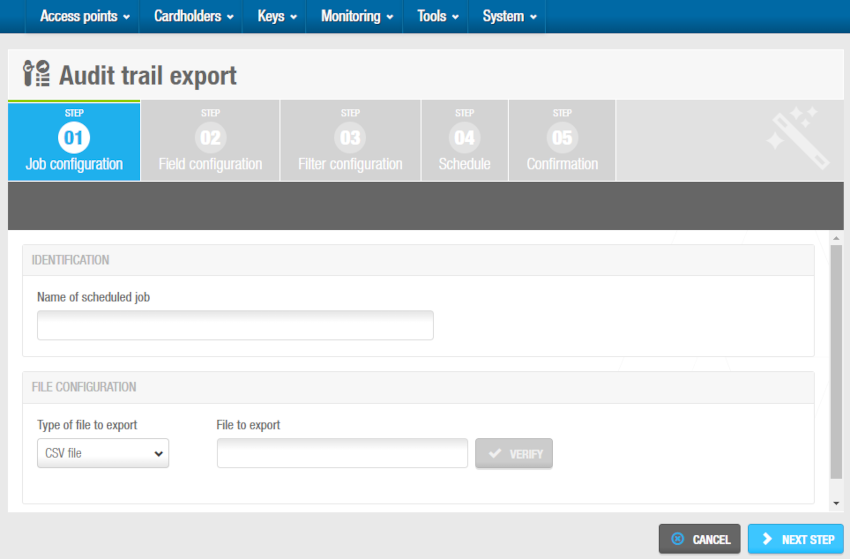 'Job configuration' screen - Audit trail export
Type a name for the job in the Name of scheduled job field. The default option in the Type of file to export field is CSV file. This is the only file format currently supported.
Type a name for the file that you want to export in the File to export field, such as
C:\SALTO\audit-trail, and follow the steps below:
- Press F2 to display the File path dialog box and insert macros in the file name if required.
Using macros, for example,
($YEAR)_($MONTH)_($DAY), allows you to save the file with a unique name so it is not overwritten by the next file that is created. - Double-click the appropriate macro to insert it in the file name. Each macro you insert is displayed in the file name in the File to export field.
- Click OK when you have finished inserting macros and the appropriate file name is displayed in the File to export field.
- You can click Verify on the Job configuration screen to verify the file directory exists and is correct.
The audit trail export file can be also sent out to a given email by activating the Send file by email option, which will show up three additional fields to fill in:
- To: The email address the file will be sent to must be defined here.
- Subject: This field can be filled in with a subject that will be included on the email title.
- Content: This field can be filled in with a suitable text that will be included on the email body.
The File to export field must be always filled in, and an email server must be configured on the Notifications tab, within the System > General options menu.
- Click Next step. The Field configuration screen is displayed.
Step two: Field configuration
To complete step two:
Select a format from the File format drop-down list on the Field configuration screen. This specifies the format of the file containing the exported audit trail data.
Select either the Tabbed or Custom option. This specifies how the audit trail data is stored in the file. The Separator and Text qualifier fields are automatically populated but you can change the characters in these fields if required.
Select the Include column names on first row checkbox if required. If you select this, the column names are included in the first row of the file.
Click Add in the Field configuration panel. The Select fields dialog box, showing a list of fields, is displayed.
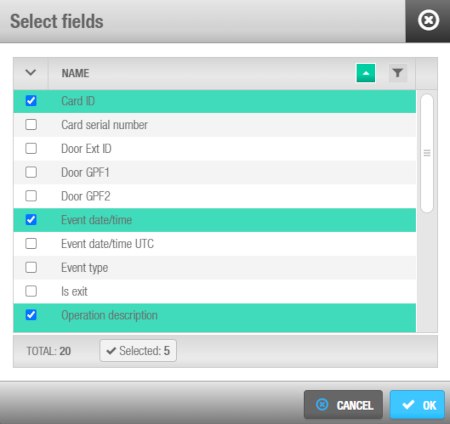 'Select fields' dialog box - Audit trail exportation
The SaltoAutomaticExportOfAuditTrail document contains more information about these fields.
Select the required fields.
Click Accept. The selected fields are displayed in the Fields list on the Field configuration screen.
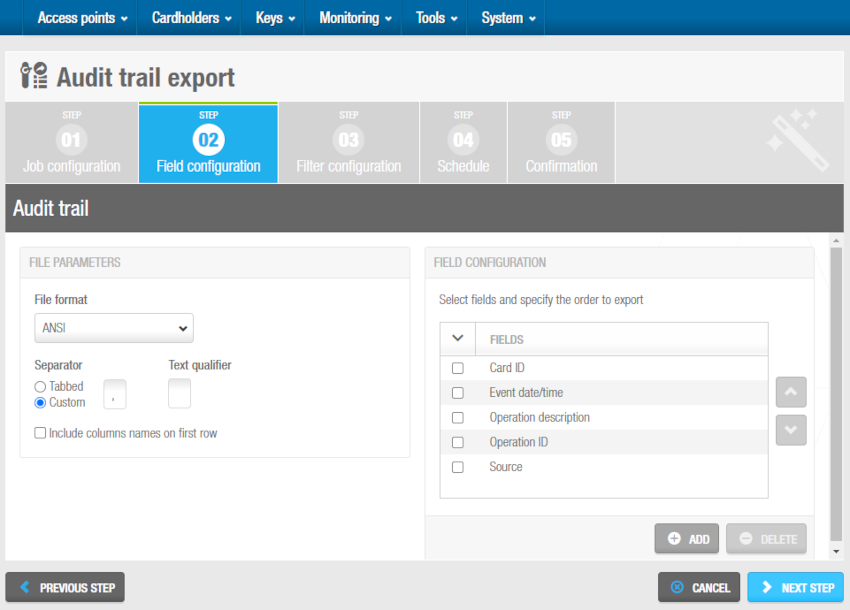 'Field configuration' screen - Audit trail export
The order of the fields in the Fields list determines the order in which the fields are exported. You can select fields and click the up and down arrows to change the order of the fields if required.
- Click Next step. The Filter configuration screen is displayed.
Step three: Filter configuration
The filter configuration step allows you to filter the type of audit trail data that is exported within a specified time period. The default option is to export all of the audit trail data within the previous 12-month period.
You can filter audit trail events by:
- Cardholders and/or operators
- Access points, nodes, alarm inputs, and/or relays
- Operations
- Date and time period
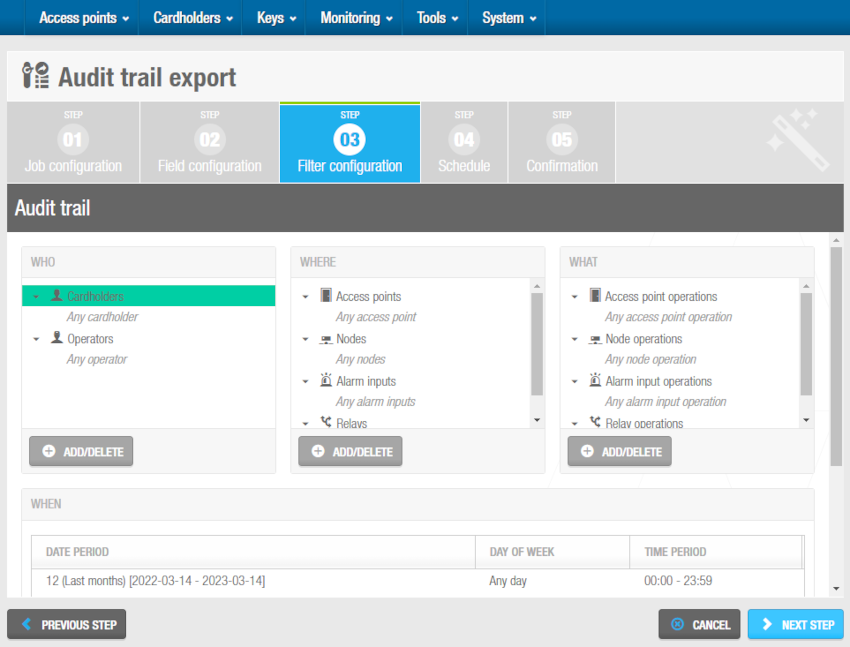 'Filter configuration' screen - Audit trail exportation
To complete this step:
Click Add/Delete in the Who panel. The Add/Delete dialog box, which contains a list of cardholders and operators on two tabs, is displayed.
Select the required cardholders in the left-hand panel and click the arrow. The selected cardholders are displayed in the right-hand panel. You can hold down the Ctrl key while clicking the fields to make multiple selections. As soon as you select a cardholder, the default Any cardholder option is automatically moved to the left-hand panel. You can use the default option if you want to export audit trail data for all the cardholders in the system.
Click the Operators tab if you also want to filter by operator. A list of operators is displayed.
Select the required operators in the left-hand panel and click the arrow. The selected operators are displayed in the right-hand panel.
Click OK. The selected cardholders and operators are displayed in the Who panel.
Follow the same procedure described in the previous steps to add the access points, nodes, alarm inputs, and/or relays you want to filter to the Where panel.
Follow the same procedure described in the previous steps to add the operations you want to filter to the What panel.
Click Add/Delete in the When panel. The Add/delete periods dialog box, showing the default period, is displayed.
Click the Edit icon to change the date period and time interval if required. You can also click Add to add additional periods. For example, you can add a period to export the audit trail data between 09:00 and 11:00 each day within a specified date period, and add another period to export the audit trail data between 14:00 and 17:00 each day within the same date period.
Save the changes when you have finished editing or adding periods and click OK. The changes are displayed in the When panel.
Click Next step. The Schedule screen is displayed.
Step four: Schedule
All the schedule steps for the jobs described in this section are done in the same way. See Step two: Schedule for more information and a description of the procedure you should follow.
Step five: Confirmation
All the confirmation steps for the jobs described in this section are done in the same way. See Step three: Confirmation for more information and a description of the procedure you should follow.
Automatic entity exports
You can export entities from the Salto Space database as a CSV file. This allows you to use the data in another system, for example, a time recording system.
When you export entities data, you can still access the data in Space as it is not removed.
The automatic entity export process consists of four steps:
Step one: Job configuration
To complete step one:
Select Tools > Scheduled jobs. The Scheduled jobs screen is displayed.
Click Add. The Add scheduled job dialog box is displayed.
Select Entity type to export from the drop-down list.
Click OK. The Job Configuration screen is displayed.
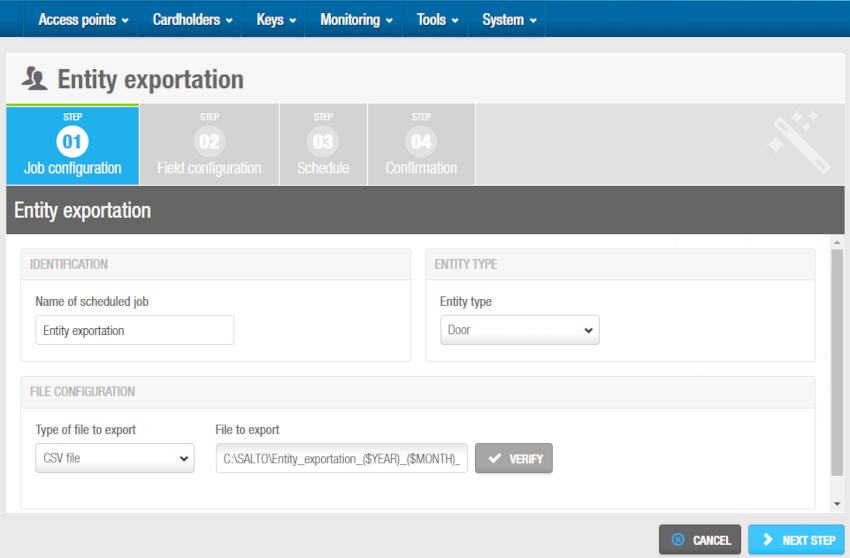 'Job configuration' screen - Automatic entity exports
Type a name for the job in the Name of scheduled job field. The default option in the Type of file to export field is CSV file. This is the only file format currently supported.
Type a name for the file that you want to export in the File to export field, such as
C:\SALTO\entity-export, and follow the steps below:
- Press F2 to display the File path dialog box and insert macros in the file name if required.
Using macros, for example,
($YEAR)_($MONTH)_($DAY), allows you to save the file with a unique name so it is not overwritten by the next file that is created. - Double-click the appropriate macro to insert it in the file name. Each macro you insert is displayed in the file name in the File to export field.
- Click OK when you have finished inserting macros and the appropriate file name is displayed in the File to export field.
- You can click Verify on the Job configuration screen to verify the file directory exists and is correct.
- Click Next step. The Field configuration screen is displayed.
Step two: Field configuration
To complete this step:
Select a format from the File format drop-down list. This specifies the format of the file containing the exported entities.
Select either the Tabbed or Custom option. This specifies how the entities are stored in the file. The Separator and Text qualifier fields are automatically populated but you can change the characters in these fields if required.
Select the Include column names on first row checkbox if required. If you select this, the column names are included in the first row of the file.
Click Add in the Field configuration panel. The Select fields dialog box, showing a list of fields, is displayed.
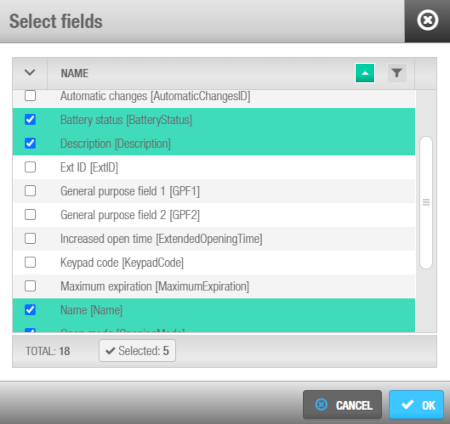 'Select fields' dialog box - Automatic entity exports
The Salto_Data_Export document contains more information about these fields. If you don't already have this document, contact your Salto partner or tech support team to receive a copy of it.
Select the required fields.
Click Accept. The selected fields are displayed in the Fields list on the Field configuration screen.
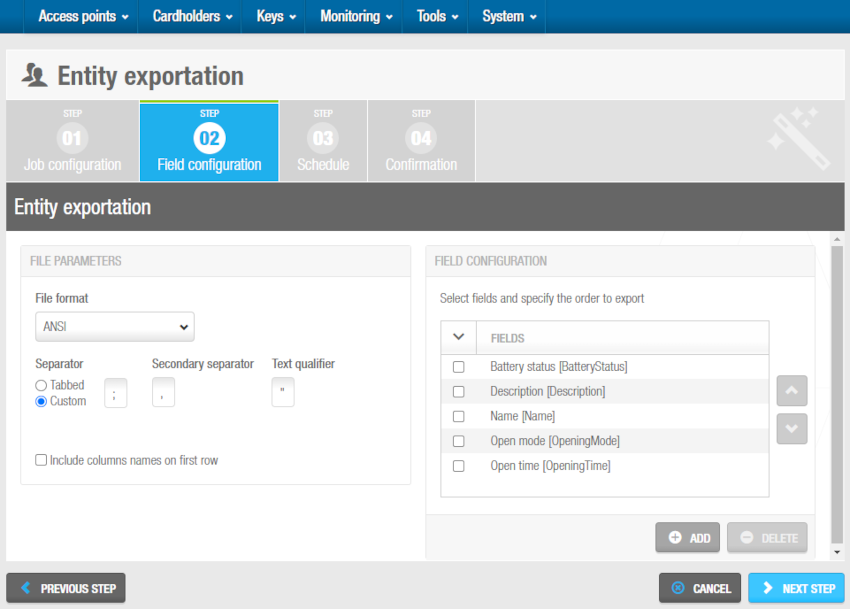 'Field configuration' screen - Automatic entity exports
The order of the fields in the Fields list determines the order in which the fields are exported. You can select fields and click the up and down arrows to change the order of the fields if required.
- Click Next step. The Filter configuration screen is displayed.
Step three: Schedule
All the schedule steps for the jobs described in this section are done in the same way. See Step two: Schedule for more information and a description of the procedure you should follow.
Step four: Confirmation
All the confirmation steps for the jobs described in this section are done in the same way. See Step three: Confirmation for more information and a description of the procedure you should follow.
Automatic users inactivity exportation
You can export users inactivity from the Salto Space database as a CSV file. This allows you to use the data in another system, for example, a time recording system.
Users data can also be sent by email. When you export users data, you can still access the data in Space as it is not removed.
The automatic users inactivity exportation process consists of four steps:
Step one: Job configuration
To complete step one:
Select Tools > Scheduled jobs. The Scheduled jobs screen is displayed.
Click Add. The Add scheduled job dialog box is displayed.
Select Users inactivity exportation from the drop-down list.
Click OK. The Job configuration screen is displayed.
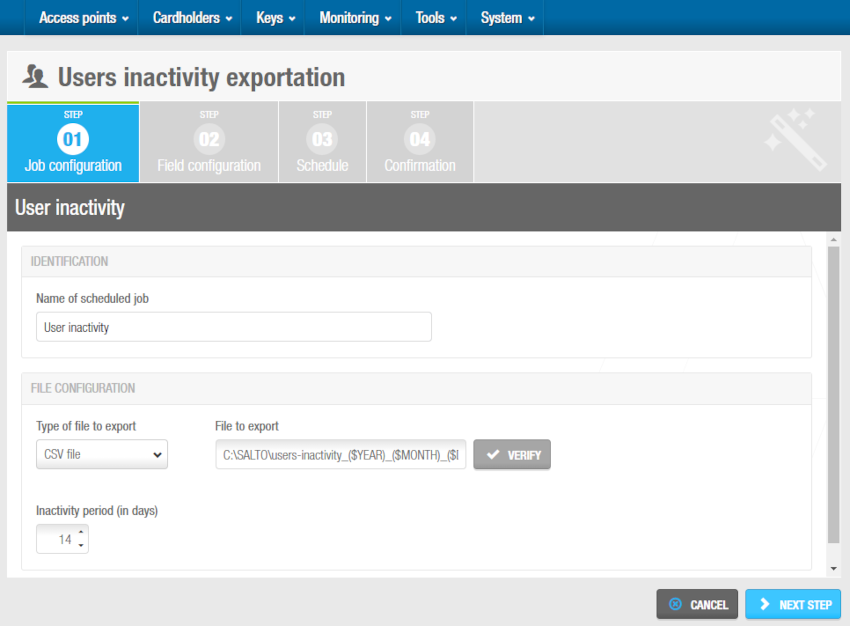 'Job configuration' screen - Automatic users inactivity exportation
Type a name for the job in the Name of scheduled job field. The default option in the Type of file to export field is CSV file. This is the only file format currently supported.
Type a name for the file that you want to export in the File to export field, such as
C:\SALTO\users-inactivity, and follow the steps below:
- Press F2 to display the File path dialog box and insert macros in the file name if required.
Using macros, for example,
($YEAR)_($MONTH)_($DAY), allows you to save the file with a unique name so it is not overwritten by the next file that is created. - Double-click the appropriate macro to insert it in the file name. Each macro you insert is displayed in the file name in the File to export field.
- Click OK when you have finished inserting macros and the appropriate file name is displayed in the File to export field.
- You can click Verify on the Job configuration screen to verify the file directory exists and is correct.
- Click Next step. The Field configuration screen is displayed.
Step two: Field configuration
To complete step two:
Select a format from the File format drop-down list. This specifies the format of the file containing the exported audit trail data.
Select either the Tabbed or Custom option. This specifies how the audit trail data is stored in the file. The Separator and Text qualifier fields are automatically populated but you can change the characters in these fields if required.
Select the Include column names on first row checkbox if required. If you select this, the column names are included in the first row of the file.
Click Add in the Field configuration panel. The Select fields dialog box, showing a list of fields, is displayed.
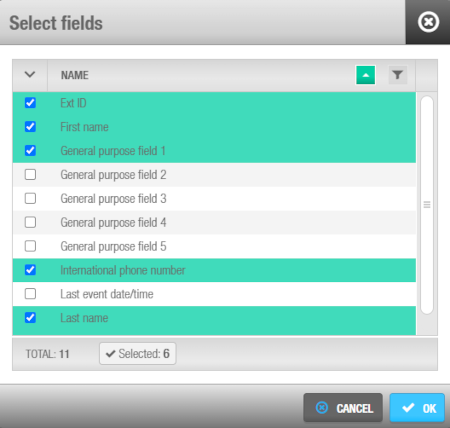 'Select fields' dialog box - Automatic users inactivity exportation
The Salto_Data_Export document contains more information about these fields. If you don't already have this document, contact your Salto partner or tech support team to receive a copy of it.
- Select the required fields and click OK. The selected fields are displayed in the Fields list on the Field configuration screen.
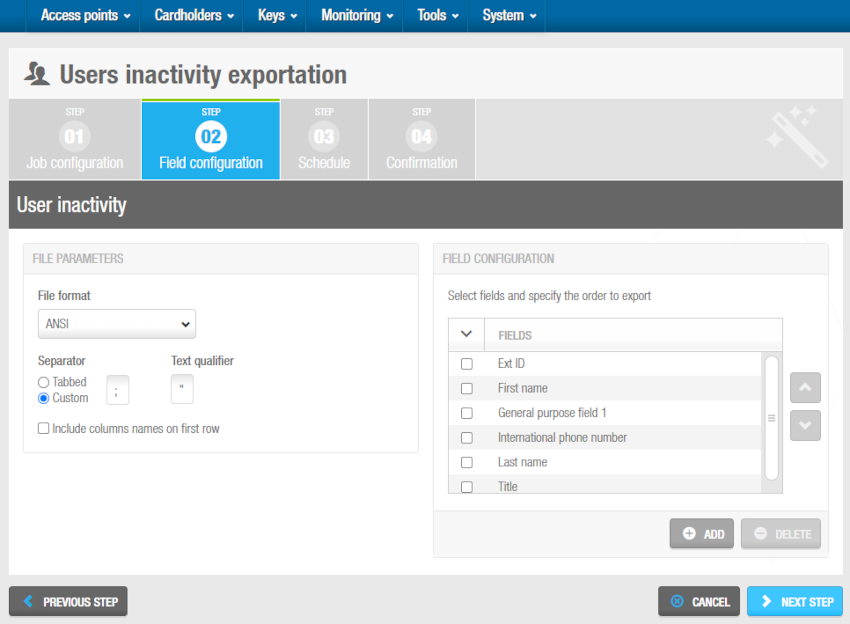 'Field configuration' screen - Automatic users inactivity exportation
The order of the fields in the Fields list determines the order in which the fields are exported. You can select fields and click the up and down arrows to change the order of the fields if required.
- Click Next step. The Schedule screen is displayed.
Step three: Schedule
All the schedule steps for the jobs described in this section are done in the same way. See Step two: Schedule for more information and a description of the procedure you should follow.
Step four: Confirmation
All the confirmation steps for the jobs described in this section are done in the same way. See Step three: Confirmation for more information and a description of the procedure you should follow.
 Back
Back
