Default scheduled jobs in Space
Overview
Default scheduled jobs are system tasks that are set up to be performed automatically. You can view the scheduled jobs on the system by selecting Tools > Scheduled jobs.
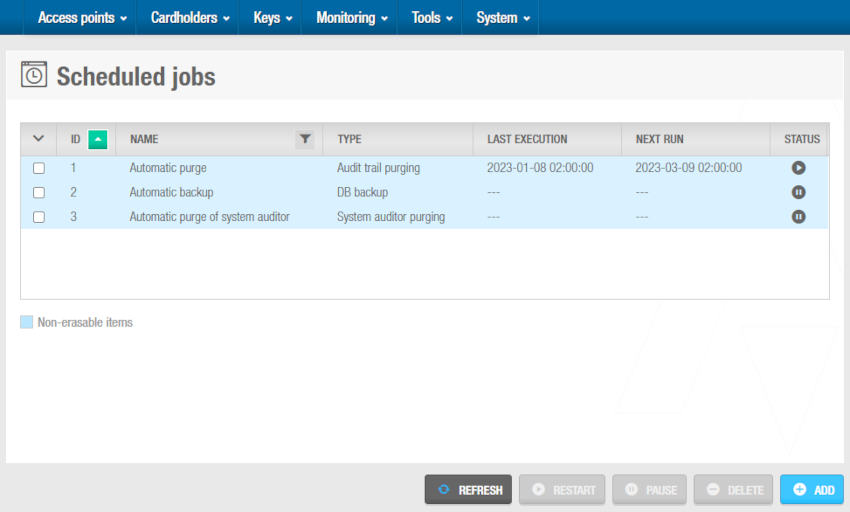 'Scheduled jobs' screen
The three job types below are scheduled on the system by default:
Depending on the status of each job, two icons can be displayed in the Status column on the Scheduled jobs screen. Find a description of these icons in the following table.
| Icon | Description |
|---|---|
 Paused | This icon is shown when a job is paused. You can select the job and click Restart to restart it. |
 Running | This icon is shown when a job is running. You can select the job and click Pause to pause it. |
You can change the configuration and scheduling options for the default jobs, or create additional scheduled jobs. If you create an additional scheduled job, you have the option to delete the entry. However, you cannot delete any of the default job types.
Scheduled jobs are not performed when the Space service is not running.
Automatic audit trail purging
Audit trail purging removes all audit trail data within a selected time frame from the system. The purged data is saved to a text file in a specified folder location. See Audit Trail for more information about audit trails. Automatic purges of the audit trail are scheduled to be performed every 60 days by default but you can change the configuration and scheduling options for this job.
It is strongly recommended that you purge the audit trail at least once a month. This is because system communication can slow down if the audit trail is full. Regular audit trail purges also allow you to perform more efficient searches on audit trail entries.
The automatic audit trail purging process consists of three steps:
Step one: Job configuration
To complete step one:
Select Tools > Scheduled jobs. The Scheduled jobs screen is displayed.
Click the Automatic purge entry. The Job configuration screen is displayed.
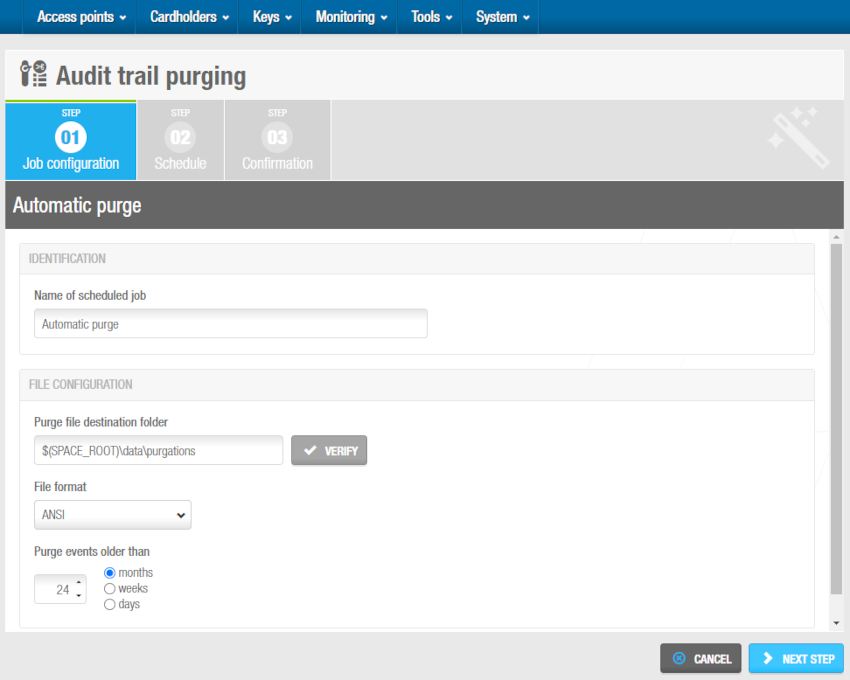 Automatic audit trail purging - 'Job configuration' screen
The Name of scheduled job and Purge file destination folder fields are automatically populated but you can change the text in these fields if required.
Click on Verify to verify the file directory exists and is correct.
Select a format from the File format drop-down list. This specifies the format of the file containing the purged events. The appropriate format depends on the alphabet you are using. In general, the system selects the required format by default. However, you can amend this if required.
Select the required time parameters using the up and down arrows and the options in the Purge events older than field. All events prior to the time you select are purged.
Click Next step. The Schedule screen is displayed.
Step two: Schedule
To complete step two do the following:
- Select the required number of days by using the up and down arrows in the Frequency (days) field. If you select 50, for example, the job is performed every 50 days.
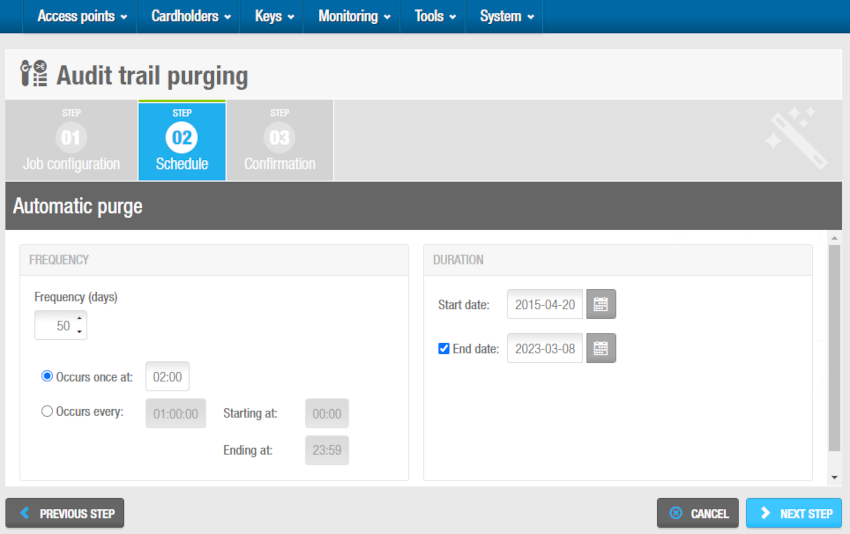 Automatic audit trail purging - 'Scheduled jobs' screen
Select either the Occurs once at or the Occurs every option and type the required time parameters for the selected option. These options allow you to specify whether the job occurs once on the scheduled day or at specific intervals during that day.
Select a start date for the job using the calendar in the Start date field in the Duration panel.
Select the End date checkbox and select an end date for the job using the calendar if required. If you do not select an end date the job is performed indefinitely.
Click Next step. The Confirmation screen is displayed.
Step Three: Confirmation
To complete step three:
- Review the job configuration and scheduling details on the Confirmation screen.
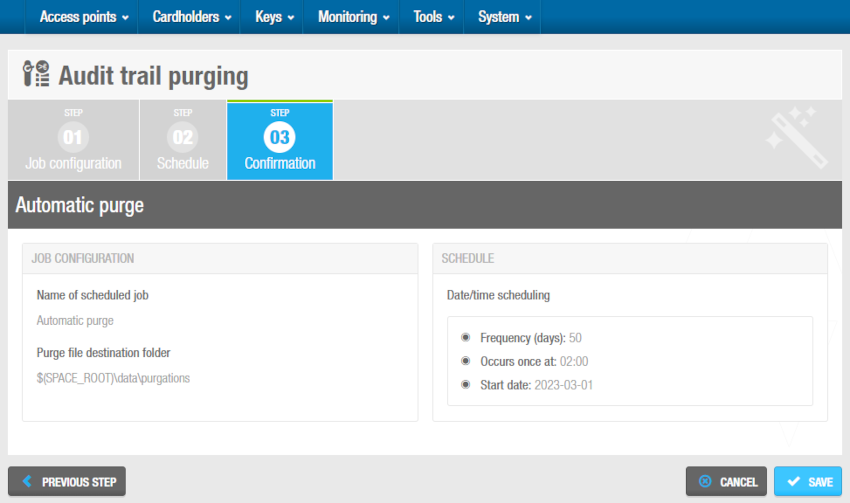 Automatic audit trail purging - 'Confirmation' screen
Click Previous step if you need to amend the job configuration and schedule details or click Cancel to discard all your configuration changes.
Click Save if all your configuration is complete and correct.
Automatic database backups
Automatic database backups are scheduled to be performed every seven days by default but you can change the configuration and scheduling options for this job.
You can also make database backups by using the Make DB Backup option.
It is recommended that you perform database backups once a week. This ensures data is up to date if you need to restore system backups. Large installations may opt to perform database backups on a day-to-day basis. You should not allow more than a month to elapse between backups. System backups are the only means of restoring the system in the event of a total system crash.
The automatic database backup process consists of three steps:
Step one: Job configuration
To complete this first step:
- Select Tools > Scheduled jobs. The Scheduled jobs screen is displayed.
 'Scheduled jobs' screen
- Click the Automatic backup entry. The Job configuration screen is displayed.
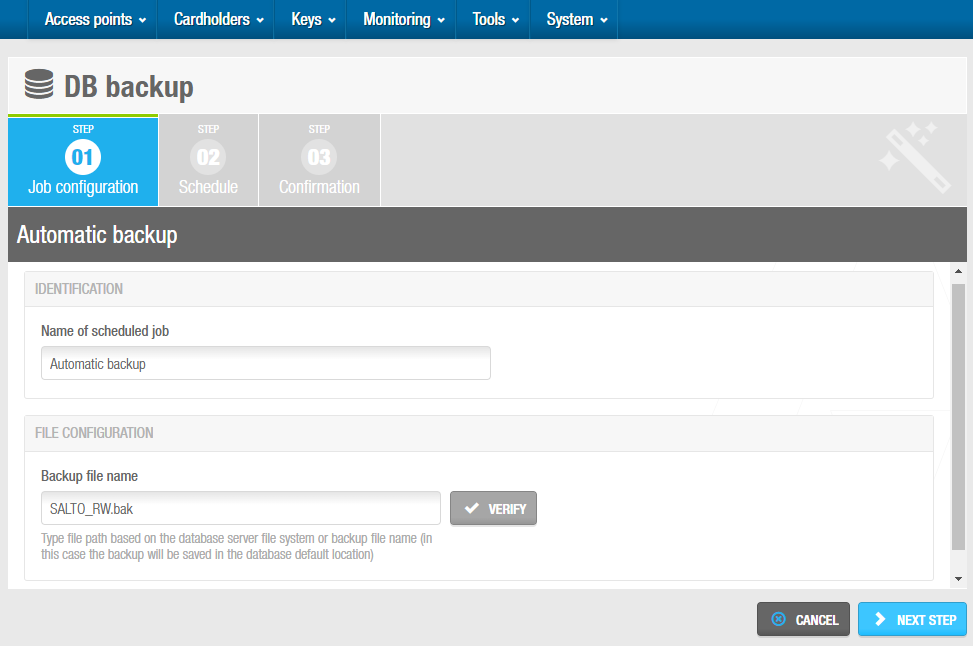 Automatic database backups - 'Job configuration' screen
The Name of scheduled job and Backup file name fields are automatically populated but you can change the text in these fields if required.
Click on Verify to verify the file directory exists and is correct.
Click on Next step. The Schedule screen is displayed.
Step two: Schedule
All the Schedule steps for the Default scheduled jobs section are performed in the same way. See Step two: Schedule for more information and a description of the procedure you should follow.
Step three: Confirmation
All the Confirmation steps for the Default scheduled jobs section are performed in the same way. See Step three: Confirmation for more information and a description of the procedure you should follow.
Automatic system auditor purging
System auditor purging removes all system auditor data within a selected time frame from the system. See System auditor for more information. The purged data is saved to a text file in a specified folder location. Automatic purges of the system auditor are scheduled to be performed every 60 days by default but you can change the configuration and scheduling options for this job.
It is strongly recommended that you purge the system auditor at least once a month. The system auditor expands as all system operator events are saved, and system communication can slow down if this is full. It is important to purge the system auditor on a regular basis if you schedule automatic synchronization jobs. See Automatic CSV file synchronization and Automatic database table synchronization for more information.
The automatic system auditor purging process consists of three steps:
Step one: Job configuration
To complete this first step:
- Select Tools > Scheduled jobs. The Scheduled jobs screen is displayed.
 'Scheduled jobs' screen
- Click the Automatic purge of system auditor entry. The Job configuration screen is displayed.
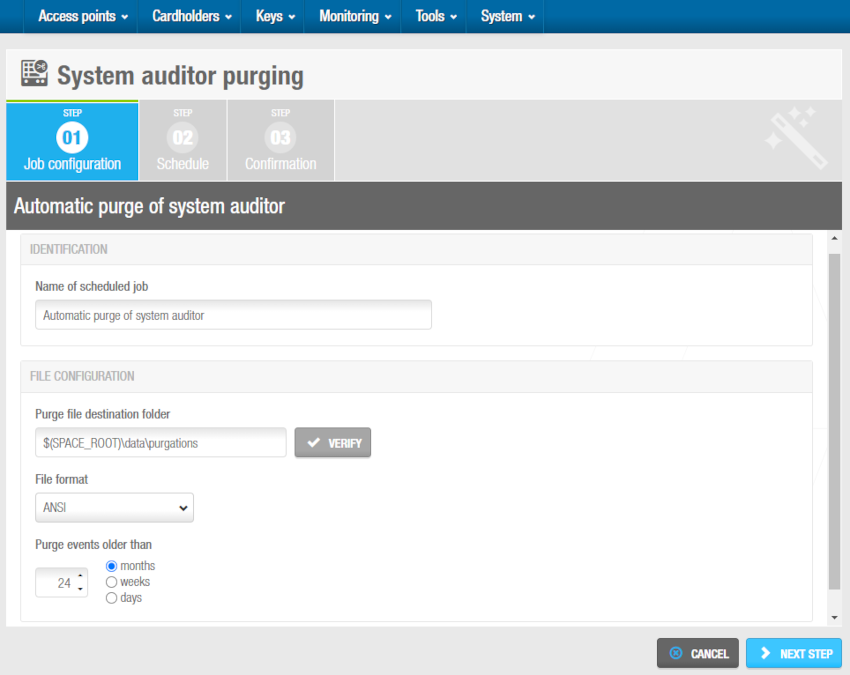 Automatic system auditor purging - 'Job configuration' screen
The Name of scheduled job and Purge file destination folder fields are automatically populated but you can change the text in these fields if required.
Click Verify to verify the file directory exists and is correct.
Select a format from the File format drop-down list. This specifies the format of the file containing the purged events. The appropriate format depends on the alphabet you are using. In general, the system selects the required format by default. However, you can amend this if required.
Select the required time parameters by using the up and down arrows and the options in the Purge events older than field. All events prior to the time you select are purged.
Click Next step. The Schedule screen is displayed.
Step two: Schedule
All the Schedule steps for the Default scheduled jobs section are performed in the same way. See Step two: Schedule for more information and a description of the procedure you should follow.
Step three: Confirmation
All the Confirmation steps for the Default scheduled jobs section are performed in the same way. See Step three: Confirmation for more information and a description of the procedure you should follow.
 Back
Back
