Access points tab in Space General options
Overview
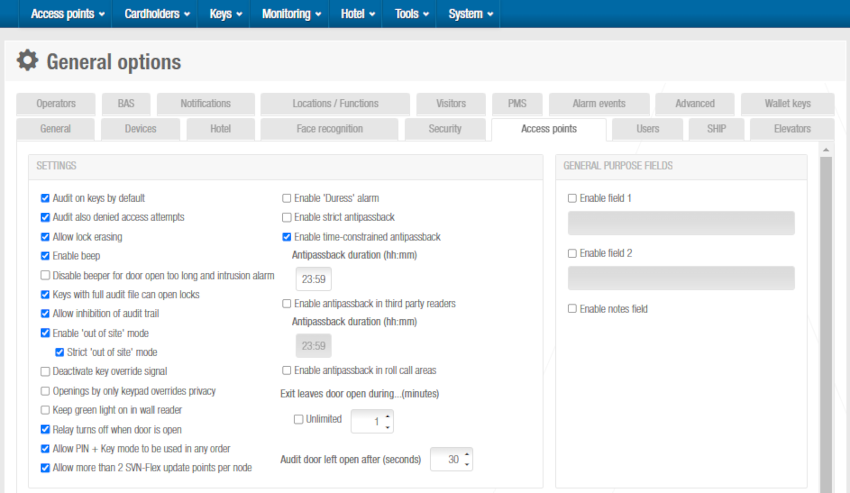
You can activate or amend options for access points (locks, doors, lockers, etc.) by using the Access points tab.
Select System > General options > Access points to view the tab.
 'Access points' tab
Settings and general purpose fields items
| Item | Description |
|---|---|
| Audit on keys by default | Controls whether installation events, such as when and where keys are used, are monitored. When this option is selected, the door is enabled to write or stamp the audit on the key as long as the key's memory is not full, and it is applied to all newly added access points. |
| Audit also denied access attempts | Controls whether failed access attempts are displayed in the audit trail. When you select this option, it is applied to all newly added access points. |
| Allow lock erasing | Controls whether locks can be reset and initialized for use with a different database. If you select this checkbox, you can reset any of the locks on the system and then initialize them with a PPD. See Initializing locks for more information about initializing locks. |
| Enable beep | Controls whether locks emit beeps during operation. When you select this option, it is applied to all system locks. |
| Disable beeper for door open too long and intrusion alarm | Disables beeps for Door left open and Intrusion alarm statuses. Regular sounds, such as access granted, access denied or low battery, remain enabled. This setting implies marking all doors as update pending. For this functionality to work, you need to update the firmware of the locks to the latest version. |
| Keys with full audit file can open locks | Controls whether keys that have a full audit trail can be used to open locks. This option is selected by default. When enabled, keys with full audit files can continue to open all doors. If disabled, keys with full audit files won't be able to open standalone doors that have the Audit on keys option active in their individual door profile - this restriction only affects doors with that specific configuration, not all doors in the installation. Disabling this option forces cardholders to visit an SVN wall reader or encoder, or any other updater point in the system, frequently to update their key before their key's memory becomes full. This can be useful for installations where complete audit trail collection is a priority, while enabling it provides more convenience for users but may result in some audit events not being recorded if users don't update their keys frequently. When a key's audit trail file is full, new events are not written to the key, but existing events on the key remain unchanged. Note that even if new events cannot be recorded on keys with full audit files, they remain stored in the lock's memory and can still be collected using a PPD. |
| Allow inhibition of audit trail | Controls whether you can inhibit the collection of audit trail data for doors. When you select this option, an Inhibit audit trail checkbox is displayed on the Door and Room information screens. Select this checkbox to ensure the lock does not memorize openings in its audit trail. See Door options for more information. |
| Enable 'out of site' mode | Controls whether Out of site mode can be enabled for online IP (CU5000) and online IP (CU4200) doors. You can only use it with doors that have two readers. You can enable this mode by selecting the Out of site checkbox on the Door information screen in Space. See Door options for more information. Out of site mode strengthens system security. If a cardholder exits an installation through either of these door types, the expiration period for their key is shortened when they place it on the exit SVN wall reader. A brief period is set for revalidation of their key upon re-entry. This period can vary depending on what time the key is placed on the exit reader, but it is never longer than 15 minutes. The cardholder's key is revalidated when they place it on the entrance SVN wall reader of the door, or another door that has Out of site mode enabled. However, they must do so within the specified period. Otherwise, access is denied as their key is not revalidated. When you select the Enable 'out of site' mode checkbox, the Strict 'out of site' mode checkbox is also available in General options. This mode works in the same way. However, the cardholder's access permissions are also removed from their key when they place it on the exit SVN wall reader. Note that Strict 'out of site' mode can only be used in cases where the SVN wall reader is located at a final exit point in an installation. For example, it cannot be used if the cardholder must subsequently enter an offline door in order to leave the installation. |
| Deactivate key override signal | Controls whether locks emit audible beeps and a visible signal when using a mechanical key override. This box is unchecked by default. When you select this option, it is applied to all system locks. |
| Openings by only keypad overrides privacy | Enables the possibility to override privacy using keypad modes of the lock. |
| Keep green light on in wall reader | The green light signal on the wall reader stays on while the door remains unlocked, rather than just flashing once if this option is not set. |
| Relay turns off when door is open | The relay strike that opens the door is deactivated at the same time as the door detector indicates it has opened. This is the opposite of the relay strike's regular behavior. In addition, the relay is also deactivated when the door detector indicates that the door has closed. |
| Allow PIN + Key mode to be used in any order | You can configure the order of the sequence of PIN + Key, that is, the PIN can be entered before or after presenting the key when this option is enabled. |
| Allow more than 2 SVN-Flex update points per node | Select this checkbox if you want to set more than two SVN-Flex updating points per node. That is, the restriction that a node has 16 access points and only 2 of them can be SVN-Flex updating points is removed. Therefore, each of the 16 access points could be configured as an updating point. See Updating keys for information on how to update keys. When you enable this option and save the change, the warning "Enabling this option means that some keys may not update correctly at SVN-Flex points." displays. The firmware does not ensure that more than 2 keys can be updated at the same time, so if more than 2 keys are presented, some of them might not be updated. |
| Enable 'Duress' alarm | Enables the activation of a special security alarm in the audit trail of the system. It can only be activated with two specific opening modes: Keypad only and PIN + Key mode. See Opening modes and Timed periods. This specific event can be generated only when the door has been opened. In the audit trail it will be possible to see two specific events, the unlocking of the door and the special Duress alarm. It's intended to prevent security situations when a person with correct access permissions can be "forced" by someone else to unlock an access point with a PIN/keypad code. The Duress alarm is activated when a person opens the lock with the Duress code. The Duress code is the User or Door PIN changing the last digit by the consecutive. For instance if the PIN is "1234" the Duress code is "1235", if the correct Keypad code is "999999" the Duress code is "999990". This option doesn't automatically activate any actions. In order to generate any actions, it has to be managed in the Event stream or Alarm event logic. See Events streams or Alarm events section. |
| Enable strict antipassback | Enables the strict antipassback functionality. See Enabling antipassback for more information about strict antipassback. |
| Enable time-constrained antipassback | Allows to enable antipassback duration (hh:mm). Antipassback duration (hh:mm) displays the period of time in hours and minutes before a cardholder can re-enter a door that has the antipassback option enabled. See Enabling antipassback for more information about antipassback. The default value is 23:59 but you can amend this time parameter if required. Note that if you enter 00:00, the antipassback period is unlimited, and cardholders must always exit a door before they can re-enter it. You must update user keys using an encoder when you select this option or amend the time parameters. See Updating keys for more information. |
| Enable antipassback in third-party readers | Allows to enable antipassback functionality for access points connected to third-party readers connected to CU4000 online devices. This antipassback logic is managed by the database, and not by card, as the standard antipassback feature. This type of antipassback is always time constrained. See the Enable time-constrained antipassback previous option for more information. If you apply the antipassback connected to third-party readers option, you can't use it in conjunction with the strict antipassback option. |
| Enable antipassback in roll call areas | Allows to enable antipassback functionality for access points configured as roll call areas readers connected to CU4000 online devices or double reader SVN-Flex devices. The strict antipassback option can be used for antipassback that's configured in roll call areas. |
| Exit leaves door open during…(minutes) | Enter the minutes the lock remains open when the inner handle is used when an access point is in Exit leaves open mode. See Exit leaves open in Door opening modes for more information. |
| Audit door left open after (seconds) | Enter the seconds the lock has to remain unlocked until the Door left open status alarm is automatically triggered. |
| Enable field | Allows you to add up to two general purpose fields for locks. When you select the checkbox for each field, it is displayed on the Door, Locker and Room information screens in Space. You can name the general purpose fields in accordance with the information you want to capture by typing a name in the field underneath each checkbox. |
Free assignment lockers items
| Item | Description |
|---|---|
| Dynamic keys | Defines whether dynamic keys can be used with free assignment lockers. When you select this option, users can choose any locker within a free assignment zone each time they enter the zone. They do not have to use the same locker each time. See Free assignment zones for more information. |
| Static keys | Defines whether static keys can be used with free assignment lockers. When you select this option, users can choose any locker the first time they enter a free assignment zone, but they must use the same locker subsequently. |
| Control of lockers left closed | Controls whether you can opt to reset the status of available lockers to 'open' on the system. This task can be performed by reception staff for information purposes, for example. It shows which lockers are available for use. However, it does not affect the physical lockers. When you select this checkbox, the Set locker state as opened button is activated, and a Set lockers states as opened button is added to the Lockers screen in Space. You can click this button to reset the status of all the available lockers in the system. This changes the status of the lockers to open on the Locker information screen in Space. Note that this option is generally used in installations where only free assignment lockers are in use, for example, gyms or spas. |
| Set locker state as opened | Allows you to reset the status of available lockers to open on the system. The changed status is displayed on the Locker information screen in Space. |
| Time-limited occupancy | Limits the amount of time for which keys can be used to open free assignment lockers after they are chosen by users. When you select this checkbox, you must enter the appropriate time parameters in the Hours and Minutes fields. Outside of the specified time period, for example, four hours, only a master key can open lockers. |
| Reset timing when retaking locker | Controls whether the time-limited occupancy period for free assignment lockers is reset each time lockers are opened and closed by users. For example, if the time-limited occupancy period is set to four hours, and a user opens and closes the locker again after three hours have elapsed, they can then use the locker for four more hours. |
GAT Net locker
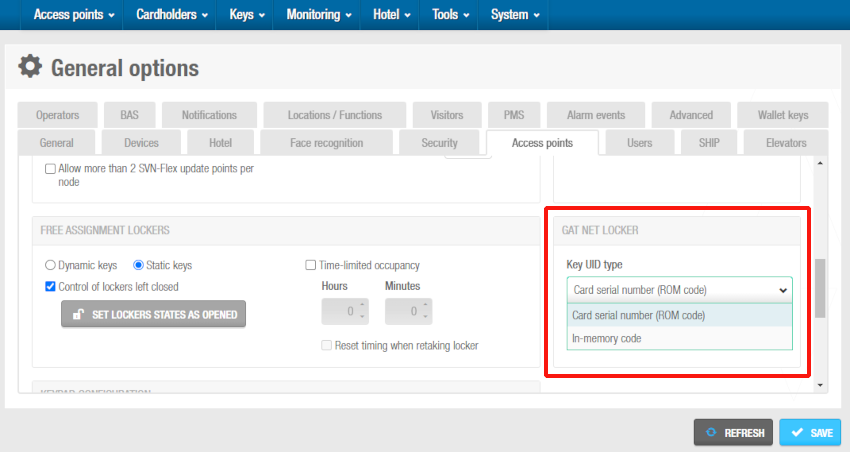
From the GAT Net locker panel, you can define the key UID type you need to use at GAT Net lockers.
There are two options:
Select the Card serial number (ROM code) option to identify keys at GAT Net lockers based on the card's UID.
Select In-memory code to identify keys at GAT Net lockers based on a code number located in the card's memory.
 You can define the key UID type from the 'GAT Net locker' panel
See Lockers in Space, Gantner GAT Net.lock or contact your Salto technical support team for more information.
Keypad configuration
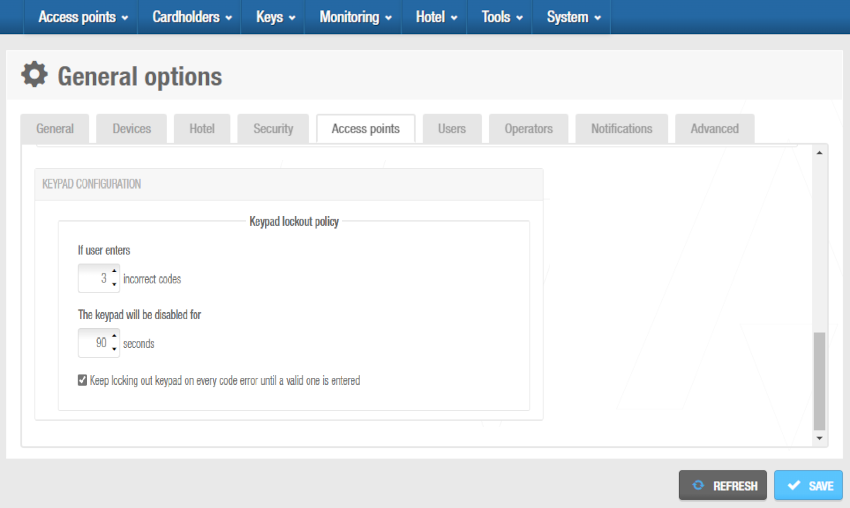
You can define the keypad lockout policy for electronic locks provided with a keypad, such as the DBolt Touch, from the Keyboard configuration panel in General options > Access points. Keypad lockout policy refers to the amount of times a user can enter an incorrect passcode before the keypad is blocked. See Passcode for more information on how to generate a passcode. It also includes the possibility to configure the time the keypad remains blocked for.
To configure the Keypad lockout policy options, follow the steps below:
- Select System > General options > Access points.
 Keypad lockout policy refers to the amount of times a user can enter an incorrect passcode before the keypad is blocked
In the If user enters option, type or select the number of incorrect codes a user can enter with the up and down arrows. After this number of attempts, the keypad will be disabled for the amount of seconds you select in the next step. This number must be greater than or equal to 1.
In the The keypad will be disabled for field, type or select the number of seconds the keypad will be disabled for. This number must be greater than or equal to 90.
When the keypad is blocked, the LED of the lock, for example, a DBolt Touch, blinks red and emits a short beep. If you want to keep locking out keypad on every incorrect code attempt until the user enters a valid one, select the Keep locking out keypad on every code error until a valid one is entered.
- Save the changes.
 Back
Back
