Suites in Space
Overview
Hotel access points can include rooms, suites, zones, automatic outputs and lockdown areas. Suites refer to a series of rooms containing one or more areas with individual entrance doors from the outside and a connecting door between. Guests can move between rooms without going through an external hallway. Suites may be booked together by one guest or separately by different guests, checking in as a group.
Creating suites
To create a suite, do the following:
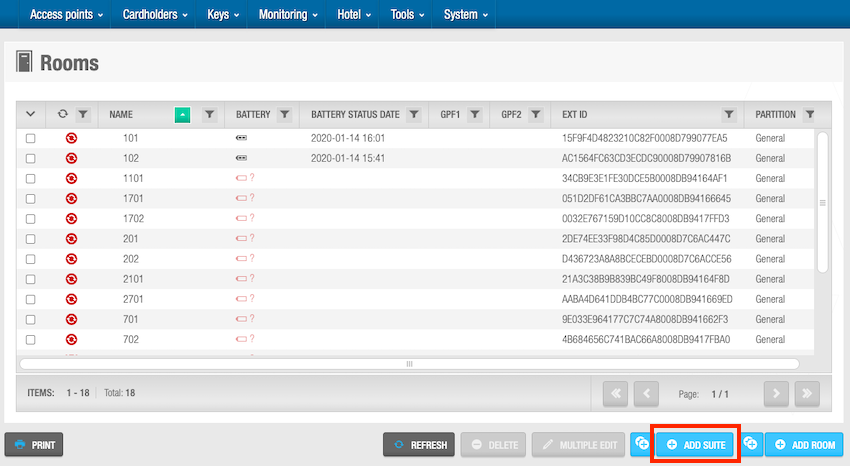
- Select Access points > Rooms. The Rooms screen is displayed.
 Use the 'Add suite' button to create a new suite
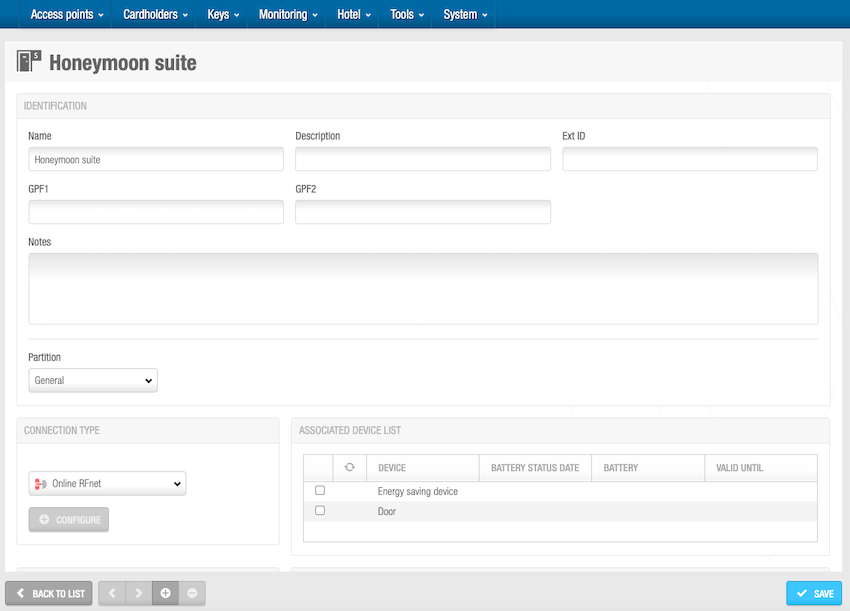
- Click Add suite. The Suite information screen is displayed.
 Suite information screen
Type a name for the suite in the Name field.
Type a description for the suite in the Description field.
Select the appropriate partition from the Partition drop-down list, if required. See Partitions for more information.
Note that the partitions functionality is license-dependent. See Registering and licensing Space for more information.
Select the appropriate configuration options. The configuration fields are described in Configuring suites.
Click Save.
Once a suite is created, it's displayed on the Rooms screen. You can see a special suite icon on the left-hand side of each suite name to help identify the suite.
![]() A suite icon displays in the room list to make it easier to identify suites from standard rooms
A suite icon displays in the room list to make it easier to identify suites from standard rooms
Configuring suites
The following sections describe the various fields used to configure suites.
Opening modes
The default opening mode for rooms and suites is standard. However, you can change this to Toggle, Exit leaves open or Toggle + Exit leaves open in General options if required. To enter the mode you want, select the option from the Open mode drop-down list in System > General options > Hotel. The selected opening mode applies to all external suite doors in the hotel. However, it does not apply to doors in subsuites. See Hotel tab and Opening modes and timed periods for more information.
You can enable office mode for subsuite doors by activating the SUBSUITE_OFFICE and SUBSUITE OFFICE_GUESTS parameters in System > General options > Advanced.
See Advanced tab and Opening modes and Timed periods for more information.
Connection types
The connection types for suites are the same as those for rooms. See Room connection types for more information.
Associated device lists
The associated device list is the same for suites as it is for rooms. See Associated device lists for more information.
Suite options
The options available for suites are the same as those for rooms. See Room options for more information.
Opening times
The opening time options are the same for both suites and rooms. See Opening time for more information.
Time zone
The time zone options are the same for both suites and rooms. See Time zones for more information.
Associating suites
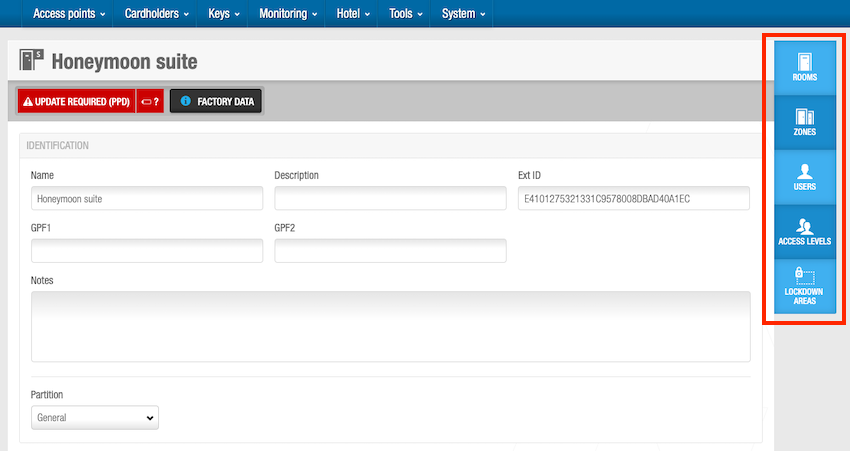
When you have created and configured a suite, you can associate automatic outputs, rooms, zones, users, access levels and lockdown areas with that suite. The following sections describe how to associate suites with these entities.
 The options available for associating suites may depend on the license you have
Automatic outputs
See Automatic outputs for a definition and information about how to create and configure an automatic output.
To associate an automatic output with a suite, do the following:
Select Access points > Rooms. The Rooms screen is displayed. It shows a list of rooms and suites.
Click the suite that will be associated with an automatic output. The Suite information screen is displayed.
Click Automatic outputs in the sidebar. The Automatic outputs dialog box is displayed. Note that the dialog box will be blank if you have not yet associated an automatic output.
Click Add. The Add dialog box, showing a list of automatic outputs, is displayed.
Select the required automatic outputs in the left-hand panel and the access point timed period in the right drop-down list. The selected suite is now associated with the automatic output. See Timed periods for more information.
Click Save & Close. The suite is now associated with the automatic output. You can also specify which access point timed period is used.
To modify an automatic output's Time period, from the Automatic outputs dialog box, perform the following steps:
- Select the automatic output to be edited and then click on Edit.
- Modify the Time period and save the changes.
To dissociate an automatic output from a suite, from the Automatic outputs dialog box, do the following:
- Select the Automatic output to be deleted.
- Click on Delete and confirm the action in the Warning dialog box.
Rooms
See the rooms section for a definition and information about how to create and configure a room.
To associate a room with a suite, do the following:
Select Access Points > Rooms. The Rooms screen is displayed. The Rooms screen shows a list of rooms and suites.
Click the suite that you want to associate with a room. The Suite information screen is displayed.
Click Rooms in the sidebar. The Rooms dialog box is displayed. Note that the dialog box will be blank if you have not yet associated a room.
Click Add. The Add dialog box, showing a list of rooms, is displayed.
Select the required room in the left-hand panel and click the chevron. The selected room is displayed in the right-hand panel.
Click Accept. The suite is now associated with the room.
To dissociate a room from a suite, from the Rooms dialog box, do the following:
- Select the Room to be deleted.
- Click on Delete and confirm the action in the Warning dialog box.
Zones
See Zones for a definition and information about how to create and configure a zone. You can associate suites with zones by using the Access points dialog box in the sidebar of the Zone information screen. See Access points for a description of the steps that you should follow.
You can view a list of zones that are associated with each suite in the system.
To view the zones associated with a suite, do the following:
Select Access points > Rooms. The Rooms screen is displayed. The Rooms screen shows a list of rooms and suites.
Click the suite with the zone list you want to view. The Suite information screen is displayed.
Click Zones in the sidebar. The Zones dialog box, showing a list of zones, is displayed.
To dissociate a zone from a suite, from the Zones dialog box, do the following:
- Select the Zone to be deleted.
- Click on Delete and confirm the action in the Warning dialog box.
Users
You associate users with suites in the same way as you associate user with doors. See the section on associating doors with users for further details.
Access levels
You associate access levels with suites in the same way as you associate access levels with doors. See the section on associating doors with access levels for further details.
Lockdown areas
You associate lockdown areas with suites in the same way as you associate lockdown areas with doors. See the section on associating doors with lockdown areas for further details.
The options you see for associating suites may differ depending on the type of license you have. Also, offline suites support automatic outputs, zones, users and access levels whereas online suites support zones, users, access levels and lockdown areas. Online CU5000 devices are the only online devices that support associating automatic outputs.