Manual synchronization in Space
Introducción
The Synchronization option refers to synchronizing the following:
This functionality differs from the Automatic CSV file synchronization and Automatic DB table synchronization scheduled jobs in that for those options you can program when and how often you want the jobs to be done. Meanwhile, the Synchronization options can be executed at a specific moment in time whenever you want.
The following sections describe how to synchronize CSV files and DB tables.
The synchronization functionality is license-dependent. See Registering and licensing Space for more information.
CSV file synchronization
CSV file synchronization allows you to synchronize user data from external system files with Space. For example, in a university installation, you can synchronize with the data in a student record system. You use data from a CSV or a text file to create entries and populate specified fields in Space. This means you can automatically transfer data from other systems (rather than entering the same data manually in Space).
The Salto document contains more information about CSV file synchronization. If you don't already have this document, contact your Salto partner or tech support team to receive a copy of it.
The automatic CSV file synchronization process consists of three steps:
Step one: Job configuration
To complete step one:
Select Tools > Synchronization. The Synchronization dialog box is displayed.
Select CSV file synchronization from the drop-down list.
Click OK. The Job configuration screen is displayed.
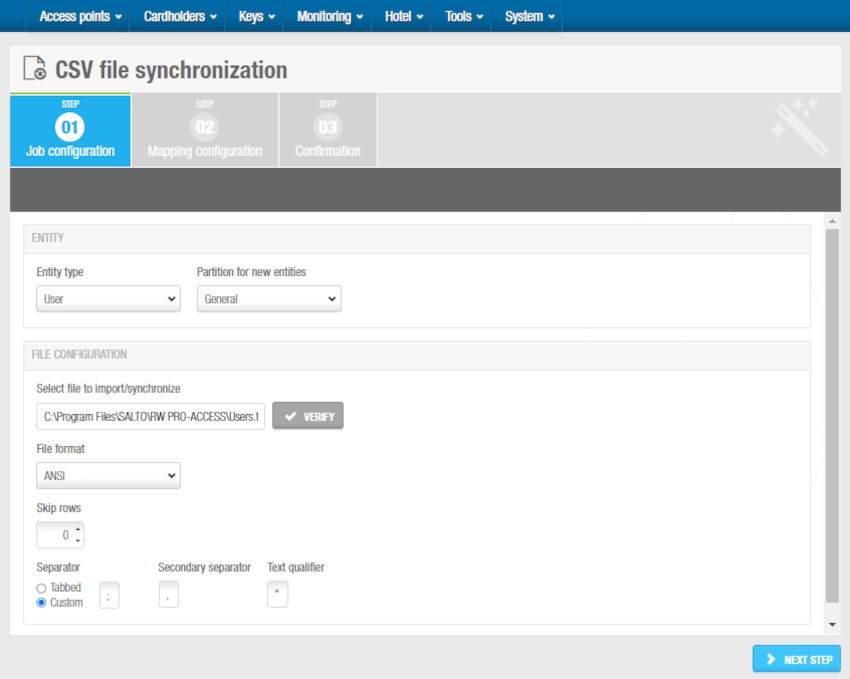
 CSV job configuration
- Select the Entity to import. Depending on your license, you can select the following entities: User, Door, Zone, User access level, Operator, Locker and Visitor.
For example, if you are synchronizing or importing doors, the fields shown will be those found in the door list.
The content of the fields may vary depending on if you are importing users, doors, user access levels or zones.
Select a partition from the Partition drop-down list if required.
Type the name of the file that you want to import in the Select file to import/synchronize field. You can click Verify to verify the file directory exists and is correct.
Select the appropriate format from the File format drop-down list.
Select the required number of rows by using the up and down arrows in the Skip rows field. This specifies the row in the file where you want to begin importing data.
Select either the Tabbed or Custom option. The Secondary separator and Text qualifier fields are automatically populated but you can change the characters in these fields if required. The text qualifier is used for text fields that contain spaces. The secondary separator is used to separate each entity, such as the access level ID, in the file.
Click Next step. The Mapping configuration screen is displayed.
Step two: Mapping configuration
To complete this step:
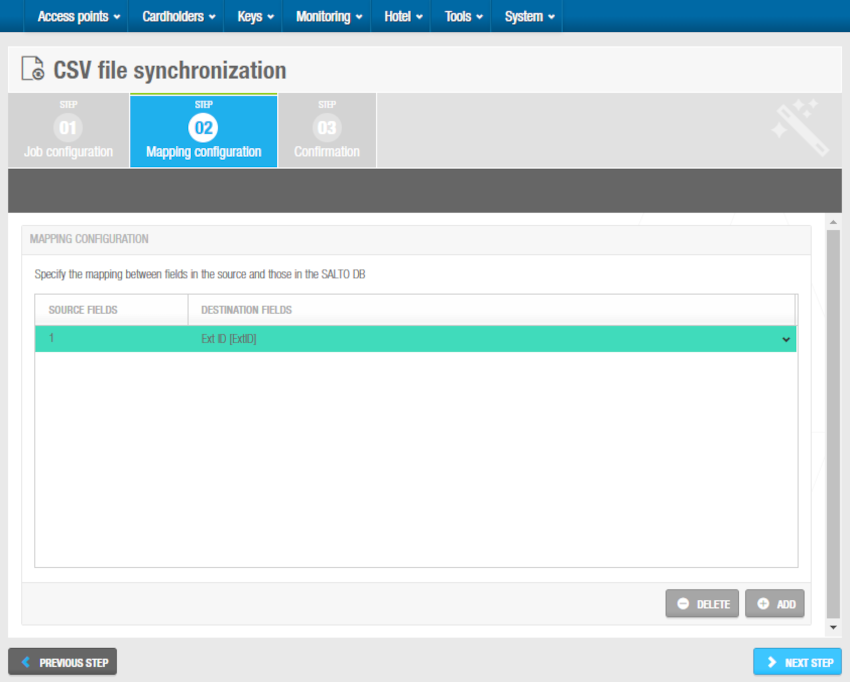
Click Add on the Mapping configuration screen. The number 1 is displayed in the Source fields column.
Click the arrow on the right-hand side of the entry to view the Destination fields drop-down list. The [Do not import] option is selected by default. The destination fields are the targeted Space options.
The Salto document contains more information about these fields. If you don't already have this document, contact your Salto partner or tech support team to receive a copy of it.
- Select the destination field to which you want to map the data from the source field. The selected option is displayed in the Destination fields column.
 CSV mapping configuration
- Repeat steps 1, 2, and 3 until you have specified the mapping between all the appropriate source and destination fields and the order of the fields.
You must select the Ext ID option as one of the destination fields to proceed to the next step. The extension ID is a unique ID that is used to identify users in the system. Selecting this option ensures that the file data is associated with the appropriate users.
- Click Next step. The Confirmation screen is displayed.
Step three: Confirmation
All the confirmation steps for the jobs described in this section are done in the same way. See Step three: Confirmation in the Default scheduled jobs section for more information and a description of the procedure you should follow.
Database table synchronization
Database table synchronization allows you to synchronize user data from external databases with the SALTO Space database. For example, in a university installation, you can synchronize with the data in a human resources database. You can access data stored in an external database and use it to create entries and populate specified fields in Space. This means you can automatically transfer data from other databases (rather than entering the same data manually in Space).
The Salto_User_Sync_Staging_Table document contains more information about database table synchronization. If you don't already have this document, contact your SALTO partner or tech support team to receive a copy of it.
The database table synchronization process consists of three steps:
Step one: Job configuration
To complete Step one:
Select Tools > Synchronization. The Synchronization dialog box is displayed.
Select DB table synchronization from the drop-down list.
Click OK. The Job configuration screen is displayed.
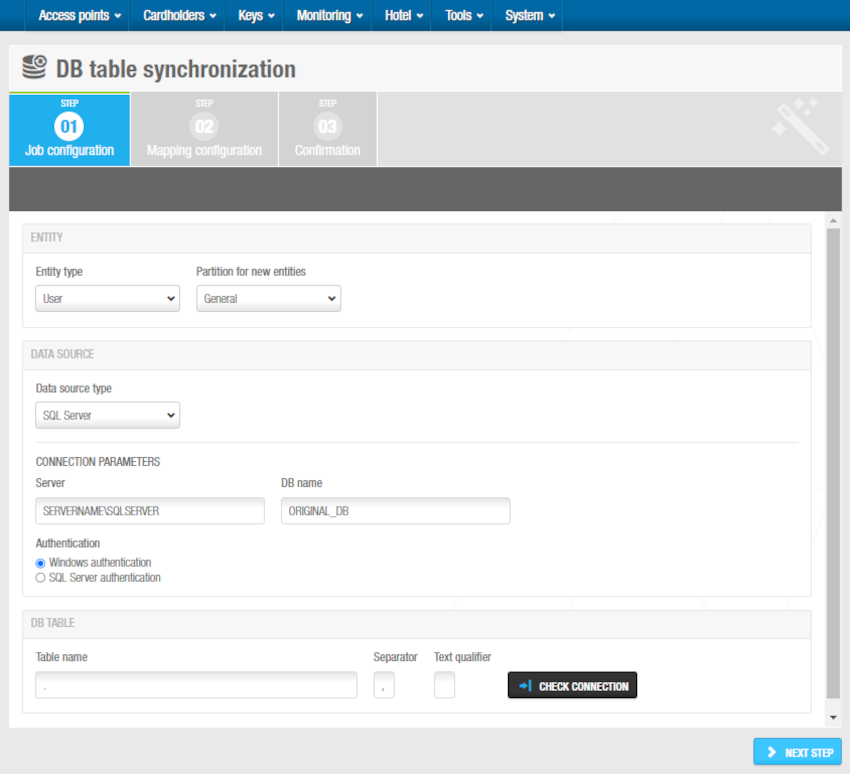
 DB table job configuration
- Select the Entity type to import. Depending on your license, you can select the following entities: User, Door, Zone, User access level, Operator, Locker and Visitor.
For example, if you are synchronizing or importing doors, the fields shown will be those found in the door list.
The content of the fields may vary depending on if you are exporting users, doors, user access level or zones.
Select a partition from the Partition drop-down list if required. See Partitions for more information about partitions. The data is only imported to the partition you select.
Select the appropriate data source type from the Data source type drop-down list. The available options are SQL server, Oracle and ODBC data sources.
Enter the required information in the fields inside the Connection parameters panel. The information you must enter in this panel varies depending on which option you select from the Data source type drop-down list.
In the DB table panel, type the name of the database table in the Table name field. The Separator field is automatically populated but you can change the character in this field if required.
Click Next step. The Mapping configuration screen is displayed.
Step two: Mapping configuration
To complete this step:
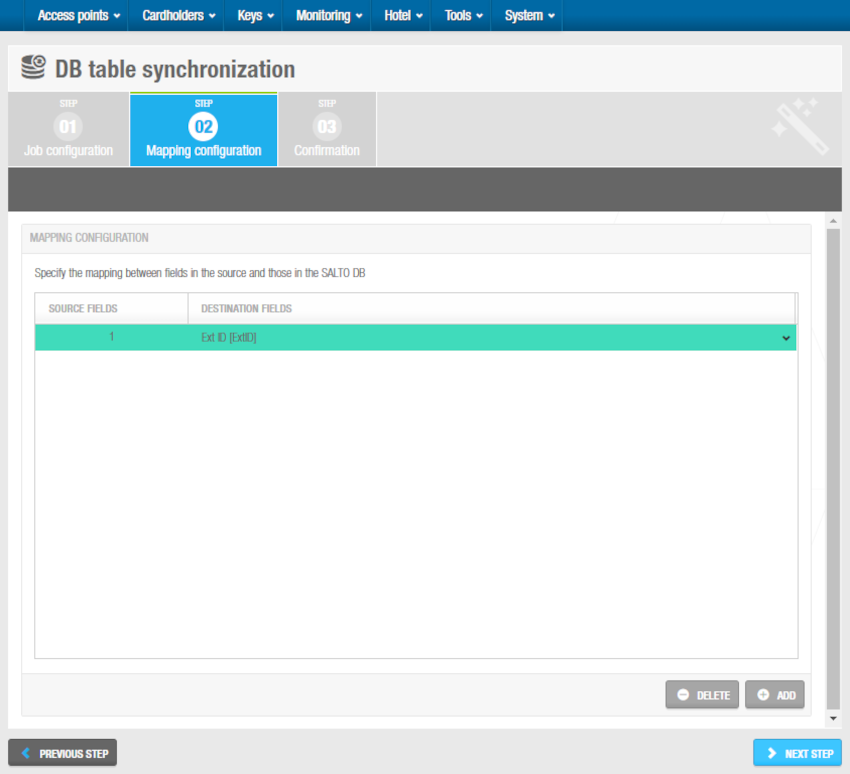
Click Add on the Mapping configuration screen. The number 1 is displayed in the Source fields column.
Click the arrow on the right-hand side of the entry to view the Destination fields drop-down list. The [Do not import] option is selected by default. The destination fields are the available Salto Space database fields to which you can import data. Once imported into the Space database, the information is then displayed in the appropriate field in Space.
The Salto_User_Sync_Staging_Table document contains more information about these fields. If you don't already have this document, contact your SALTO partner or tech support team to receive a copy of it.
- Select the destination field to which you want to map the data from the source field. The selected option is displayed in the Destination fields column.
 DB table mapping configuration
- Repeat steps 1, 2, and 3 until you have specified the mapping between all the appropriate source and destination fields and the order of the fields. You must select the following options as destination fields to proceed to the next step:
- Ext ID
- Control field (to be processed by Space)
- Control field (processed date/time)
- Control field (error code)
- Control field (error message)
The system uses these fields to write a report after database table synchronization occurs. If all of these options are not selected, the synchronization job cannot be performed.
- Click Next step. The Confirmation screen is displayed.
Step three: Confirmation
All the confirmation steps for the jobs described in this section are done in the same way. See Step three: Confirmation in the Default scheduled jobs section for more information and a description of the procedure you should follow.
 Atrás
Atrás
