Desktop readers in Space
Introducción
The Desktop reader functionality in Space refers to using a Salto NCoder device (a specific encoder model) to read data from keycards, and pass that data on to an external device.
These external devices are generally point of sale (POS) terminals which could be located, for example, in the restaurant of a hotel.
Desktop readers are configured to be continuously looking for a card. In the previously mentioned example, when a hotel guest places their card on the desktop reader, the desktop reader reads the card information and sends that data to the hotel property management system (PMS).
| Device | Descripción |
|---|---|
 NCoder | Only Salto NCoder devices can be configured to be used as desktop readers. Other Salto encoder types do not support this feature. |
NCoder devices have a USB 2.0 type-B connector and can be connected with a cable to a POS USB type-A terminal. The POS operating system must support USB-HID keyboards because the NCoder is enumerated as a USB-HID keyboard. NCoders are equipped with a USB interface that can be connected to the POS terminal.
Configuring desktop readers
Before configuring an NCoder as a desktop reader, the NCoder has to be initialized in Space. If the Ncoder has not been initialized yet, a warning will display. See also the section on adding encoders to Space.
Once initialized, do the following:
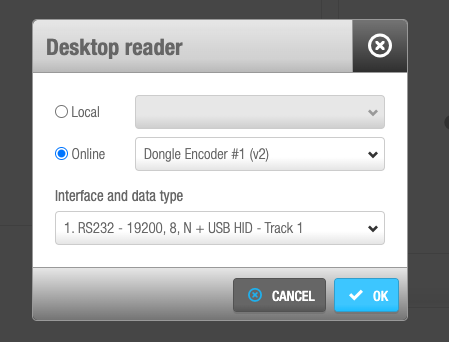
- Select System > Desktop reader. The Desktop reader dialog box is displayed.
 'Desktop reader' dialog box
Select Local if the encoder is connected by USB or select the Online option if you're configuring an Ethernet encoder.
Select the Interface and data type. See also the section on data. (If you select None, the Desktop reader functionality will be removed.)
Click OK. The NCoder is ready to be used as a desktop reader.
At this point the LED on the NCoder will blink yellow and green and emit a beep. This means that the desktop reader is active. From this point, the NCoder maintains the desktop reader configuration, and it can be unplugged from the machine that's running Space and be plugged in to the POS device.
If you want to go back to the previous state, connect the desktop reader to Space again and deactivate the previously set desktop reader configuration (select None), or set a new one.
Desktop reader connector
The NCoder is equipped with an USB 2.0 type-B port. A type-A cable is provided with the encoder and this must be connected directly to the POS. It is powered by the USB (5V, 500mA max).
The desktop reader is continuously looking for a card and when one is placed on top, it sends the data to the external device giving simultaneously a valid signal (green LED and beep).
CLR button
The CLR button can be used for the following purposes:
- Push while the power cycle is in progress. This erases all previous configuration and restores the NCoder to factory mode.
- Five-second pulse to start the Ethernet addressing mode (to connect the device to Space).
SAM programming process
SAM programming is done automatically through Space, when Desktop reader is selected. See SAM & issuing options for more information.
Desktop reader modes
The following table shows the available modes:
| Desktop reader mode | Sent data |
|---|---|
| Modes 1, 5, 9 | Track 1 |
| Modes 2, 6, 10 | Track 2 |
| Modes 3, 7, 11 | % + ROM14 + ? |
| Mode 12 | ROM14 |
Data
There are two types of data that can be read by the desktop reader:
| ROM code or serial number | This is a factory programmed code specific to each card. |
| Tracks | Emulates tracks 1, 2 and 3 of the magnetic strip cards. |
ROM code
The Salto ROM code is a 7-byte code that's specific to each card. Each byte is expressed as a double hexadecimal character so the total ROM code will be 14 ASCII characters (called ROM14).
Example:
| Format | ROM6 | ROM5 | ROM4 | ROM3 | ROM2 | ROM1 | ROM0 |
|---|---|---|---|---|---|---|---|
| Bytes | 0×11 | 0×22 | 0×33 | 0×44 | 0×55 | 0×66 | 0×77 |
| ROM14 | 11223344556677 |
ROM code and serial number
The relation between the ROM code and the card serial number depends on the technology of the card. This table shows the relationships for the following card technologies:
| Card technology | ROM6 | ROM5 | ROM4 | ROM3 | ROM2 | ROM1 | ROM0 |
|---|---|---|---|---|---|---|---|
| Mifare | UID0 | UID1 | UID2 | UID3 | 0×00 | 0×00 | 0×00 |
| Desfire Vicinity | UID0 | UID1 | UID2 | UID3 | UID4 | UID5 | UID6 |
| JustinMobile HCE & BLE | 0 | 0 | 0 | 0 | 0 | 0 | 0 |
- Mifare: The first four bytes are the Unique Identifier (UID) also called Serial Number (SN) of the Mifare card starting by the LSB (Least Significant Bit). Followed by three null bytes (0×00).
- Desfire: The seven bytes of the card UID (or Serial Number SN) starting by the LSB.
- ISO15693 Vicinity Cards: The seven lower bytes of the UID (or Serial Number SN) starting by the LSB and removing the UID7 that is always 0×E0 in ISO15693 cards. PicoPass cards are included in this type.
- JustinMobile: JustinMobile digital keys - HCE and BLE. Don't define any kind of UID or SN. If ROM code is required, the key responses all '0'-s ROM code. If these kind of keys are used, tracks must also be used.
Tracks
They emulate the tracks of the magnetic strip cards. There are three tracks available:
- Track 1
- Track 2
- Track 3
The information in the emulated tracks are ASCII characters. However, in the magnetic strip cards, track 1 carries alphanumeric data and track 2 and track 3 only carry numeric data.
Format
The desktop reader is identified as a keyboard by the POS operating system. The desktop reader converts the track and ROM bytes in Unicode and sends them through the USB-HID interface. Supported Unicode characters are from U+0020 (Space) to U+00FF (ÿ). Non-printable ASCII characters are filtered, except the special characters shown in the following table. In those cases, the characters are mapped to common keyboard key strokes:
| ASCII | Keyboard | ||
|---|---|---|---|
| Dec | Hex | Char | |
| 8 | 0×08 | BS | Backspace |
| 9 | 0×09 | TAB | Tab key |
| 13 | 0×0D | CR | Return key (enter) |
| 27 | 0×1B | ESC | Escape key |
Example
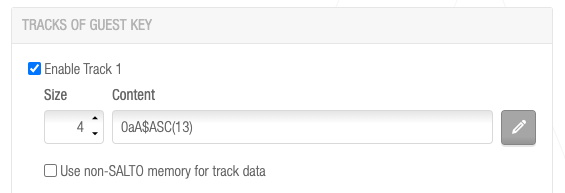
If the Track is defined as "0aA$ASC(13)":
 Track format example
- In the card, the following bytes are written: 0×30, 0×61, 0×48, and 0×13.
- The desktop reader will map the correct Unicode characters to the printable ASCII characters, U+0030, U+0061, U+0048 and the Enter key for the non-printable 'Carriage return (CR)' ($ASC(13)) character.
- It is the same effect if you push ALT plus the decimal values of each character in your keyboard: ALT + 48, ALT + 65, ALT + 97, and the Enter key.
Card technologies
The desktop reader supports the following RW technologies:
- ECB04B0: Mifare series: Mifare, Mifare Plus, Desfire, Ultralight C, ICODECS20, VTI256, SKIDATA FlexSpace and JustinMobile (HCE and BLE).
- ECJ04B0: iClass series: HID iClass, iClass SEOS and JustinMobile (HCE and BLE).
Please also refer to the Desktop reader mode section of the NCoder installation guide.
 Atrás
Atrás
