Configuring Mifare settings in Space
Introducción
These instructions refer to configuring cards with the NCoder device. Note that the process differs slightly if you're using the Encoder (Legacy) device. We recommend using the newer NCoder device for Mifare key encoding.
You can configure the settings for Mifare technology from the SAM and issuing data tab.
This process involves two steps:
Entering the SAM card data using the Read SAM card button. Note that this step adds the SAM keys to Space.
Entering the data for issuing Mifare Classic 1K, Mifare Classic 4K, Mifare Plus 2K and Mifare Plus 4K keys using the Issuing data tabs.
It is assumed that operators who configure Mifare settings are familiar with the technologies and associated terms mentioned in this section.
Note that the key issuing functionality is license-dependent. See Registering and licensing Space for more information or contact your Salto representative.
Step one: entering the SAM card data
Select System > SAM & Issuing options.
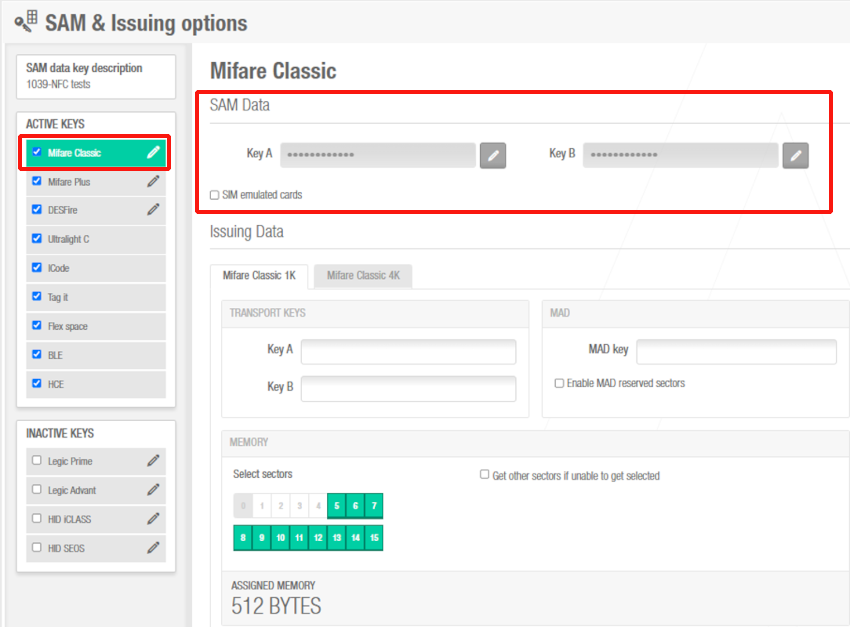
Click the pencil of the corresponding Mifare technology in the Active keys left hand panel. SAM data displays information that is transferred to the Salto locks, encoders, and readers.
 SAM data dialog box
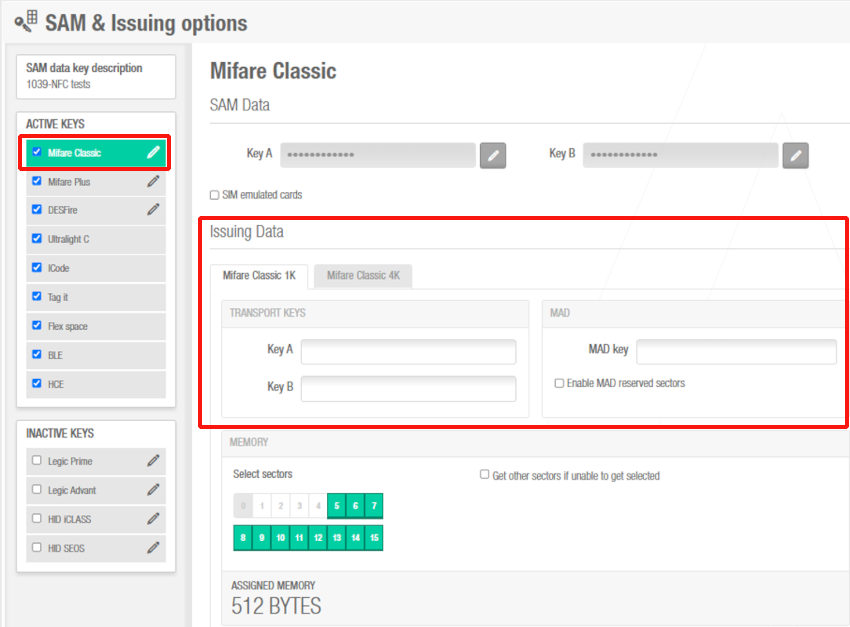
Issuing data displays information required for issuing keys.
 Issuing data dialog box
The Mifare Classic and Mifare Plus fields are editable if you have the SAM custom keys defined by user functionality enabled in your license. In this case, you can add the key data manually in the required fields. Otherwise, these fields are automatically populated with the relevant Mifare Classic and Mifare Plus keys data when you read the SAM card.
In special cases, the system can be configured to allow operators to create SAM cards and use them with Space. You should consult with your Salto technical support contact if you want to activate this option.
Click Read SAM card if required. A pop-up is displayed asking you to place the key on the encoder. This copies the key data on the SAM card to Space.
Place the appropriate SAM card on the encoder when the LED light begins to flash. Once the SAM card is read, the keys are saved in the system database. They have to be transferred to:
- The encoder by clicking the Supported keys button (see below).
- The access points by initializing them using a PPD or via online.
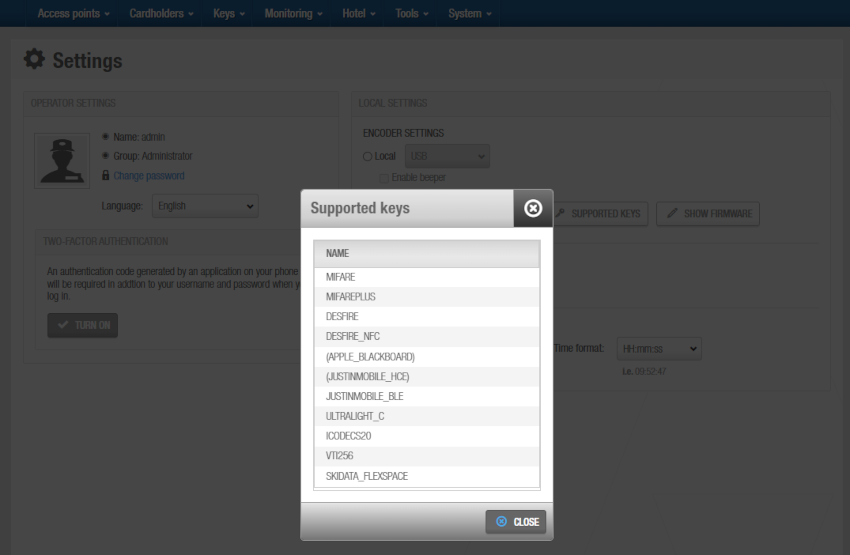
By clicking Supported keys on the Encoder settings panel in the Settings screen, the keys are transferred to the encoder. The Supported keys dialog box displays showing the encoder's active reading technologies.
 'Supported keys' button
Select the SIM emulated cards checkbox if required. You should consult with your Salto technical support contact if you require additional information about this option.
Click Save. When you click Save, the key data is masked on the screen for security purposes.
Step two: entering the data for issuing keys
To complete this step go to the Issuing data section and follow the instructions below:
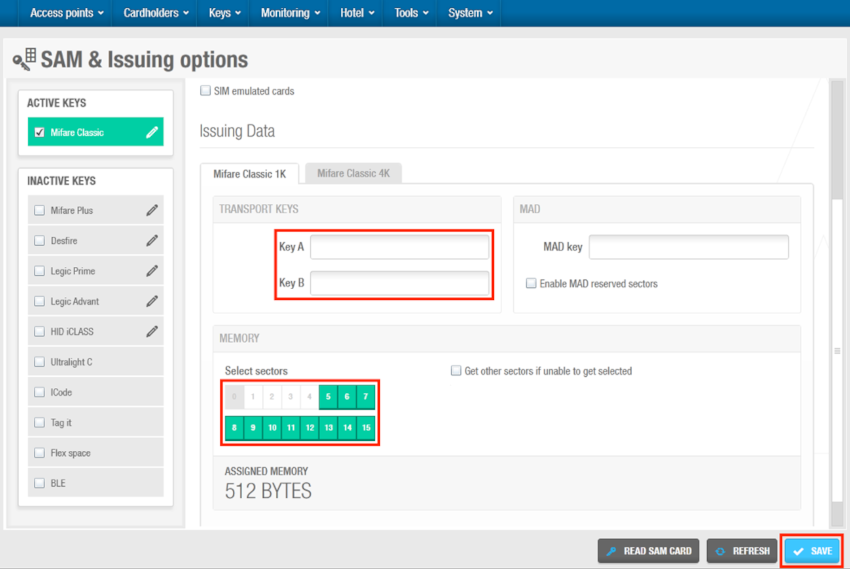
 Issuing data panel
The Mifare 1K option is selected in the Card type panel by default.
If required, type the required keys in the Key A and Key B fields in the Transport keys panel. You must use hexadecimal format. Note that you may need to request these from your Salto technical support contact. If used cards do not have the factory default keys, the transport keys should be defined for the readers to be able to change them to the installation ones.
If required, type the Mifare Application Directory (MAD) key in the MAD key field. You must use hexadecimal format. All Mifare keys have a MAD, which is the directory of the key, and contains data about the properties of the key sectors.
Click Read SAM card. A pop-up is displayed asking you to place the key on the encoder.
Place the appropriate SAM card on the encoder when the LED light begins to flash.
In the Memory panel, select the Get other sectors if unable to get selected checkbox if required. This option allows Space to select another key sector if a selected sector is already in use by another application.
In the Transport keys panel, select the Enable MAD reserved sectors checkbox if required. This enables the MAD key and secures reserved sectors on the key for Space.
Select the checkboxes for the appropriate key sectors in the Memory panel. The selected sectors will be reserved for the Salto application when assigning the keys to users.
Note that you can only reserve sectors in keys if you are using a SAM card distributed by Salto. The amount of space reserved for Salto data in keys is displayed in the Assigned memory field. You cannot manually amend the value that is shown in this field.
Repeat the process to complete the configuration for the Mifare 4K, Mifare Plus 2K, and Mifare Plus 4K options in the Card type panel.
When you select each option, the screen is updated to show the appropriate configuration fields. The checkboxes and the number of key sectors available vary for each option.
You can reserve up to 39 key sectors when configuring the Mifare 4K and Mifare Plus 4K keys. If you need to encode these keys with information from multiple installations (rather than a single Salto installation), you must assign at least one of the last four sectors (36, 37, 38, and 39) to each installation. The maximum number of installations that can be included in these key types is four. You are required to SAM the Mifare readers if you use this option, so they can operate effectively.
For more information on Mifare keys, please contact your Salto technical support team.
 Atrás
Atrás
