Users tab in Space General options
Introducción
You can activate or amend options for users and select options for automatic key assignment by using the Users tab.
Select System > General options > Users to view the tab.
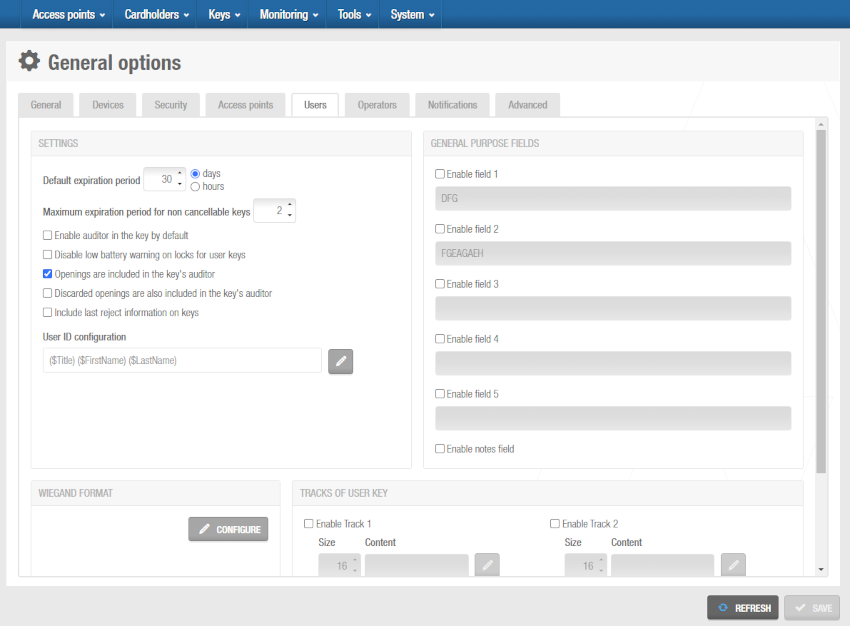 'Users' tab
Users tab panels items
Ajustes
| Item | Descripción |
|---|---|
| Default expiration period | Defines a default revalidation period for user keys. This can be a period of days or hours. The time parameters you select are displayed in the Update period field in the User and key expiration panel on the User information screen in Space. However, you can amend these parameters for individual users if required. See User and key expiration for more information. |
| Maximum expiration period for non cancellable keys | Defines the maximum revalidation period that is allowed in the system for non cancelable user keys. Non cancelable keys are keys that are not sent to the denylist when you cancel them. The default option is three days. You can amend this value if required but it cannot be higher than seven days. See Managing denylists for more information. To activate this option, you must enable the MORE_THAN_64K_USERS parameter in System > General options > Advanced. See Advanced tab for more information. |
| Enable auditor in the key by default | Controls whether the Enable auditor in the key checkbox is selected by default when creating a new user. See Key options |
| Disable low battery warning on locks for user keys | Controla si las cerraduras emiten un sonido de advertencia de batería baja cuando se están utilizando llaves de usuario. If the lock battery is low, the reader emits four successive beeps of one second in duration. Note that low battery warnings are displayed in the audit trail by default. |
| Openings are included in the key's auditor | Controls whether opening events are included in audit trail entries for user keys. |
| Discarded openings are also included in the key's auditor | Controls whether failed opening events are included in audit trail entries for user keys. |
| Include last reject information on keys | Controls whether data about a user's most recent failed access attempt is stored on keys. When you select this option, you can access the data by reading keys. See Reading keys for more information. |
| Hide ROM code for automatic key assignment | Hides the ROM code field in the user profile. |
| User ID configuration | Defines the format of user IDs. There is a default format on the system but you can amend this if required. See Configuring user IDs for more information. |
General purpose fields
| Item | Descripción |
|---|---|
| Enable field | Allow you to add up to five general purpose fields for users. When you select the checkbox for each field, it is displayed on the User information screen in Space. You can name the general purpose fields in accordance with the information you want to capture by typing a name in the field underneath each checkbox. |
| Enable notes field | When you select this checkbox, the Notes field is displayed in the User information screen. It allows you to add some notes in the User information screen. |
Wiegand format
| Item | Descripción |
|---|---|
| Wiegand format | Defines the code format for Wiegand keys. See Configuring Wiegand codes for more information. |
JustIN Mobile app settings
| Item | Descripción |
|---|---|
| Default notification message | Allows you to enter a default notification message for JustIN Mobile app keys. Users receive this message when these types of keys are sent to their phones. |
Tracks of user key
| Item | Descripción |
|---|---|
| Enable Track #1 | Enables track 1 on user keys. When you select this checkbox, you can use the track to write additional data on user keys. See Configuring tracks for more information. |
| Enable Track #2 | Enables track 2 on user keys. When you select this checkbox, you can use the track to write additional data on user keys. See Configuring tracks for more information. |
| Enable Track #3 | Enables track 3 on user keys. When you select this checkbox, you can use the track to write additional data on user keys. See Configuring tracks for more information. |
| Wiegand code | Activates the Wiegand code option for users. When you select this checkbox, the Wiegand code is written on user keys when they are encoded. Also, a Wiegand code field is displayed on the User information screen in Space. This field is automatically populated during data synchronization jobs. You can also edit the field manually if you have the required code. You must select either the Profile code or Constant code option when you select the Wiegand code checkbox. The profile code is the code included in user profiles. The constant code is a fixed code that is the same for all users. If you select the Constant code option, you must enter the constant code in the Constant code field. |
Automatic key assignment
| Item | Descripción |
|---|---|
| Automatic key assignment enabled | Specifies a mode for automatic key assignment. You must select the #1 option, which is the standard mode. SHIP cardholder must be selected only if a SHIP integration exists. This allows an automatic key assignment for users created with SHIP. The #2 option is used by Salto staff for demonstration purposes only, as it allows the reuse of canceled keys for automatic key assignment. See Assigning keys automatically for more information. |
| Card serial number | Controls whether the serial numbers of keys are used for automatic key assignment. You must select either the Card serial number or In-memory code option. See Assigning keys automatically for more information. |
| In-memory code | Controls whether key data is used for automatic key assignment. This allows you to use codes that are located in a specific sector in keys that is specified by the key manufacturer. You must select either the Card serial number or In-memory code option. See Assigning keys automatically for more information. |
Configuring user IDs
The system does not allow you to create two cardholders with the same name. However, you can configure user IDs to include the information contained in various user-related Space fields. This option applies to users only. In cases where two users have the same name, for example, you can use this option to change the default format of user IDs to make each one unique. User IDs are displayed in the Name column on the Users screen in Space.
To configure the format of user IDs, do the following:
Select System > General options > Users.
Click the edit (pencil icon) button on the right-hand side of the User ID configuration field. The User ID configuration dialog box, showing the default macro format for user IDs, and a list of available macros, is displayed. The default macro format is displayed in the Content field.
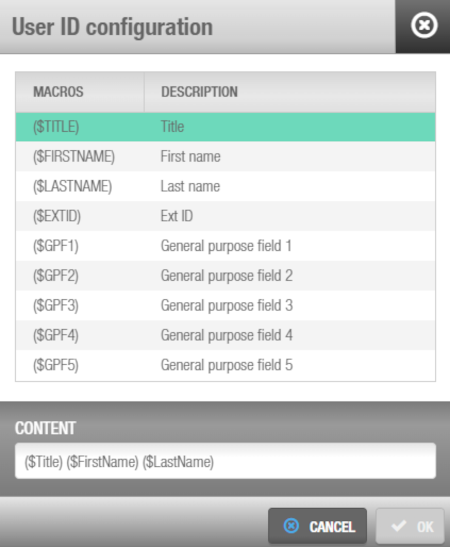 'User ID configuration' dialog box
Double click the required macro in the Macros column to add it to the Content field. You can place the cursor where you want to insert a macro within the existing entry in the Content field, or delete the entry to insert a new macro format.
Click OK when you have finished inserting macros and the correct macro format is displayed in the Content field.
Save the changes. The new user data is now displayed in the Users screen.
Configuring Wiegand codes
Wiegand codes are used by external applications such as time and attendance software to identify individual users. You can configure the Wiegand code in Space General options.
You must complete the following steps:
Define the parts of the Wiegand code.
Define the format of the Wiegand code.
The sections below describe how to complete each step.
Step one: defining the parts of the Wiegand code
To complete the first step do the following:
Select System > General options > Users.
Click Configure in the Wiegand format panel. The Wiegand format configuration dialog box is displayed.
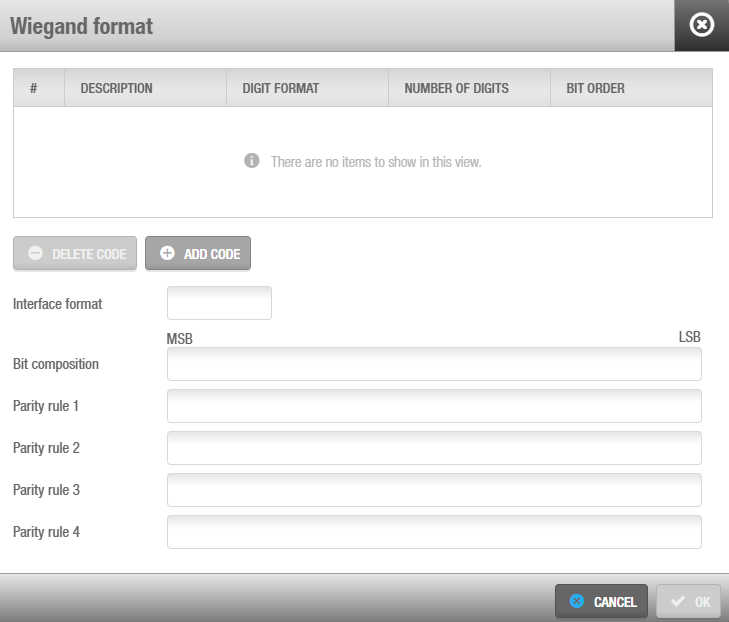 'Wiegand format' dialog box
- To understand how to correctly set up a Wiegand code, the explanation below focuses on the Standard 26-bit Wiegand format. The example follows the below specifications:
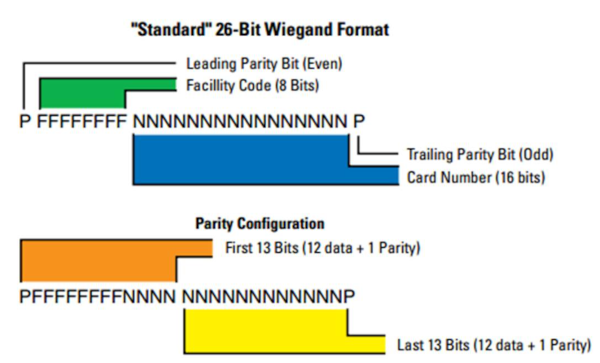 Standard 26 Wiegand format
This example uses hexadecimal format. One byte equals 8 bits, and one byte is represented by two digits in hexadecimal format (from 0 to 9, and from A to F). This means that a 26-bit Wiegand code will be represented by 24 data bits (8 × 3 bytes), with two additional bits for the parity.
Based on the above example, a Wiegand code represented by two groups of bits would have to be configured to correctly represent the "Facility Code" and "Card Number" data of the example:
 Facility code and Card number data
- Click on the Add code button:
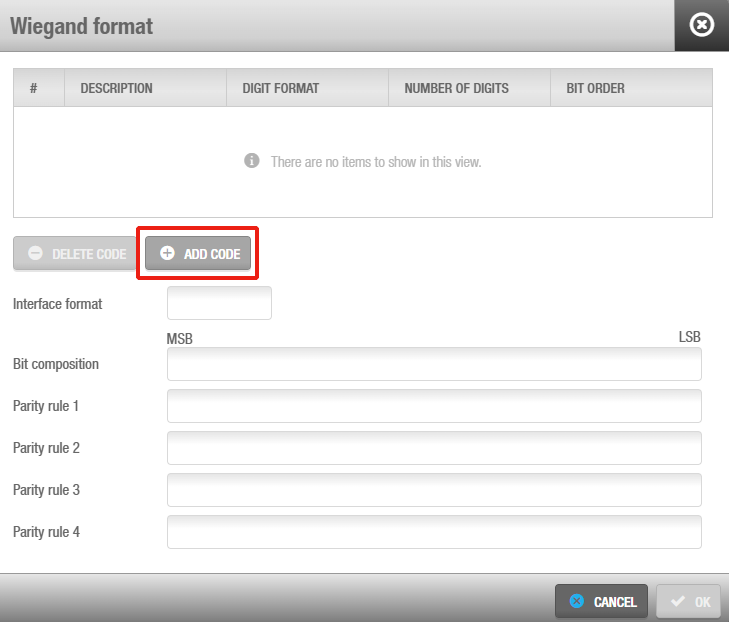 'Wiegand format' dialog box - Add code
This allows you to specify the different parts that make up the Wiegand code, and define their characteristics:
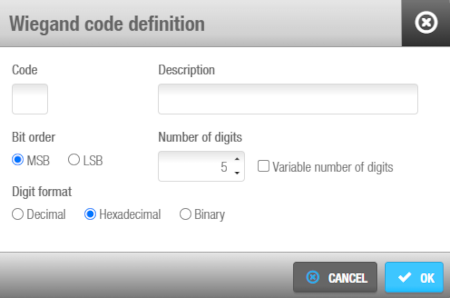 'Wiegand code definition' dialog box
Type in a letter to identify the code in the Code field. Any letter can be entered except 'P', as this is used to identify the parity of the codes at the beginning and end of the Wiegand code.
Type in a description for the code in the Description field.
Select the appropriate bit ordering option for the code. If you select the MSB option, the bit order will begin with the most significant bit. If you select the LSB option, the bit order will begin with the least significant bit.
Type in the appropriate number of code digits in the Number of digits field. The default value is 5 but can be changed if required. Following the example, the "Facility Code" is defined as code A, and 1 hexadecimal byte (8 data bits) would be represented with 2 digits. "Card Number" would be represented with code B, and 2 hexadecimal bytes (16 data bits) would be represented with 4 digits.
Select the Variable number of digits checkbox if required. You must select this checkbox if the code has a variable number of digits. When you select it, the value in the Number of digits field is automatically set to 0.
Select the appropriate digit format for the code, selecting the decimal, hexadecimal or binary format.
Click OK. The code details are displayed in the list of codes, as can be seen on the image below:
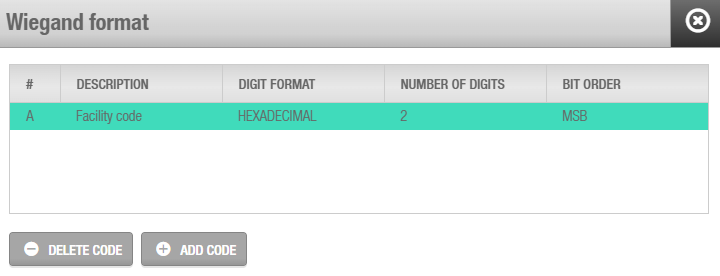 Wiegand code added to the 'Wiegand format' dialog box
Double click to view or change the code details or click Delete code to delete the code.
Click Add code again and repeat the process for each required code.
Step two: defining the format of the Wiegand code
To complete the second step do the following:
- Type in the separators that you want to use for the codes in the Interface format field once you have finished adding codes. This controls how the codes are communicated between the different components in the system. For example, if you have three codes named A, B, and C, you can type 'A-B/C'. In this case, code A is separated from code B by a dash (-), and code B is separated from code C by a slash (/).
The practical example used in this section would require a format like A-B:
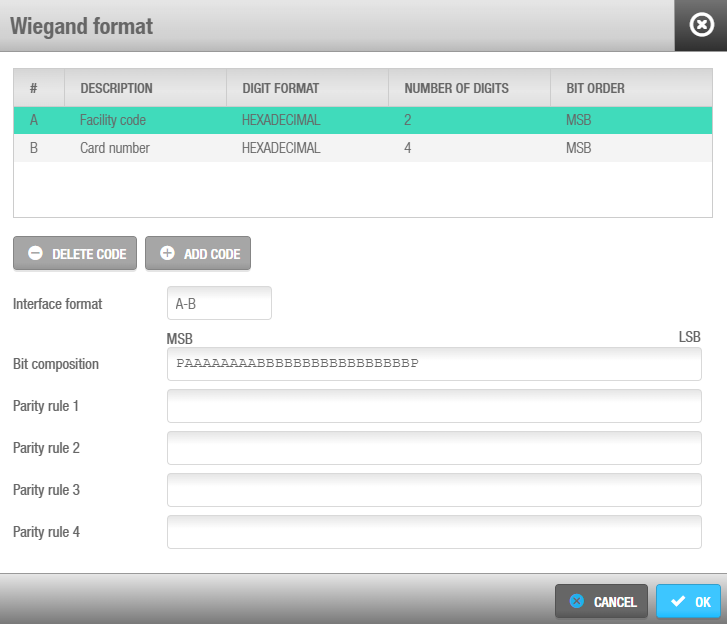 'Interface format' and 'Bit composition' fields in the 'Wiegand format' dialog box
- Type in the appropriate order of the Wiegand code in the Bit composition field. This defines how each Wiegand code that you have created in the code list is ordered. The length of the entry should correspond to the number of digits for each code you included, and it should begin and end with the parity (P). In the example from above, if the codes A and B contain 8 and 16 digits respectively, you should enter 'PAAAAAAAABBBBBBBBBBBBP'. The parity indicates whether the number of bits is odd or even.
Once the codes, interface format, and bit composition are defined, parity rules must be configured:
 Parity rules configuration
- As per the example above, 13 (12 data + 1 parity) even parity bits and 13 odd parity bits (12 data + 1 parity) should be defined. Therefore, type in the appropriate parity format for even numbers in the Parity rule 1 field, and the appropriate parity format for odd numbers in the Parity rule 2 field. The parity is calculated according to the specified order so it is important that this is entered correctly. The text you enter should correspond to each bit in the Wiegand code. Enter an 'X' for bits you do want to be used and a dash (-) for the bits you do not want to be used to calculate the parity on each case.
The system will assist on configuring properly the parity rules, specifying the remaining digits to be inserted:
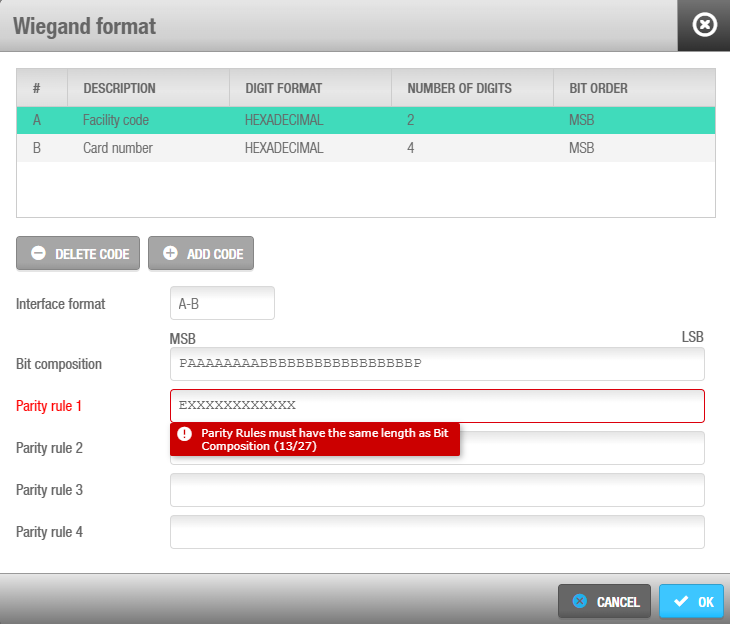 Remaining digits warning in the Wiegand parity rules
It will also warn in case the number of digits to be configured exceeds the required length.
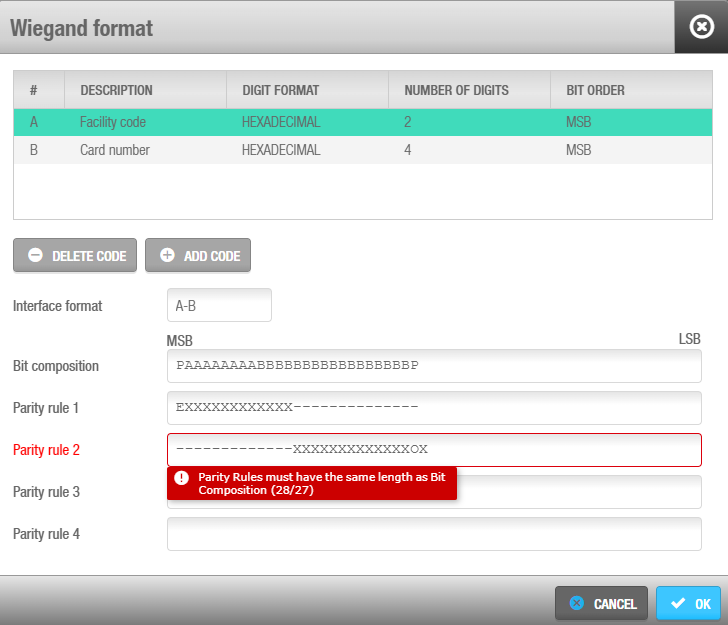 Exceeded digits warning in the Wiegand parity rules
In summary, the example used on this page would look like the following:
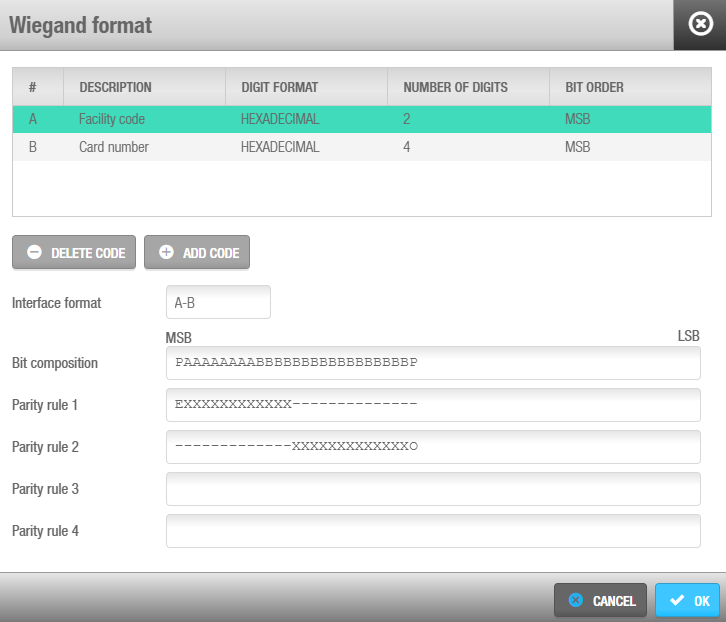 Wiegand format configured
Additional parity rules can be specified in the Parity rule 3 and Parity rule 4 fields if required.
Click OK when the Wiegand code configuration is complete and correct. The software will show the configured Wiegand code interface format on the Users tab:
 Wiegand code configured in the 'Users' tab
Configuring tracks
Keys have three tracks or areas in which you can encode data (track 1, track 2, and track 3). You can enable these tracks on user and guest keys to store information from specific Space fields, such as room names, or key expiration dates. See Users tab panel items for more information. You must define what data is written on each track, and this is displayed when you read keys. See Reading keys for more information about reading keys.
To configure a track, do the following:
Select System > General options > Users.
Select the checkbox for the required track.
Type the appropriate value in the Size field. This defines the number of bytes on the key that are used for the track.
Click the edit button on the right-hand side of the Content field. The Notification message dialog box is displayed. This dialog box allows you to specify the data that is written by default when new keys are encoded.
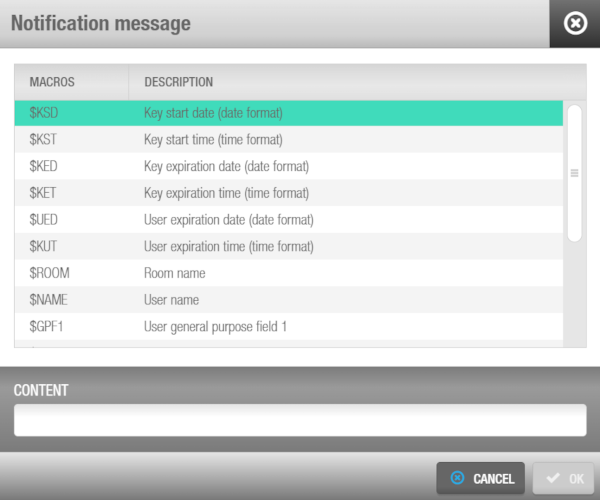 'Notification message' dialog box
Double-click the required macro in the Macros column to be displayed in the Content field. Macros are available for a number of the fields in Space. Note that you can use the $ASC macro for ASCII characters or non-printable characters. You can include a constant value before or after each macro by typing it in the Content field, for example, 'Date' or '-'.
Click OK when you have finished inserting macros and the correct macro format is displayed in the Content field.
Enabling automatic key assignment
You can configure the system to assign keys to users automatically. See Assigning keys automatically for more information about usage.
Note that this functionality is license-dependent. See Registering and licensing Space for more information.
To configure the settings for automatic key assignment, follow the steps below:
Select System > General options > Users.
Select the Automatic key assignment enabled checkbox.
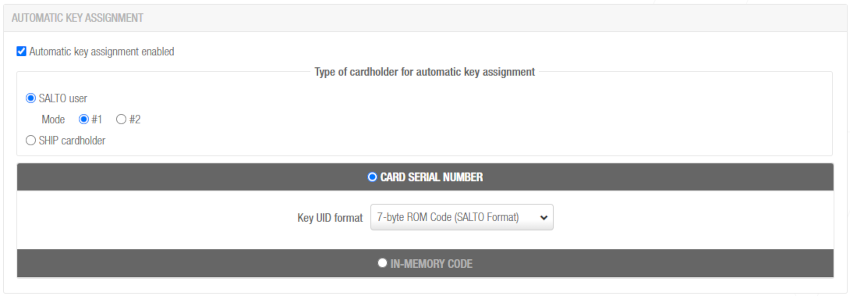 'Automatic key assignment' panel
Select the appropriate mode in the Type of cardholder for automatic key assignment panel. See Automatic key assignment for more information on the Salto user (Mode #1 and Mode #2) and the SHIP cardholder options.
Select either the Card serial number or the In-memory code option.
You should select the Card serial number option if you want to use the serial number of keys for the automatic key assignment. This means the Salto readers will use the ROM or Unique Identifier (UID) to identify user keys. When you select this option, you must select the appropriate UID format from the Key UID format drop-down list. The default option is 7-byte ROM Code (Salto Format) but you may need to select a different option, depending on the type of keys you are using. It is important to select the correct option so that the Salto readers can correctly read the keys. You can also select the In-memory code option if you want to use another code instead of the serial number for the automatic key assignment.
Salto readers include any device that can read keys, including wall readers, electronic locks, or encoders.
- Click Save.
 Atrás
Atrás
