Ubicaciones en Space
Introducción
En el sistema Space, una ubicación es un área grande de puntos de acceso designados. Por ejemplo, una empresa podría crear una entrada de ubicación para cada una de sus oficinas en Australia, en Sídney, Melbourne y Perth. Puedes asignar acceso para cada ubicación.
A continuación, se describe una forma sencilla de completar este proceso:
Agrupaciones de ubicaciones añadidas. El operador administrador añade la agrupación de ubicaciones en Space Opciones generales. Consulta la pestaña Ubicaciones/Funciones para obtener información sobre cómo añadir una agrupación de ubicaciones.
Ubicaciones creadas y configuradas. El operador administrador crea ubicaciones y configura las opciones de ubicación en Space.
Ubicaciones asociadas. El operador administrador asocia usuarios o puntos de acceso con las ubicaciones especificadas en Space.
Creación de ubicaciones
Para crear una ubicación, haz lo siguiente:
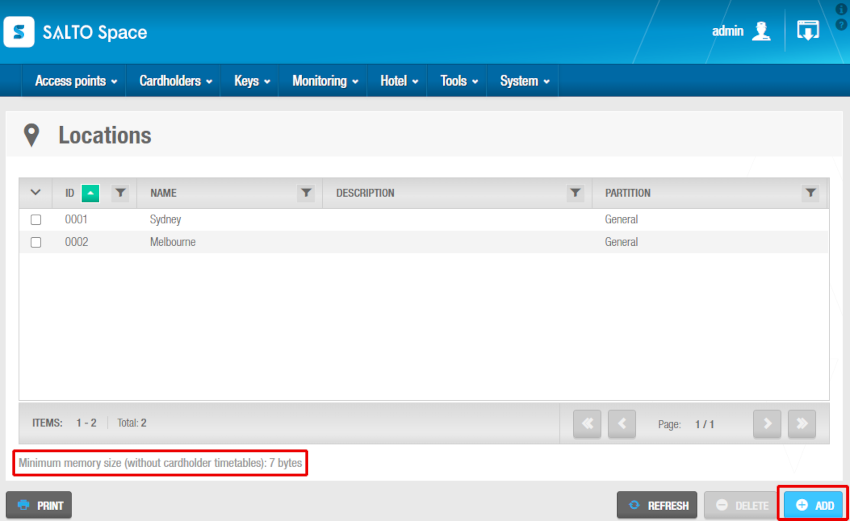
- Selecciona Puntos de acceso > Ubicaciones. Se muestra la pantalla Ubicaciones.
 Pantalla de ubicaciones que muestra el mensaje de tamaño mínimo de memoria
El número de ubicaciones que crees en Salto Space ocupa una cantidad fija de memoria en las llaves. La memoria máxima de la llave suele ser de unos 230 bytes, pero puede ser menor dependiendo de la tecnología de la llave. El texto "Tamaño mínimo de memoria (sin horarios de titular de tarjeta)" indica el tamaño del espacio fijo asignado.
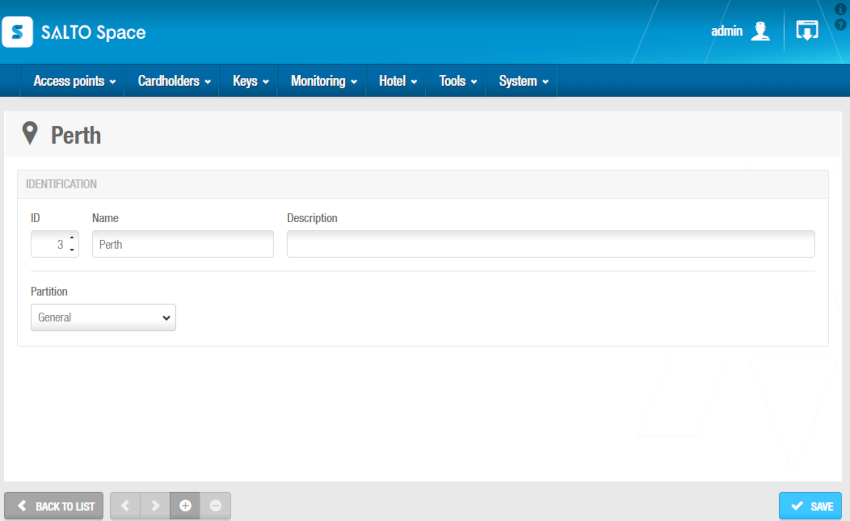
- Haz clic en Añadir. Se muestra la pantalla de información de la ubicación.
 Pantalla de información de la ubicación
- Escribe un nombre para la ubicación en el campo Nombre, una descripción para la ubicación en el campo Descripción y selecciona la partición correspondiente de la lista desplegable Partición, si es necesario. Consulta Particiones para obtener más información.
Ten en cuenta que la funcionalidad de particiones depende de la licencia. Consulta Registro y licencia de Space para obtener más información.
- Haz clic en Guardar.
El campo ID se rellena automáticamente, pero los números del 1 al 1024 se pueden editar si es necesario.
De forma predeterminada, si te saltas los números de ID, por ejemplo, del 5 al 125, Salto reserva el espacio de memoria entre estos números, incluso si no se crean números de ID. Esto significa que se ocupará innecesariamente una cantidad de memoria en las llaves y, por lo tanto, Salto recomienda utilizar esta configuración predeterminada.
Salto Space genera un error si introduces un valor superior a 1024.
Asociación de ubicaciones
Una vez que hayas creado una ubicación, debes asociar usuarios y puntos de acceso con esa ubicación. Un ejemplo de usuario podría ser un miembro del personal que habitualmente trabaja en esa ubicación. Por ejemplo, para una ubicación en Sídney, podrías proporcionar a un administrador de TI acceso a todas las áreas de TI de esa ubicación. Las siguientes secciones describen cómo asociar ubicaciones con los distintos componentes.
Usuarios
Para asociar un usuario a una ubicación, haz lo siguiente:
Selecciona Puntos de acceso > Ubicaciones. Se muestra la pantalla Ubicaciones.
Haz clic en la ubicación que quieras asociar a un usuario. Se muestra la pantalla de información de la ubicación.
Haz clic en Usuarios en la barra lateral. Se muestra el cuadro de diálogo Usuarios. Ten en cuenta que el cuadro de diálogo estará en blanco si aún no has asociado un usuario con esta ubicación en particular.
Haz clic en Añadir. Se muestra el cuadro de diálogo Añadir, que muestra una lista de usuarios.
Selecciona los usuarios necesarios y haz clic en Guardar y cerrar. El usuario seleccionado ahora tiene permisos de acceso para esa ubicación.
Puntos de acceso
Consulta Acerca de los puntos de acceso para obtener más información.
Para asociar una ubicación con un punto de acceso, sigue los pasos que se indican a continuación:
Selecciona Puntos de acceso > Ubicaciones. Se muestra la pantalla Ubicaciones.
Haz clic en la ubicación que quieras asociar a un punto de acceso. Se muestra la pantalla de información de la ubicación.
Haz clic en Puntos de acceso en la barra lateral. Se muestra el cuadro de diálogo Puntos de acceso. Ten en cuenta que el cuadro de diálogo estará en blanco si aún no has asociado un punto de acceso con esta ubicación en particular.
Haz clic en Añadir. Se muestra el cuadro de diálogo Añadir, que muestra una lista de puntos de acceso.
Selecciona el punto de acceso requerido y haz clic en Guardar y cerrar. La ubicación ahora está asociada con ese punto de acceso.
 Atrás
Atrás
