System auditor in Space
Overview
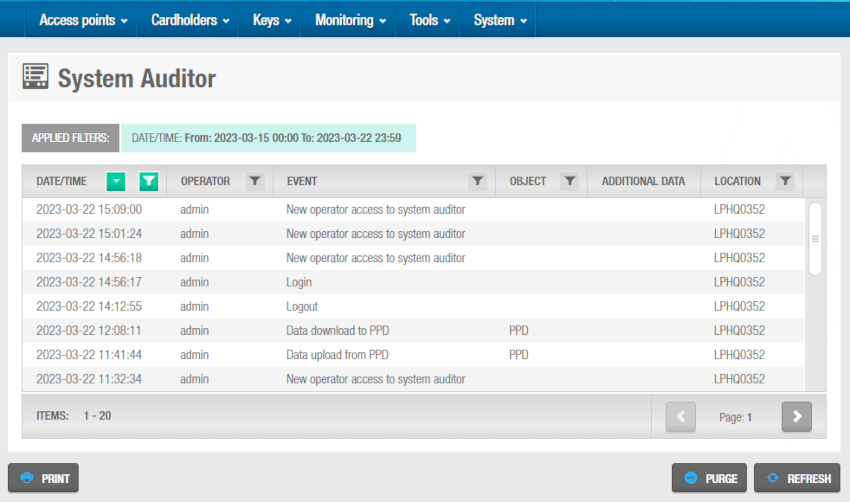
The System auditor information screen shows a list of all system operator events. Each event has a date and time stamp. By default, the System auditor information screen shows events for the previous seven days. To see earlier events, you must define the specific date range in the Date/Time filter. See Filtering system auditor data for more information.
The audit trail and system auditor track different system information. The System auditor information screen shows system and operator events. The Audit trail information screen shows events related to access points and their associated devices, like nodes or relays.
See Collecting audit trail data from offline doors for information about how to collect audit trail data from offline doors.
To access the System auditor information screen select System > System auditor.
 'System auditor' information screen
Exporting system auditor lists
You can select System > System auditor and click Print on the System Auditor information screen to export the list to a specified file format. See Exporting data in Space for more information and a description of the steps you should follow.
Filtering system auditor data
You can filter the system auditor data by event data/time, operator, event, object, and/or location.
See System auditor filters for more information.
To filter the system auditor data, follow the steps below:
Select System > System auditor. The System auditor information screen is displayed.
Click the Funnel icon above the filter item. A search dialog box is displayed.
![]() You can filter the system auditor data by clicking the funnel icon
You can filter the system auditor data by clicking the funnel icon
For example, if you want to filter by operator, click the Funnel icon at the top of the Operator column and type a name. For the Object filter, you can see a predefined drop-down list of search terms by clicking on the down arrow in the dialog box. For the Date/Time range, you can define a date range by using the From and To fields.
- Type your search term.
Or
Select a predefined search term from the drop-down list.
Or
Select a date range.
You can apply multiple filters. The applied filters are displayed, highlighted in green, at the top of your screen. You can click the Close icon on an applied filter to remove it. However, you cannot remove the Date/Time filter.
- Click the Search icon. A filtered system auditor list is displayed.
System auditor filters
You can use the System Auditor information screen filters to display only certain events.
The options are described in the following table.
| Icon | Description |
|---|---|
| Date/Time | Date and time upon which the event took place. |
| Operator | Type of the operator who performed the event. |
| Event | Details of the event. For example, check-in, new key edited, automatic purge. |
| Object | Object of the event. There are two different predefined types: Access point and Cardholder. For example, if a new key was issued to a user (cardholder), the user (cardholder) is the object. |
| Location | Name of the installation where Space is hosted. |
Purging system auditor data
Purging the system auditor removes all system auditor data prior to a selected date from the system. The purged data is saved to a text file in a specified folder location.
Automatic purges of the system auditor are scheduled by default. See Automatic system auditor purging for more information.
To purge the system auditor, do the following:
Select System > System auditor. The System auditor information screen is displayed.
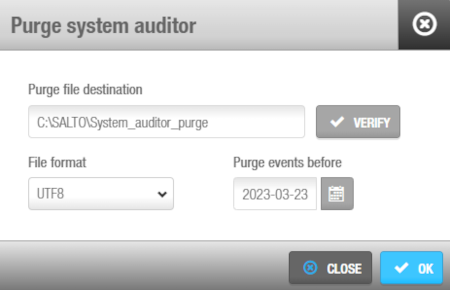
Click Purge. The Purge system auditor dialog box is displayed.
 'Purge system auditor' dialog box
Type the appropriate destination folder name in the Purge file destination field. You can click Verify to verify the file directory exists and is correct.
Select a format from the File format drop-down list. This specifies the format of the file containing the purged events. The appropriate format depends on the alphabet you are using. In general, the system selects the required format by default. However, you can amend this if required.
Select the required date by using the calendar in the Purge events before field. All events prior to the date you select are purged.
Click OK. A pop-up is displayed confirming the operation was completed successfully. Click OK to close the pop-up.
 Back
Back
