Adding encoders to Salto Network
Overview
Encoders are used to read keys, and encode keys with access permission data. They are connected to the system either by a USB, Ethernet connection or serial connection. You can add two types of Ethernet encoders to the system by using the Salto Network screen:
You must specify how encoders connect to the system on the Settings screen. Note that you must assign an IP address to Ethernet encoders by using the Salto Network screen before you select them on the Settings screen.
You can update the firmware of an encoder that is plugged into your local PC using either a USB, Ethernet or serial connection. Firmware updates are available when a new version of the Salto software is downloaded. Your Salto technical support contact may also recommend specific firmware updates if required.
- Encoder options panel
Both types of Salto encoders include a Encoder options panel. The table below shows the options you can select in this panel:
| Option | Description |
|---|---|
| Run update reader | This option is used to configure an Ethernet encoder to update user keys automatically when users present their keys to it. If you select this option, the encoder runs continuously but it can only update keys. It cannot be used to encode keys with access data from the Salto software. See Updating keys for more information. |
| Enable beeper | If you select this option, the encoder emits beeps when in use. |
| Enable dongle mode | This option allows you to use the online Ethernet encoder in dongle mode. This mode is used to encrypt the data that is sent over the air or when using a third-party encoder. |
NCoder

To add an Ethernet NCoder, do the following:
Select System > Salto Network. The Salto Network screen is displayed.
Click Add. The Add network device dialog box is displayed.
Select NCoder from the drop-down list.
Click OK. The NCoder information screen is displayed.
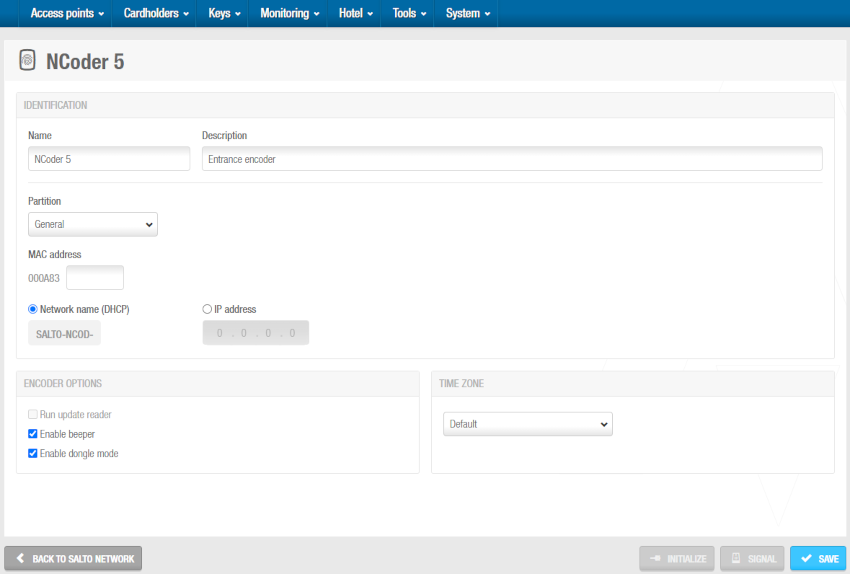
 'NCoder' information screen
Type a name for the encoder in the Name field.
Type a description for the encoder in the Description field. For example, it can be used to describe where the encoder is located.
Select the relevant partition from the Partition drop-down list, if required. See Partitions for more information.
Note that the partitions functionality is license-dependent. See Registering and licensing Space for more information.
Type the media access control (MAC) address in the MAC address field. This is displayed on a sticker on the encoder.
Select either the Network name (DHCP) or IP address option.
- If you select the Network name (DHCP) option, this automatically assigns an IP address to the encoder. A Dynamic Host Configuration Protocol (DHCP) server and a DNS are required for this option.
- If you select the IP address option, you must type a static IP address in the field.
Select the Run update reader checkbox if required. See the table on Encoder options panel in Ethernet encoders for more information on this option.
Select the Enable beeper checkbox if required. If you select this option, the encoder emits beeps when in use.
Select the Enable dongle mode checkbox if required. See the table on Encoder options panel in Ethernet encoders for more information on this option.
Select the appropriate time zone from the Time zone drop-down list. Note that the Time zone panel is only displayed if you have enabled the multiple time zones functionality in General options. See Activating multiple time zones and Time zones for more information.
Click Save.
Encoder (Legacy)

To add an Ethernet Encoder (Legacy), do the following:
Select System > Salto Network. The Salto Network screen is displayed.
Click Add. The Add network device dialog box is displayed.
Select Encoder (Legacy) from the drop-down list.
Click OK. The Encoder (Legacy) information screen is displayed.
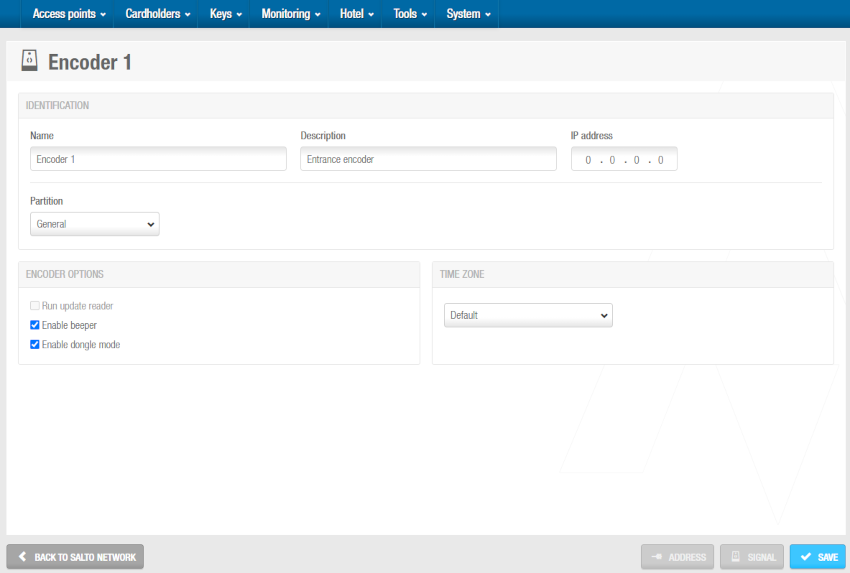
 'Encoder (Legacy)' information screen
Type a name for the encoder in the Name field.
Type a description for the encoder in the Description field. For example, it can be used to describe where the encoder is located.
Type an IP address for the encoder in the IP address field.
Select the relevant partition from the Partition drop-down list, if required. See Partitions for more information.
Note that the partitions functionality is license-dependent. See Registering and licensing Space for more information.
Select the Run update reader checkbox if required. See the table on Encoder options panel in Ethernet encoders for more information on this option.
Select the Enable beeper checkbox if required. If you select this option, the encoder emits beeps when in use.
Select the Enable dongle mode checkbox if required. See the table on Encoder options panel in Ethernet encoders for more information on this option.
Select the appropriate time zone from the Time zone drop-down list. Note that the Time zone panel is only displayed if you have enabled the multiple time zones functionality in General options. See Activating multiple time zones and Time zones for more information.
Click Save.
Encoder requirements for PMS integration
When integrating with a Property Management System (PMS), the following requirements must be met for encoders.
Salto Encoders used in PMS integrations must be Ethernet-based, as all communications take place over the network where the solution is installed. USB encoders cannot be used for any PMS-related functionality.
Encoder configuration guidelines
- Ensure the encoder name in Space matches the name used in the PMS software
- Use simple, clear names for encoders to avoid configuration errors
- Verify network connectivity between the PMS system and Ethernet encoders
See also the section on using the PMS functionality in Space.
 Back
Back
