PMS tab in Space General options
Overview
You can configure Property Management System (PMS) options by using the PMS tab. This creates a link between Space and any PMS software used to issue guest keys in a hotel installation, for example, and allows them to work together. You must stop and restart the Space service before certain changes you make on the PMS tab take effect.
Note that the PMS functionality is license-dependent. See Registering and licensing Space for more information or contact your Salto representative.
Important encoder requirements for PMS integrations:
Salto encoders used in PMS integrations must be ethernet-based, as all communications take place over the network where the solution is installed
USB encoders cannot be used for any PMS-related functionality
Ensure the encoder name in Space matches the name used in the PMS software
Use simple, clear names for encoders to avoid configuration errors
Select System > General options > PMS to view the tab.
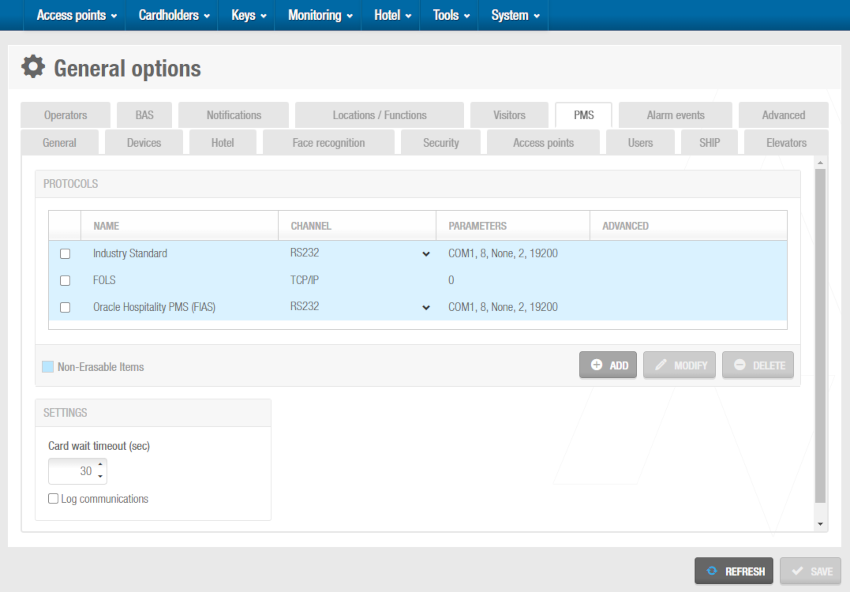 Select 'System' > 'General options' > 'PMS' to view the tab
Tab items description
| Setting | Description |
|---|---|
| Protocols checkboxes | Allows you to enable PMS protocols that can be used with Space. Three protocols are currently available: Industry Standard, Oracle Hospitality PMS (FIAS) and FOLS. If you are unsure of which protocol to select, it is recommended that you consult your PMS administrator. You can select more than one protocol if required. When you select a protocol, you can use the drop-down arrows in the Channel column to select a communication port for the PMS connection. The default option is an RS232 serial port but you can select the TCP/IP option can be selected if required. |
| Modify button | Allows you to configure the communication settings for the port you have selected for the protocol. Note that you must click the required protocol to highlight it before you click the Modify button. |
| Add button | Allows you to add new TPC/IP connections for the Oracle Hospitality PMS (FIAS) protocol. 14 new connections can be added and they should be configured and enabled as the default one. See Oracle Hospitality PMS (FIAS) for more information. |
| Delete button | Allows you to delete the new TPC/IP connections you add for the Oracle Hospitality PMS (FIAS) protocol. The default Industry Standard, Oracle Hospitality PMS (FIAS) and FOLS connections cannot be deleted. |
| Log communications checkbox | Controls whether the PMS software communication data is stored or not. If you select this option, the data is stored as a text file in the following location: C:\SALTO\ProAccess Space\logs\PMS_LOG It is recommended that you only enable this option if technical issues occur. This is because the log file expands fast. |
Configuring communication settings
You must configure the communication settings for the PMS protocols that are used. The settings vary depending on the specific protocol and port option selected.
Oracle Hospitality PMS (FIAS)
You can choose to use either a TCP/IP port or an RS232 serial port for the Oracle Hospitality protocol.
TCP/IP ports
To configure the settings for a TCP/IP port, follow the steps below:
Select System > General options > PMS.
Select the checkbox for the Oracle Hospitality protocol in the Protocols panel.
Click the Oracle Hospitality PMS (FIAS) protocol to highlight it.
Select TCP/IP from the drop-drown list in the Channel column.
Click Modify. The TCP/IP com parameters dialog box is displayed.
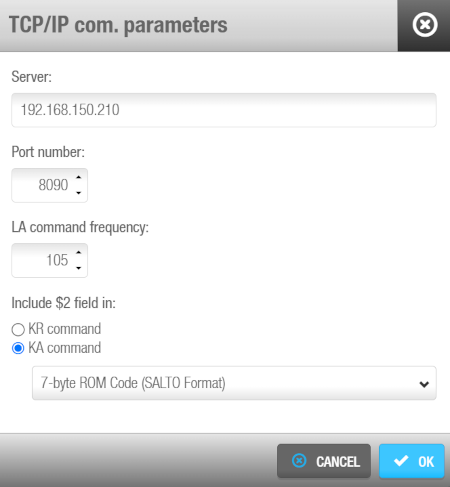 'TCP/IP com parameters' dialog box
Type the address of the server in the Server field. Typically, the IP address of the Oracle Hospitality server is entered in this field.
Type the port number in the Port number field. This is the port number that is available for Salto in the PMS server. The port number should be the same in Space as it is in the PMS software.
Specify the frequency (in seconds) the LA (Link Alive) command will be sent to verify the connection is still active in the LA command frequency field.
Select the KA command include $2 checkbox if required. When you select this option, the UID code of guest keys is transferred to the PMS software when the key is encoded. The default option for the code format is 7-byte ROM Code (Salto Format) but you can select a different option from the drop-down list if appropriate.
Click OK. The configuration information is displayed in the Parameters and Advanced columns in the Protocols panel.
Click Save.
RS232 ports
To modify the settings for an RS232 serial port, do the following:
Select System > General options > PMS.
Select the checkbox for the Oracle Hospitality protocol in the Protocols panel.
Click the Oracle Hospitality PMS (FIAS) protocol to highlight it.
Select RS232 from the drop-drown list in the Channel column.
Click Modify. The Serial com parameters dialog box is displayed.
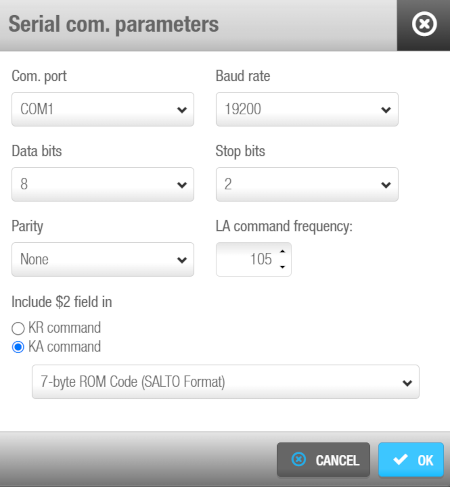 'Serial com parameters ' dialog box
Select the appropriate COM port from the Com port drop-down list.
Select the appropriate number from the Data bits drop-down list. This value defines the number of data bits in each data character. The default option is 8 but you can select one of the other available values if required.
Select the appropriate option from the Parity drop-down list if required. This allows you to specify the parity method used to detect data transmission errors. The default option is None.
Select the appropriate option from the Baud rate drop-down list. This value defines the speed at which data is transmitted.
Select the appropriate number from the Stop bits drop-down list. This value defines the number of stop bits that are included at the end of each data character.
Select the KA command in the Include $2 field in parameter if required. When you select this option, the UID code of guest keys is transferred to the PMS software when the key is encoded. The default option for the code format is 7-byte ROM Code (Salto Format) but you can select a different option from the drop-down list if appropriate.
Click OK. The configuration information is displayed in the Parameters and Advanced columns in the Protocols panel.
Click Save.
When you use RS232 serial ports, you must use the same configuration settings for both Space and the PMS software. The number of data bits and stop bits, and the baud rate and parity type you select must be the same for both.
Industry Standard protocol
You can choose to use either a TCP/IP port or an RS232 serial port for the Industry Standard protocol.
TCP/IP ports
To configure the settings for a TCP/IP port, do the following:
Select System > General options > PMS.
Select the checkbox for the Industry Standard protocol in the Protocols panel.
Click the Industry Standard protocol to highlight it.
Select TCP/IP from the drop-drown list in the Channel column.
Click Modify. The TCP/IP com parameters dialog box is displayed.
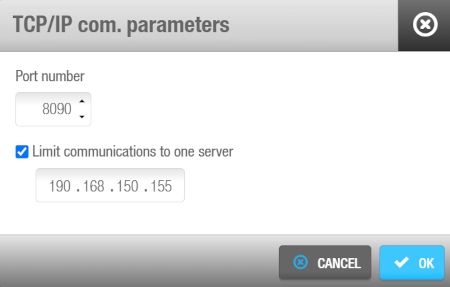 'TCP/IP com parameters' dialog box
Type the port number in the Port number field. If the PMS and Space are not running on the same PC, the port number you enter must be '5010' or higher. In this case, you must also use the same port number for each of them.
Select the Limit communications to one server checkbox if required. You can limit communications to one PC in the network if required. This means that the system will only process key requests from that PC. You must enter the IP address of the PC in the IP address field under the Limit communications to one server checkbox.
Click OK. The configuration information is displayed in the Parameters column in the Protocols panel.
Click Save.
RS232 ports
To modify the settings for an RS232 serial port, do the following:
Select System > General options > PMS.
Select the checkbox for the Industry Standard protocol in the Protocols panel.
Click the Industry Standard protocol to highlight it.
Select RS232 from the drop-drown list in the Channel column.
Click Modify. The Serial com parameters dialog box is displayed.
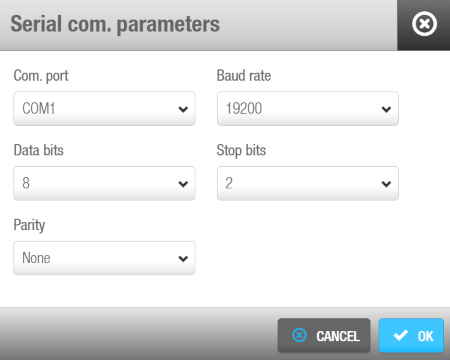 'Serial com parameters ' dialog box
Select the appropriate COM port from the Com port drop-down list.
Select the appropriate number from the Data bits drop-down list. This value defines the number of data bits in each data character. The default option is 8 but you can select one of the other available values if required.
Select the appropriate option from the Parity drop-down list if required. This allows you to specify the parity method used to detect data transmission errors. The default option is None.
Select the appropriate option from the Baud rate drop-down list. This value defines the speed at which data is transmitted.
Select the appropriate number from the Stop bits drop-down list. This value defines the number of stop bits that are included at the end of each data character.
Click OK. The configuration information is displayed in the Parameters column in the Protocols panel.
Click Save.
FOLS protocol
The only port available for the FOLS protocol is the TCP/IP port.
To configure the settings for the FOLS TCP/IP port, do the following:
Select System > General options > PMS.
Select the checkbox for the FOLS protocol in the Protocols panel.
Click the FOLS protocol to highlight it.
Click Modify. The TCP/IP com parameters dialog box is displayed.
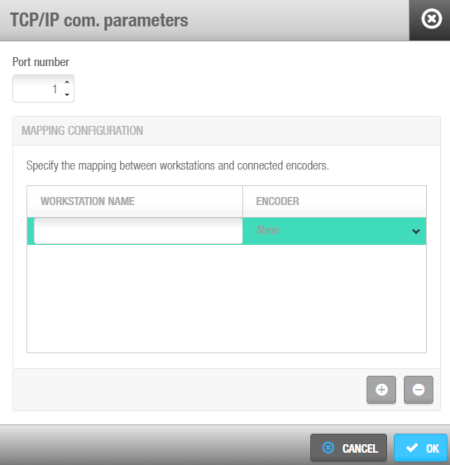 'TCP/IP com parameters' dialog box
Type the port number in the Port number field. This is the port number that is available for Space in the PMS server. The port number should be the same in both Space and the PMS software.
Add (+) a mapping between workstations and connected encoders. You can also delete them as required.
Enter the name of the workstation in the Workstation name field.
Select Online encoder. You need to have an encoder set up to be able to view this option.
Click OK. The configuration information is displayed in the Parameters column in the Protocols panel.
Click Save.
 Back
Back
