User access levels in Space
Overview
User access levels are used to define a group of users with the same access permissions, for example, all staff in a department. This means that if you are configuring a door entry on the Door information screen, you can allow access permissions for that door to all users belonging to a specific user access level. Without user access levels, you would have to associate each individual user with that particular door.
The following sections describe how to create and configure a user access level.
User access levels allow you to group users for easier access management. Unlike zones, user access levels do not save memory space on a key.
Creating user access levels
To create a user access level, perform the following steps:
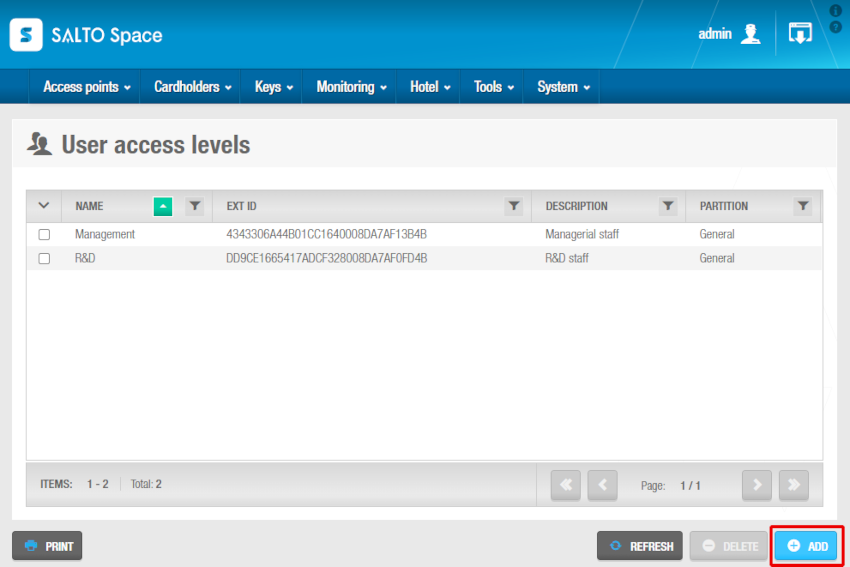
- Select Cardholders > User access levels. The User access levels screen is displayed.
 User access levels screen
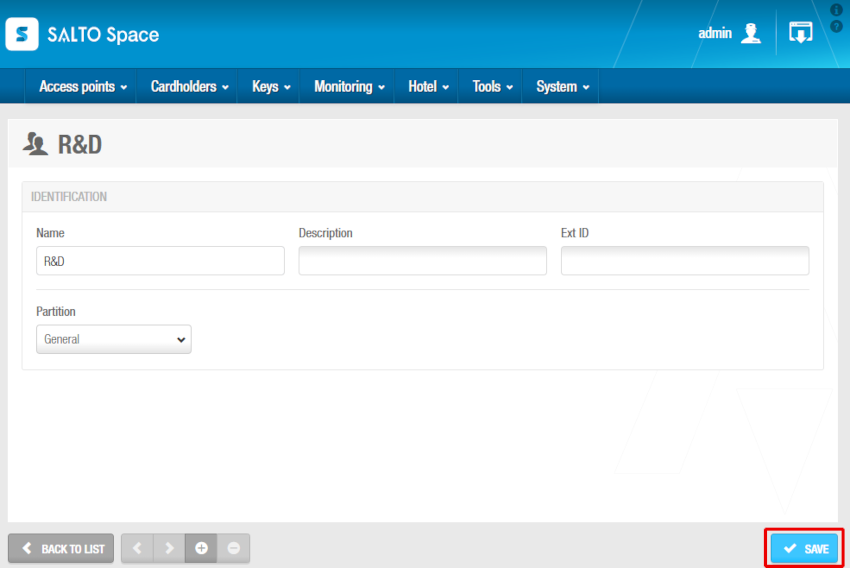
- Click on Add. The User access level information screen is displayed.
 User access level info screen
Type a name for the user access level in the Name field.
Type a description for the user access level in the Description field.
Select the relevant partition from the Partition drop-down list, if required. See Partitions for more information.
Note that the partitions functionality is license-dependent. See Registering and licensing Space for more information.
If you are creating a GAT Net access level, select the User cards will be GAT Net lockers master cards checkbox. See the section on GC7 (Gantner) controllers configuration for more information.
Click Save.
If required, you can activate the Ext ID field that appears on the User access level information screen by adding the SHOW_EXT_ID parameter on System > General options > Advanced. See Advanced tab for more information. The Ext ID field displays a unique identifier for the user access level, automatically generated by the system. You can amend this identifier if required.
Associating user access levels
After you have created a user access level, you can associate access points, zones, users, and outputs with the specified user access level.
This section describes how to associate user access levels with the various components.
Access points
See Access points for more information about how to create and configure the various types of access points.
To associate a user access level with an access point, follow the steps below:
Select Cardholders > User access levels. The User access levels screen is displayed.
Click the user access level that you want to associate with an access point. The User access level information screen is displayed.
Click Access points in the sidebar. The Access points dialog box is displayed. Note that the dialog box will be blank if you have not yet associated an access point with this particular user access level.
Click on Add. The Add dialog box, showing a list of users, is displayed.
Select the required access point in the left-hand panel, and the timetable and the days period in the right-hand panel. Same as key is selected by default. It means the users in that user access level will have access to the access point while the keys are valid. Select Use the following days period if you want them to have access to that specific access point only during a period of time. Select a Start date and an End date.
Click on Save & Close. The user access level is now associated with the access point.
To modify an access level timetable or days period of a specific access point, from the Access points dialog box, perform the following steps:
Select the access point to be edited and then click on Edit.
Modify the Timetable and Days period selection and save the changes.
To dissociate a user access level from an access point, from the Access points dialog box of the specific user access level, perform the following steps:
Select the access point to be dissociated.
Click on Delete and confirm the action in the Warning dialog box.
Zones
See Zones for information about how to create and configure a zone.
To associate a user access level with a zone, perform the following steps:
Select Cardholders > User access levels. The User access levels screen is displayed.
Click the user access level that you want to associate with a zone. The User access level information screen is displayed.
Click Zones in the sidebar. The Zones dialog box is displayed. Note that the dialog box will be blank if you have not yet associated a zone with this particular user access level.
Click on Add. The Add dialog box, showing a list of zones, is displayed.
Select the required zone and click on Save & Close. The user access level is now associated with the zone.
To modify an access level timetable or days period of a specific zone, from the Zones dialog box, perform the following steps:
Select the zone to be edited and then click on Edit.
Modify the Timetable and Days period selection and save the changes.
To dissociate a user access level from a zone, from the Zones dialog box of the specific user access level, perform the following steps:
Select the zone to be dissociated.
Click on Delete and confirm the action in the Warning dialog box.
Users
See Users for more information about how to create and configure users.
To associate a user access level with a user, follow the steps below:
Select Cardholders > User access levels. The User access levels screen is displayed. Click the user access level that you want to associate with a user. The User access level information screen is displayed.
Click Users in the sidebar. The Users dialog box is displayed. Note that the dialog box will be blank if you have not yet associated a user with this particular user access level.
Click on Add. The Add dialog box, showing a list of users, is displayed.
Select the required users.
Select the appropriate Days period.
Click on Save & Close. The selected users now have access permissions for that user access level.
To modify a user's days period of a specific user access level, from the Users dialog box, perform the following steps:
Select the user to be edited and then click on Edit.
Modify the Days period selection and save the changes.
To dissociate a user from a user access level, from the Users dialog box of the specific user access level, perform the following steps:
Select the user to be dissociated.
Click on Delete and confirm the action in the Warning dialog box.
Outputs
See Outputs for more information about how to create and configure an output.
To associate a user access level with an output, perform the following steps:
Select Cardholders > User access levels. The User access levels screen is displayed.
Click the user access level that you want to associate with an output. The User access level information screen is displayed.
Click Outputs in the sidebar. The Outputs dialog box is displayed. Note that the dialog box will be blank if you have not yet associated an output with this particular user access level.
Click on Add. The Add dialog box, showing a list of outputs, is displayed.
Select the required outputs. The selected outputs are now associated with the user access level.
Click on Save & Close.
To dissociate an output from a user access level, from the Outputs dialog box, perform the following steps:
Select the output to be dissociated.
Click on Delete and confirm the action in the Warning dialog box.
Destinations
See Destinations for information about how to create and configure a destination.
To associate a user access level with a destination, perform the following steps:
Select Cardholders > User access levels. The User access levels screen is displayed.
Click the user access level that you want to associate with a destination. The User access level information screen is displayed.
Click Destinations in the sidebar. The Destinations dialog box is displayed. Note that the dialog box will be blank if you have not yet associated a destination with this particular user access level.
Click on Add. The Add dialog box, showing a list of destinations, is displayed.
Select the required destination and click on Save & Close. The user access level is now associated with the destination.
To modify an access level timetable of a specific destination, from the Destinations dialog box, perform the following steps:
Select the zone to be edited and then click on Edit.
Modify the Timetable selection and save the changes.
To dissociate a user access level from a destination, from the Destinations dialog box of the specific user access level, perform the following steps:
Select the destination to be dissociated.
Click on Delete and confirm the action in the Warning dialog box.
 Back
Back
