Hotel tab in Space General options
Overview
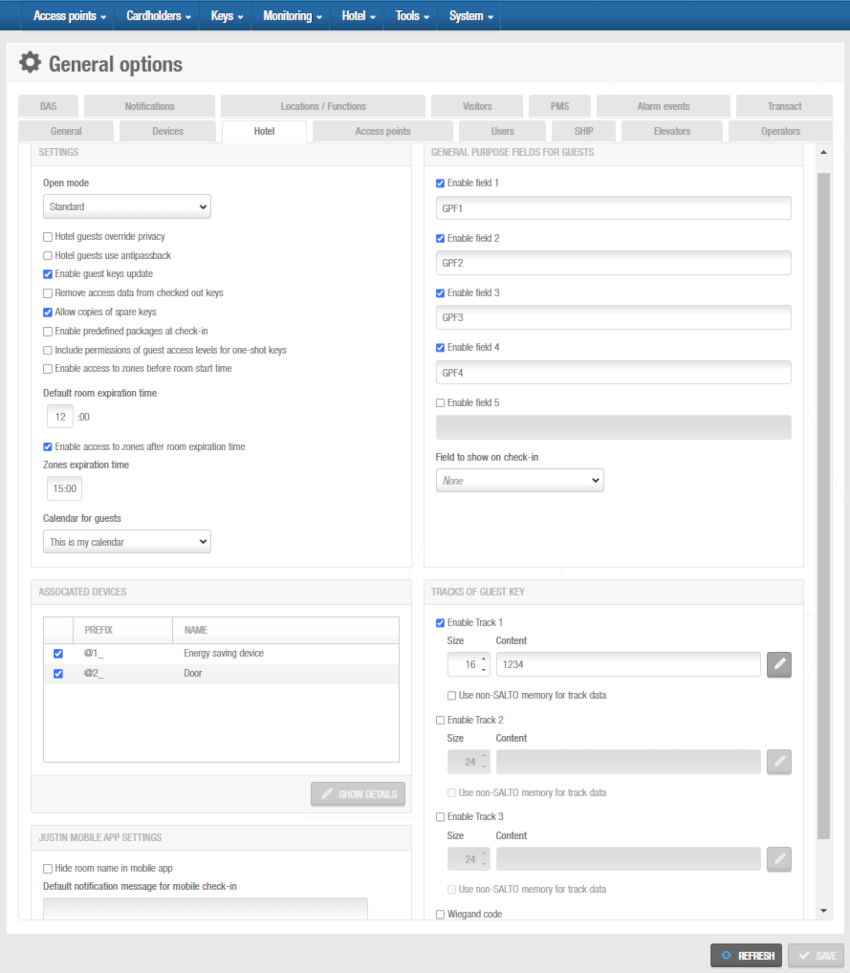
You can activate or amend options for rooms and suites, and configure associated devices by using the Hotel tab.
Note that the hotel functionality is license-dependent. See Registering and licensing Space for more information or contact your Salto representative.
Select System > General options > Hotel to view the tab.
 Select 'System' > 'General options' > 'Hotel' to view the tab
Tab items description
Settings panel
| Setting | Description |
|---|---|
| Open mode drop-down list | Defines the opening mode for room and suite doors. You can select Standard, Toggle, Exit leaves open or Toggle + Exit leaves open opening modes. The specified opening mode is applied to all external room and suite doors. However, it is not applied to doors in subsuites. See Opening modes and timed periods for more information about opening modes. |
| Hotel guests override privacy checkbox | Controls whether guests can enter their room when the door has been locked from the inside. If selected, all guests who have been checked in to the room can enter it at any time, even if the door is locked from the inside. If not selected, they cannot enter if the door is locked. |
| Hotel guests use antipassback checkbox | Controls whether the antipassback functionality is used for guests. Note that this applies to guest access points that have been defined as optional but not rooms or suites. When selected, the option is applied to all guests. See Zones for more information. |
| Enable guest keys update checkbox | Controls whether guest keys can be updated at an SVN wall reader or SVN-Flex-enabled locks. Useful for re-rooming guests, extending stays or updating access rights on the guest card without having to visit the front desk. Important: This setting does not apply to JustIN Mobile keys. See Re-rooming for more information about re-rooming guests. |
| Remove access data from checked out keys checkbox | When checking out a guest, the check-in list is updated but this doesn't invalidate the key. The key remains valid until it reaches its expiration date or a new check-in is performed. By selecting this checkbox, access permissions from checked-out keys are deleted when presented to online locks or readers. |
| Allow copies of spare keys checkbox | Controls whether copies of spare keys can be edited. When selected, an Edit spare key copies button is displayed on the Programming & spare keys screen in Space. See Editing spare keys copies for more information about this process. |
| Enable predefined package at check-in checkbox | Predefined amount of check-in days for the guest stay. Options include: - Weekend: Friday to Sunday - Week: Monday to Sunday - Midweek: Monday to Friday Selecting an option automatically sets the departure date. See Check-in for more information. |
| Include permissions of guest access levels for one-shot keys checkbox | One-shot keys can open the door only once. See One-shot keys for creating them. If other access points require permissions, selecting this checkbox adds guest access levels to one-shot keys. |
| Enable access to zones before room start time checkbox | Controls whether guests can access zones in a hotel before the specified time on the day of check-in. See Zones for more information. When selected, the Rooms activation time and Start date time are displayed on the Hotel check-in screen in Space. |
| Default room expiration time field | Defines the time guests must vacate rooms on the day of check-out. If, for example, 13 is selected, the guest's key cannot access their room after 13:00 on the day of check-out. This value is displayed in the Date of expiry time field on the Hotel check-in screen in Space. It can be changed for individual guests. |
| Default rooms start time field | Defines the time guests can enter their room on the day of check-in. If, for example, 16 is selected, the guest's key can access their room after 16:00 on the day of check-in. This value is displayed in the Start date time field on the Hotel check-in screen in Space. It can be changed for individual guests. |
| Enable access to zones after room expiration time checkbox | Defines the time after which a guest's access to zones in a hotel expires on the day of check-out. See Zones for more information about giving guests access to zones. |
| Calendar for guests drop-down list | Defines which calendar is applied to the guest during the check-in operation. See Calendars for more information. |
General purpose fields for guests panel
| Setting | Description |
|---|---|
| Enable field checkboxes | Allow you to add up to five general purpose fields for guests. When you select the checkbox for each field, it is displayed on the Guest information screen in Space. You can name the general purpose fields in accordance with the information you want to capture by typing a name in the field underneath each checkbox, for example, "Special requirements". |
| Field to show on check-in drop-down list | Allows you to select which General purpose field, from 1 to 5, is displayed on the Check-in screen in Space. This field can be used to add guest-related information related with the guest. If required, the content of the General purpose field can be added to a track. See Configuring tracks for more information. |
Associated devices panel
| Setting | Description |
|---|---|
| Associated device checkbox | Gives you the option to enable associated devices in rooms and suites. When you select this option, an Associated device list panel is added to the Room and Suite information screens in Space. See Associated device lists for more information. |
| Show details button | Allows you to change the configuration options for associated devices. See Configuring associated devices for more information. |
JustIN Mobile app settings panel
| Setting | Description |
|---|---|
| Hide room name in mobile app checkbox | When selected, the room name won't be shown in the phone screen. The JustIN Mobile app is license dependent. See Check-in section for more information. |
| Default notification message for mobile check-in field | Allows you to enter a default notification message for mobile guest keys. Guests receive this message when mobile keys are sent to their phones. See Room options for more information about the mobile guest keys option. |
Tracks of guest key panel
| Setting | Description |
|---|---|
| Enable Track #1 checkbox | Enables track 1 on guest keys. When you select this checkbox, you can use the track to write additional data on guest keys, for example, the key expiration date. See Configuring tracks for more information. |
| Size fields | Allows you to define the number of bytes that are used for tracks. You need to specify the size for each track used. |
| Content fields | Allows you to specify what data is written on tracks. You need to specify the content for each track used. See Configuring tracks for more information. |
| Use non-Salto memory for track data checkbox | See Mifare classic 1k card for thrird party systems |
| Enable Track #2 checkbox | Enables track 2 on guest keys. When you select this checkbox, you can use the track to write additional data on guest keys. |
| Enable Track #3 checkbox | Enables track 3 on guest keys. When you select this checkbox, you can use the track to write additional data on guest keys. |
| Wiegand code checkbox | Activates the Wiegand code option for guest keys. This enables the Salto system to send the Wiegand code to third-party applications, if required. Note that only a constant Wiegand code can be used for guest keys. This is a fixed code that is the same for all guests. |
Mifare classic 1k card for third-party systems
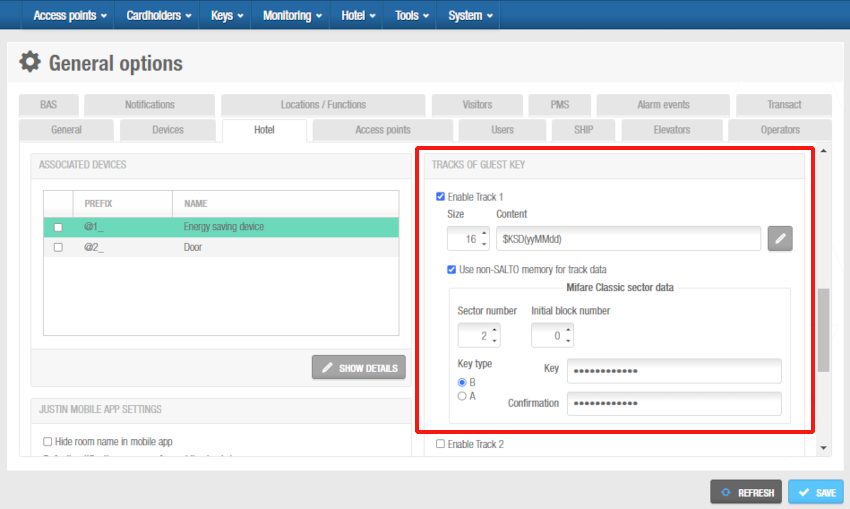
Salto allows the option to define and encode specific information in Mifare Classic 1k cards so they can be used by a third-party system.
Select the Use non-Salto memory for track data checkbox and select or type the information for the corresponding options:
 'Tracks' panel in 'Hotel' tab
Configuring associated devices
You can amend the configuration settings for associated devices, such as ESDs, if required.
To amend the configuration settings for ESDs, for example, do the following:
Select System > General options > Hotel tab.
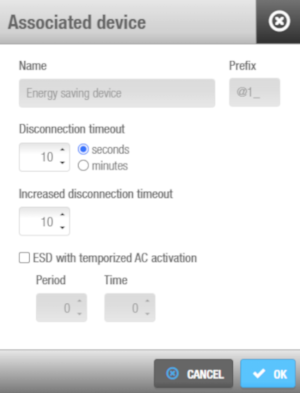
In the Associated devices panel, select the associated device to be configured and, then, click on Show details. The Associated device dialog box is displayed.
 'Associated device' dialog box
You cannot amend the default characters in the Prefix field. The prefix is included at the beginning of ESD entries for hotel rooms and suites in Space, for example, @1_101.
Enter the required time parameters in the Disconnection timeout field by clearing the default numerical value and typing a new value, and selecting either the seconds or minutes option from the drop-down list. These parameters define the period for which the ESD remains active after you remove a key from it.
Clear the default value in the Increased disconnection timeout field and type a new value, if required. This feature is designed for disabled or 'hands full' users or guests. The ESD remains active for the increased period that you specify after users or guests remove their keys from it. You must also enable this option in the user's or guest's profile.
Select the ESD with temporized AC activation checkbox, if required. This sets the air conditioning in the room to activate automatically for a certain period at specified time intervals. Note that access to the AC is controlled by the system-generated ESD_#2 entry. This is one of the outputs that activate the relays for ESDs. See Associated device lists for more information.
Type a value in the Period and Time fields. These values control the automatic activation of the AC. For example, if you type '60' in the Period field and '5' in the Time field, the AC is automatically activated for five minutes every hour.
Click OK.
Click Save.
Configuring tracks
Keys have three tracks or areas in which you can encode data (track 1, track 2, and track 3). You can enable these tracks on user and guest keys to store information from specific Space fields, for example room names, or key expiration dates. See Overview, Tab items description or Users tab for more information. You must define what data is written on each track, and this is displayed when you read keys. See Reading keys for more information about reading keys.
To configure a track, do the following:
Select System > General options > Hotel.
Select the checkbox for the required track.
Type the appropriate value in the Size field. This defines the number of bytes on the key that are used for the track.
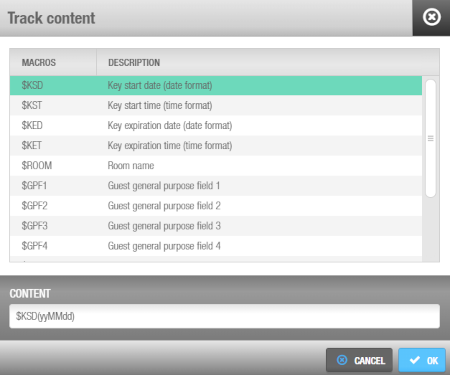
Click the button on the right-hand side of the Content field. The Track content configuration dialog box is displayed.
 'Track content' configuration dialog box
This dialog box allows you to specify the data that is written by default when new keys are encoded.
Click the required macro in the Macros field to select it. Macros are available for a number of the fields in Space. Note that you can use the $ASC macro for ASCII characters or non-printable characters.
Click OK. The selected macro is displayed in the Content field. You can include a constant value before or after each macro by typing it in the Content field, for example, 'Date' or '-'.
Click OK when you have finished inserting macros and the correct macro format is displayed in the Content field.
Click Save.
See the SAM and issuing options section for more information.
 Back
Back
