Calendars in Space
Introducción
The calendars functionality defines your organization's working calendar. For example, you can define public holidays, company holidays, and company shutdowns. If your organization consists of multiple installations that operate according to different workday calendars, a separate calendar can be created for each installation. Up to 255 calendars can be set up on Space.
A calendar day can be defined as a normal day, a holiday (H1), or a special day (there are two special day definitions available, S1 and S2). Special days may be installation-specific holidays or installation shutdown days.
After you have created a calendar, you can then set up time periods, automatic changes, and cardholder timetables specific to each day type or user. See Access point timed periods, Access point automatic changes, and Cardholder timetables for more information.
Cómo crear calendarios
To create a calendar, do the following:
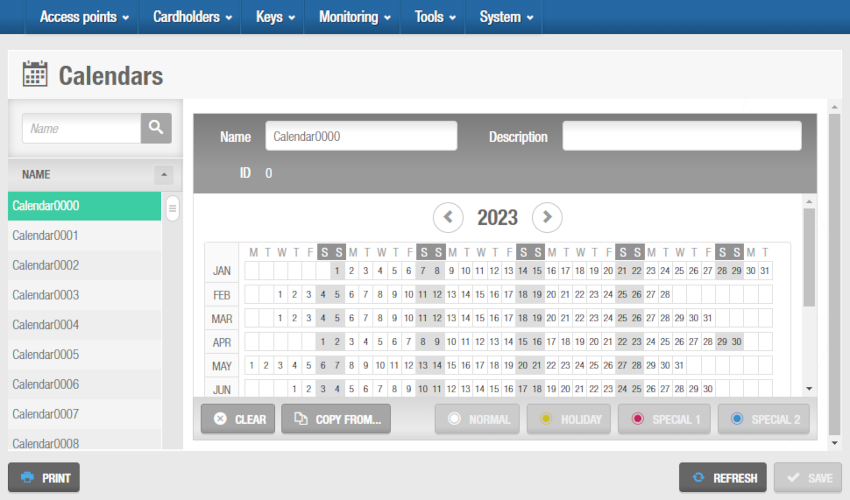
- Select System > Calendars. The Calendars screen is displayed.
 'Calendars' screen
Select a calendar from the Name panel. You can change the name of the calendar to something meaningful for your organization. For example, if your organization has multiple installations that have different holiday periods, you could choose a name such as "London—Canary Wharf". You can also add a description to further differentiate calendars.
Select a partition from the Partition drop-down list if required. See Partitions for more information.
Note that the partitions functionality is license-dependent. See Registering and licensing Space for more information.
Selecciona el año que corresponda. By default, the current year is displayed. You can use the arrow keys to scroll backwards or forwards. Se recomienda configurar los calendarios para el año en curso y el año siguiente.
Click on the date that you want to define as a holiday or a special day. De forma predeterminada, todos los días se definen como corrientes. You can hold down the Ctrl key or type the Shift key while clicking the fields to make multiple selections.
Click Holiday, Special 1, or Special 2 as appropriate. Repeat this step until you have entered all holidays and special days for the specific installation. If you are editing an existing calendar, you can redefine a holiday or a special day as a normal day by clicking Normal.
If users are given access to doors on days that have been defined as holidays or special days, their cardholder timetables must be set up accordingly. See Cardholder timetables for more information.
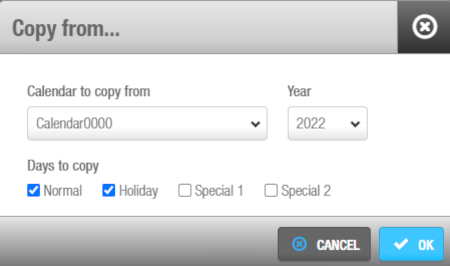
- If your organization requires to have more than one calendar, you can copy an existing one. Click Copy from. The following dialog box is displayed.
 'Copy from' dialog box
From the Calendar to copy from drop-down menu, select the appropriate calendar.
From the Year drop-down menu, select the year the calendar to copy is from.
Check the boxes of the corresponding days to be copied. If the box is not checked, the days won't be copied.
Click OK.
Click Save. The new calendar is saved.
 Atrás
Atrás
