Check-in for hotel guests and groups in Space
Introducción
This section explains both guest check-ins and group check-ins. A guest check-in refers to the process the front-desk operator does when an individual guest arrives at the hotel. A group check-in is also carried out by the front-desk operator and is useful to allocate a selection of rooms to guests in one go without having to assign keys and rooms one at a time. It can be done in advance of the arrival of a large group so as to avoid long check-in wait times when the group arrives at the hotel.
Guest check-in
A guest check-in is generally done by the front-desk operator when a guest arrives at the hotel.
The front-desk operator follows the steps below:
- Room is selected and check-in information is entered
The hotel operator selects a room and enters the check-in information, such as, the dates of the guest's stay and any additional rooms required.
- Key is edited
The hotel operator edits the key for the guest using an encoder. See Ethernet encoders for more information about encoders.
See the sections below to check in a guest:
Selecting rooms
When a guest arrives at the hotel, the hotel operator selects a room and enters the guest check-in information.
To select a room, do the following:
- Select Hotel > Check-in. The Hotel check-in screen is displayed.
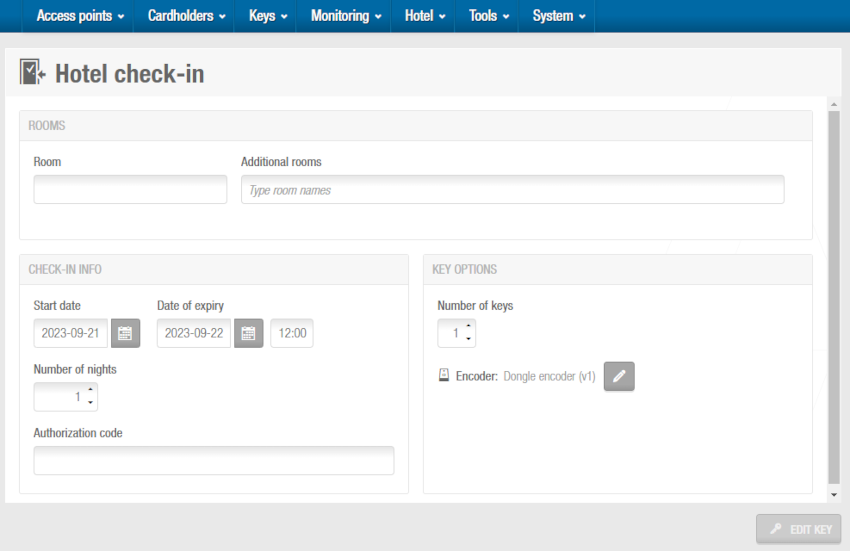 'Hotel check-in' screen
- Type the name of the room or press F2 to display the Select room dialog box.
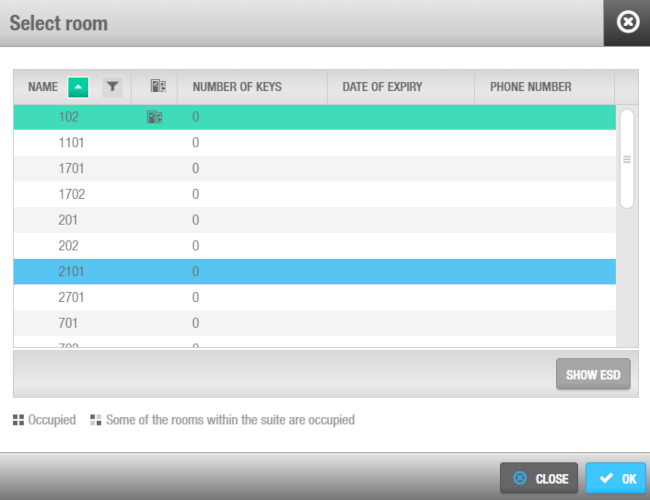 'Select room' dialog box
Select an available room and click OK. The selected room is added to the Room field in the Hotel check-in screen.
You can use the Additional rooms field to give the guest access to other rooms. For example, parents may be staying in Room 101 and their children may be staying in Room 102. You can give the parents access to both Room 101 and Room 102. If a suite is selected, access is granted to all of the rooms within the suite. Additional rooms outside of the suite can also be added.
Select the applicable check-in information in the Check-in info panel. The check-in information fields are described in Adding check-in information.
This information can also be added into key tracks if required. See Tracks of guest keys in General options > Hotel tab for more information. You can have up to 5 General purpose fields for guests. In these general purpose fields you can add information related with the guest such as their car tag, an ID number or a zip code, for example.
Select the appropriate optional facilities if required. The optional facilities shown in the Optional facilities panel match any access points you have set up and defined as optional. See Zones for more information about defining guest access points as optional. You can control whether guests can access optional facilities before their specified room start time in System > General options > Hotel tab. You can also define there the time when guest access to optional facilities expires on their check-out day.
Select the number of keys required in the Number of keys field.
Up to 10 keys can be issued per room during a check-in. Only the original key and the first three copies are named differently by the system. For example, for Room 101, the first four keys are named as follows: @101, @101#1, @101#2, and @101#3. The remaining six keys are all named @101#3. If more keys are required, additional copies can also be made. See Copying guest keys for more information.
Click Edit key. A pop-up is displayed asking you to place the key on the encoder.
Place the key on the encoder when the LED light begins to flash. The check-in information is transferred to the key. A pop-up is displayed confirming that the operation was successful.
Remove the key and click OK.
JustIN Mobile check-in
The JustIN Mobile check-in feature is license-dependent. This means that the functionality will not be enabled in your installation unless it's covered by your selected license options. See Registering and licensing Space for more information.
When a guest arrives at the hotel or checks in online, the hotel operator can select to send the key to that guest's phone.
JustIN Mobile key access data is sent over the air (OTA) to the guest's mobile phone.
Both iOS and Android phones can be used as keys with Salto's JustIN Mobile application but there are some differences between them. For a full description of the technologies that are supported in each phone, like Bluetooth Low Energy or NFC, please consult the JustIN Mobile user guide.
Note: Using an NFC or Bluetooth Low Energy-enabled phone as a credential requires locks that have been equipped with Bluetooth Low Energy and NFC readers.
JustIN Mobile digital keys have some limitations when compared to physical keys in Space when using Bluetooth Low Energy:
- Free assignment lockers are not supported
- Antipassback is not supported
- Last rejection and Audit on key are not supported
Android and iOS devices that use NFC do support those features.
In a hotel, JustIN Mobile keys are assigned in different ways for staff and guests. This section describes how to do it for guests by following the check-in process. See Assigning JustIN Mobile keys for detailed information on how to assign JustIN Mobile keys to the hotel staff.
To use a JustIN Mobile key, guests must first download the Salto JustIN Mobile app from the Apple App Store or the Google Play Store, depending on whether they have an iPhone or an Android phone.
Once guests have downloaded the JustIN Mobile app, they should follow the instructions for registration on their own phones. However, JustIN Mobile guests can register once they have been assigned a key. See also the JustIN Mobile user guide for more information on using JustIN Mobile keys.
Assigning JustIN Mobile keys during check-in
To select a room, follow the steps for physical keys described in Selecting rooms. Then, send the key to the guest's phone as follows:
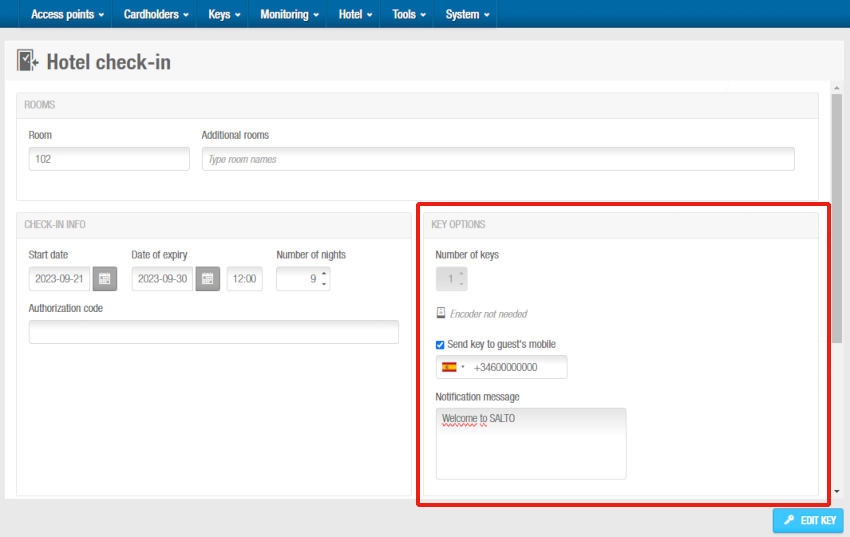 The 'Send key to guest's mobile' only displays if you have this option enable in your license
- Select Send key to guest's mobile in the Key option panel. You can add a message in the Notification message box and this message will be shown in the guest's phone. For example, "Welcome to Hotel Paradise".
To see the Send key to guest's mobile in Key options during the check-in, you must enable Allow mobile guest's keys in the corresponding Room information screen. See Room options for more information. If Allow mobile guest's keys is not checked in the corresponding Room information screen, the Send key to guest's mobile will not be shown during the check-in process.
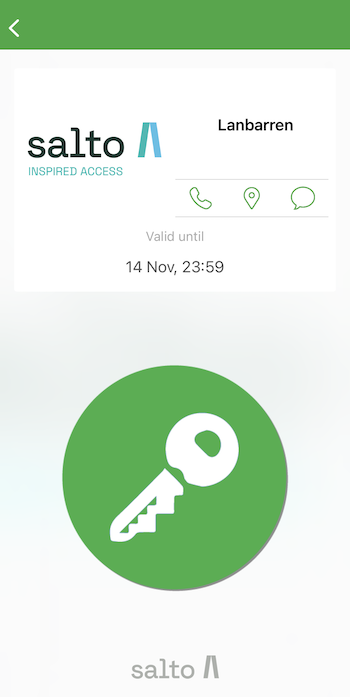 JustIN Mobile app Bluetooth key screen
- Select the appropriate optional facilities if required. The optional facilities shown in the Optional facilities panel match any access points you have set up and defined as optional. See Zones for more information about defining guest access points as optional. You can control whether guests can access optional facilities before their specified room start time in System > General options > Hotel tab. You can also define there the time when guest access to optional facilities expires on their check-out day.
Only one digital key can be created during the guest check-in. Additional copies of a digital key can be issued through the Copy guest key screen.
- Click Edit key. A pop-up is displayed telling you that the operation was completed successfully.
The data sent over the air (OTA) to your phone is encrypted and this happens by using the Salto Ethernet encoder as a dongle. See Devices for more information.
The phone must be online in order to receive the check-in information.
- Go to the JustIN Mobile app and tap the green key button while presenting the phone to the lock.
Make sure that the guest has Bluetooth (or NFC if it's an applicable Android device) activated when they are using their phone to unlock doors.
Adding check-in information
The check-in information options are described in the following table.
| Option | Descripción |
|---|---|
| Fecha de inicio | Date on which the guest checks in to the hotel. |
| Number of nights | Number of nights the guest is staying. There is also a pre-set option related to the amount of check-in days for the guest stay. According to the guest arrival day various options will be shown: - Weekend: from Friday to Sunday, - Week: from Monday to Monday, - Midweek: from Monday to Friday. By selecting one of these options you will automatically set the departure date. To activate this option, you must select the Enable predefined packages at check-in checkbox in System > General options > Hotel. See Hotel tab for more information. |
| Date of expiry | Date on which the key expires and the key is no longer valid. This automatically updates when the number of nights is entered. |
| Start date time | Time when the key becomes valid. The Start date time field is displayed when the Enable access to zones before room start time is enabled on the Hotel tab in System > General options. The default room start time is 16.00. If required, you can amend this by changing the value in the Default room start time field. See Hotel tab for more information. |
| Date of expiry time | Latest check-out time. After this time, the key is no longer valid. The default expiry time is 12.00. See Hotel tab for more information. If required, you can change the default expiry time by amending the value in the Default room expiration time field in System > General options > Hotel. |
| General purpose field | You can have up to 5 General purpose fields for guests. In these general purpose fields you can add information related with the guest such as their car tag, an ID number or a zip code, for example. This information can also be added into key tracks if required. See Hotel tab for more information about guests general purpose fields. The content of the General purpose field can be added to a track in the guest key. |
Changing stay duration
See Changing stay duration for a detailed description of this feature.
Group check-in
Group check-in is a feature that is generally carried out by the front-desk operator. It is useful to allocate a selection of rooms to guests in one go without having to assign keys and rooms one at a time.
A group check-in can be done in advance of the arrival of a large group so as to avoid long check-in wait times when the group arrives at the hotel.
Note that this functionality is license-dependent. See Registering and licensing Space for more information or contact your Salto representative.
A group check-in is done as follows:
- Group check-in information is entered
The hotel operator enters the group check-in information.
- Pre-edit guest key information is added
The key is pre-edited and the room is reserved for the arrival date. The hotel operator adds the pre-edit guest key information using the encoder.
A new guest can occupy the reserved rooms before the group arrives. This does not affect the encoded keys for the group.
- Group is checked in.
The hotel operator checks in the group when they arrive at the hotel.
See the sections below to check in a group of guests:
- Entering group check-in information
- Printing check-in groups lists
- Check-in group icons
- Pre-editing guest keys
- Group check-in process
Entering group check-in information
Hotel operators, such as reservation staff, can enter the group check-in information at the time of booking before the guests arrive.
To enter the group check-in information, follow the steps below:
- Select Hotel > Check-in groups. The Check-in groups screen is displayed.
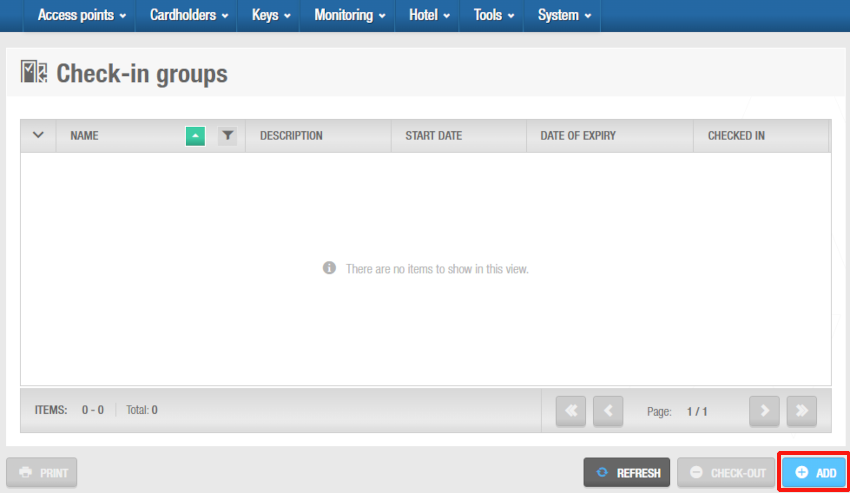 'Check-in groups' screen
- Click Add check-in group. The Check-in group information screen is displayed.
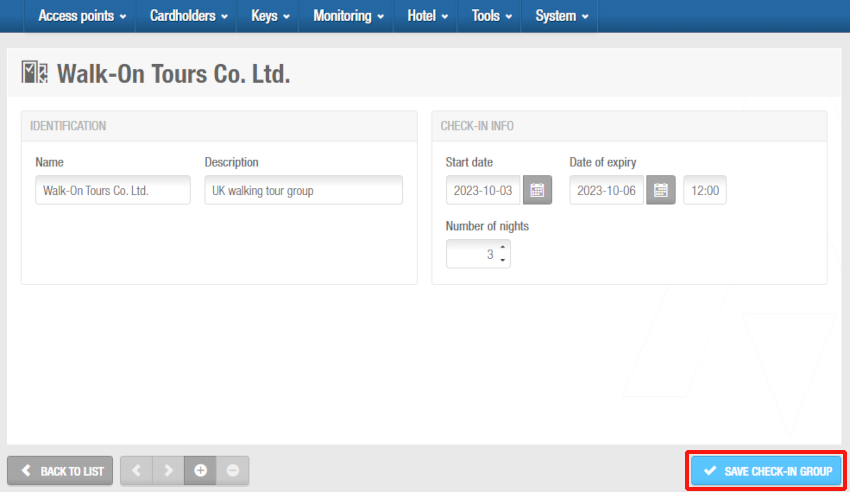 'Check-in group' information screen
Type the name of the group in the Name field.
Type a description of the group in the Description field.
Select the applicable check-in information in the Check-in info panel.
The check-in information fields are described in Adding check-in information.
Select the appropriate partition from the Partition drop-down list, if required. See Partitions for more information.
Note that the partitions functionality is license-dependent. See Registering and licensing Space for more information.
Click Save check-in group. The Rooms panel is displayed in the Check-in groups information screen.
Click Add. The Add dialog box, showing a list of room names, is displayed.
Select the rooms and save the changes. The selected rooms are displayed in the Rooms panel.
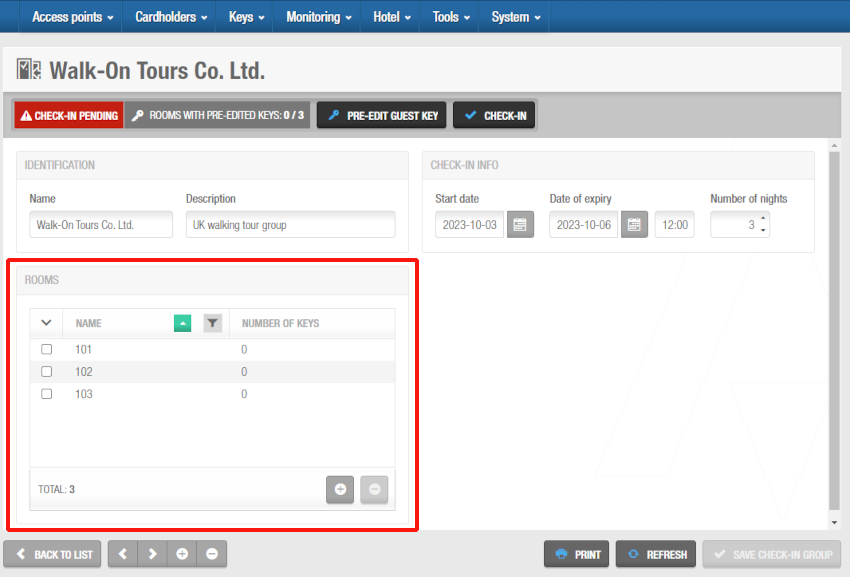 'Check-in group' information screen
Printing check-in groups lists
From the Check-in groups screen, you can print all the check-in groups lists defined in this section. You can also print the information of all the list rooms related to a single specific check-in group.
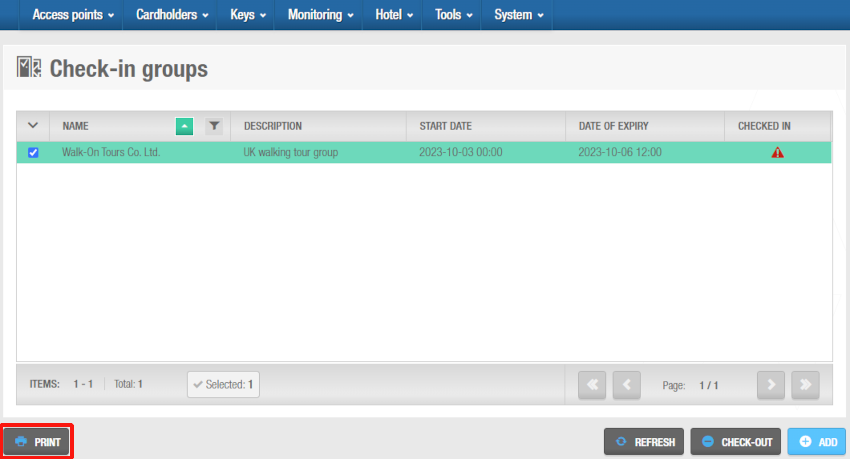 You can print check-in groups lists
Once you click on Print, select the report type to be printed: List or Selected detailed.
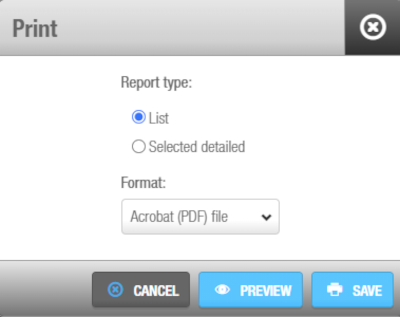 Select the report type and format
If you select List, a list with all the check-in groups will be printed. If you select Selected detailed, and having selected one group from the list in the Check-in groups screen before, the information about the rooms related to a specific check-in group will be printed.
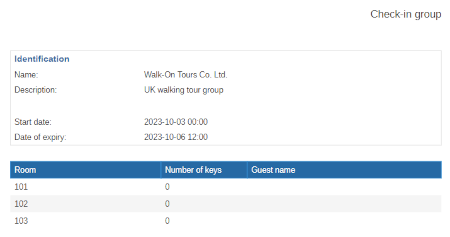 'Selected detailed' report example
Check-in group icons
When you add check-in groups to the system, different icons are displayed in the Checked in column on the Check-in groups screen. These icons vary depending on the status of each group and are described in the following table.
| Icon | Descripción |
|---|---|
 Checked in | Indicates that a group has been checked in |
 Check-in pending | Indicates that a group needs to be checked in |
Pre-editing guest keys
You must pre-edit guest keys before performing a group check-in. This allows you to assign the number of keys per room and encode the keys in advance of the group arriving which speeds up the check-in process when a big group arrives.
To pre-edit guest keys, follow the steps below:
- Select Hotel > Check-in groups. The Check-in groups screen is displayed.
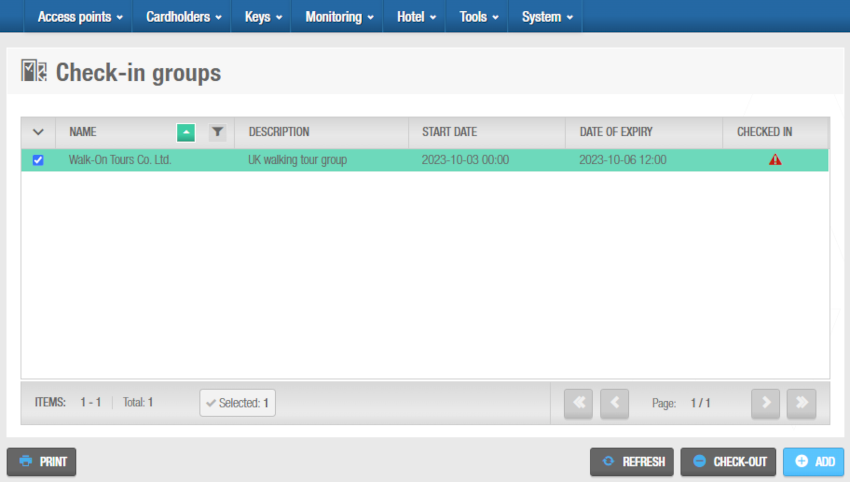 'Check-in groups' screen
- Click the check-in group. The Check-in group information screen is displayed.
The Rooms with pre-edited keys information field (shown in grey at the top of the Check-in group information screen) displays the number of rooms that have had pre-edited keys added.
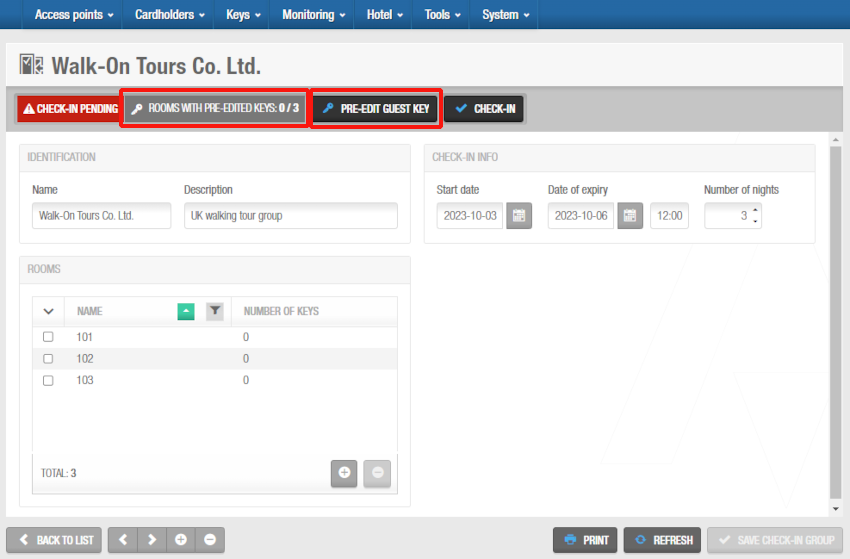 'Check-in group' information screen
- Click Pre-edit guest key. The Guest key pre-edition dialog box is displayed.
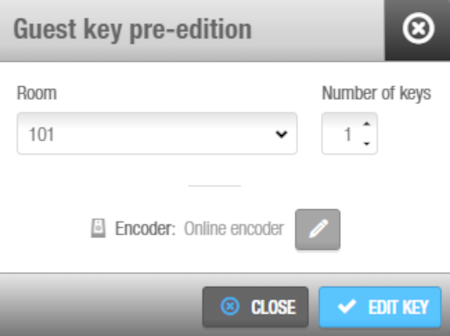 'Guest key pre-edition' dialog box
Select the room in the Room drop-down list.
Select the number of keys in the Number of keys field.
Click Edit key. A pop-up is displayed asking you to place the key on the encoder.
Place the key on the encoder when the LED light begins to flash. A pop-up is displayed confirming that the operation was successful.
If you have selected more than one key in the Number of keys field, a pop-up is displayed asking you to place the next key on the encoder and click OK. You must do this for each required key.
- Remove the key and click Close.
Repeat the process for each room.
Group check-in process
This operation is important as it informs the system that the group has arrived.
You must pre-edit guest keys before doing a group check-in. See Pre-editing guest keys for more information about pre-editing guest keys.
To check in a group, do the following:
Select Hotel > Check-in group. A list of check-in groups is displayed.
Click the check-in group. The Check-in group information screen is displayed.
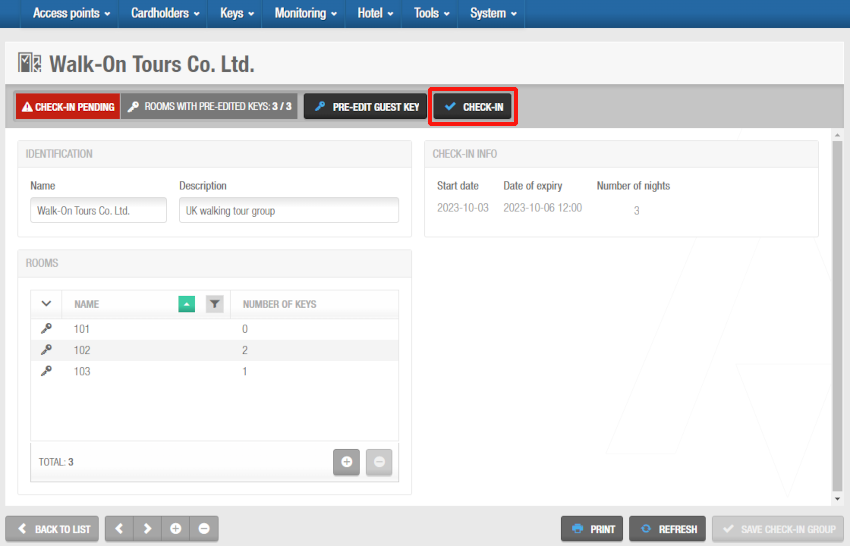 'Check-in group' information screen
- Click Check-in. The group is checked in.
 Atrás
Atrás
