Puertas en Space
Introducción
Una puerta es un punto de acceso a un área, por ejemplo, una puerta a una oficina, una sala de reuniones o un área de descanso. Cada puerta está equipada con un dispositivo electrónico que controla el cierre. El cierre puede ser mecánico, eléctrico o magnético. Cuando se agrega una puerta al sistema, los datos se pueden transferir al dispositivo electrónico mediante un PPD. Consulta PPD para obtener más información.
Las siguientes secciones describen cómo crear y configurar una puerta dentro de Salto Space.
Cómo crear puertas
Para crear una puerta, haz lo siguiente:
- Selecciona Puntos de acceso > Puertas. Se muestra la pantalla Puertas.
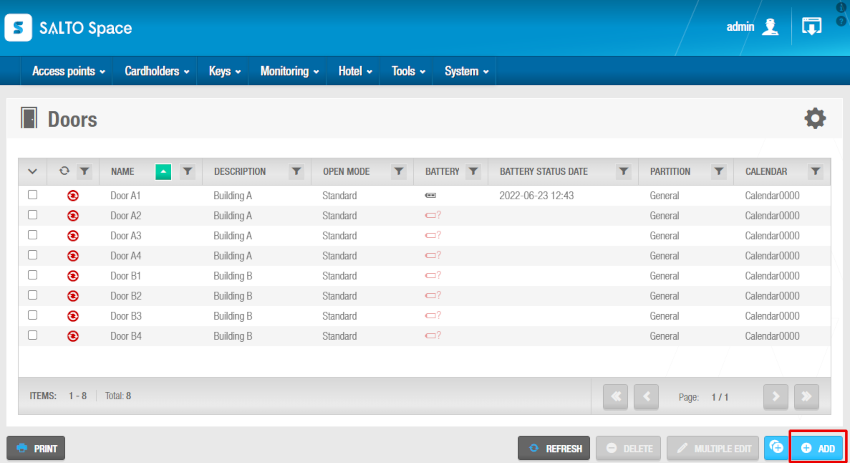 Pantalla Puertas
- Haz clic en Añadir. Se muestra la pantalla de información de la puerta.
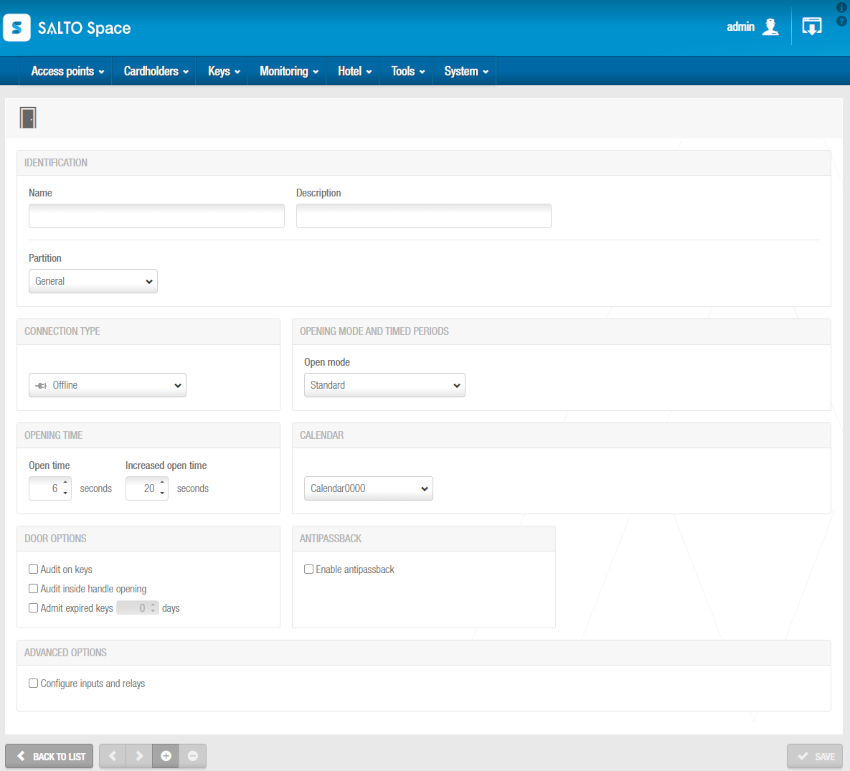 Pantalla de información de la puerta
En las pantallas de información de los puntos de acceso se muestra un campo de información de Válido hasta si los datos relacionados con el estado de la batería y los calendarios, por ejemplo, están a punto de caducar.
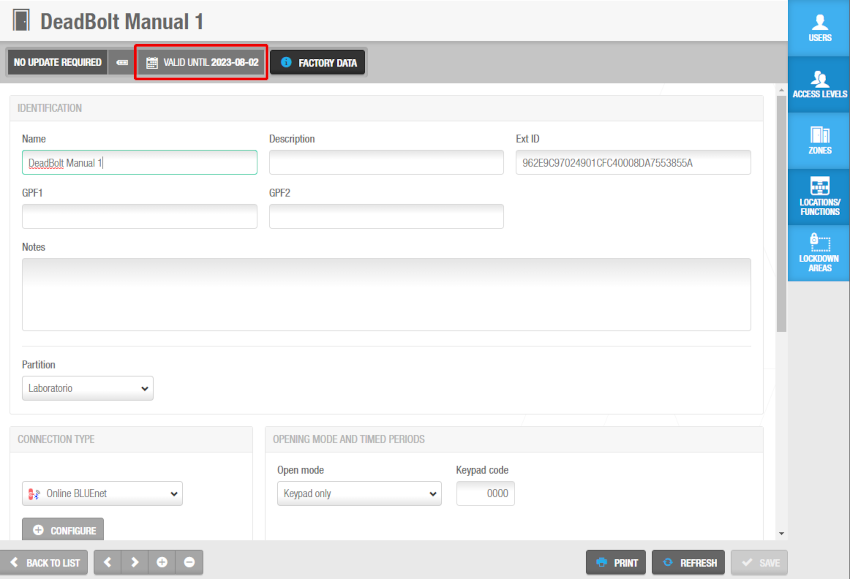 Campo de información Válido hasta
Escribe un nombre para la puerta en el campo Nombre.
Escribe una descripción para la puerta en el campo Descripción. Por ejemplo, se puede utilizar para describir dónde se encuentra la puerta.
Selecciona la partición correspondiente de la lista desplegable Partición, si es necesario. Consulta Particiones para obtener más información.
The locations and functions functionality is license-dependent. Consulta Registrar y licenciar Space para obtener más información.
Selecciona las opciones de configuración y gestión adecuadas. Los campos de configuración y gestión se describen en Configuración de puertas.
Haz clic en Guardar.
Si es necesario, puedes activar el campo ID Ext que aparece en la pantalla de información de la puerta añadiendo el parámetro SHOW_EXT_ID en Sistema > Opciones generales > Avanzado. Consulta la pestaña Avanzado para obtener más información. El campo ID Ext muestra un identificador único para la puerta, generado automáticamente por el sistema. Puedes modificar este identificador si es necesario.
También puedes añadir y nombrar un máximo de dos campos de propósito general utilizando las Opciones generales de Space. Para activar un campo de propósito general, debes seleccionar la casilla de verificación Habilitar campo en la pestaña Sistema > Opciones generales > Puntos de acceso. A continuación, puedes nombrar el campo de acuerdo con la información que deseas capturar.
Puedes crear varias puertas a la vez utilizando la opción Añadir múltiple. Además, puedes editar varias puertas a la vez utilizando la opción Editar múltiple. El botón Editar múltiple se habilita cuando seleccionas más de una entrada en la pantalla Puertas. Esto te permite introducir los detalles de identificación y configuración adecuados en la pantalla Editar múltiple, incluidos los derechos de acceso. A continuación, los detalles se aplican a todas las entradas seleccionadas.
Configuración de puertas
A continuación, se describen los distintos campos utilizados para configurar las puertas.
Tipos de conexión
El panel Tipo de conexión define el tipo de conexión de la puerta. La opción predeterminada es Offline. Cuando seleccionas cualquiera de los otros tipos de conexión (online) de la lista desplegable Tipo de conexión, se muestra un botón Configurar en la pantalla de información de la Puerta. See Configuring online connection types for more information.
También se muestran paneles adicionales en la pantalla de información de la Puerta, dependiendo del tipo de conexión que selecciones.
Las opciones de tipo de conexión se describen en la siguiente tabla.
| Opción | Descripción |
|---|---|
| Offline | Used for doors that are not connected to the Salto Network and need to be updated using a PPD. Consulta PPD para obtener más información sobre los PPD. |
| IP en línea (CU50ENxx) | Used for doors that are hardwired to the Salto Network and managed using Ethernet TCP/IP protocols. Consulta Red Salto para obtener más información. Cuando seleccionas esta opción, se muestran un panel de área de bloqueo y un panel de área de ocupación limitada en la pantalla de información de la Puerta. Para una CU en línea, puedes añadir la puerta a un área de bloqueo y/o a un área de ocupación limitada si es necesario. Consulta Áreas de bloqueo y Áreas de ocupación limitada para obtener más información. También se muestra una casilla de verificación Caducidad extendida (sin conexión). Si seleccionas esta opción, cualquier llave que se presente se volverá a validar durante un período específico, incluso si la CU está sin conexión. Consulta Caducidad de usuario y llave para obtener más información. |
| IP en línea (CU42xx) | Used for doors that are hardwired to the Salto Network and managed using Ethernet TCP/IP protocols. Consulta Red Salto para obtener más información. La unidad debe tener alimentación y estar conectada a la red Ethernet. Cuando seleccionas esta opción, se muestran un panel de área de ocupación limitada y un panel de área de bloqueo en la pantalla de información de la Puerta. La opción Habilitar actualización de llave está seleccionada de forma predeterminada, pero puedes anular la selección de esta opción si tus dispositivos IP en línea (CU42xx) no requieren actualizar las llaves. Para que esta funcionalidad funcione, debes actualizar el firmware de los bloqueos a la última versión. También se muestra una casilla de verificación Caducidad extendida (sin conexión). Consulta lo anterior para obtener más información sobre estas opciones. |
| RFnet en línea | Used for doors that are connected to the Salto Network using RF technology. Cuando seleccionas esta opción, se muestra un panel de área de bloqueo en la pantalla de información de la Puerta. Esto significa que puedes añadir la puerta a un área de bloqueo si es necesario. The RF functionality is license-dependent. See Registering and licensing Space for more information. See Lockdown areas for more information. |
| BLUEnet en línea | Used for doors that are connected to the Salto Network using BLUEnet technology. Cuando seleccionas esta opción, se muestra un botón + Configurar en la pantalla de información del Tipo de conexión. En esta pantalla de + Configurar, puedes elegir las pasarelas o los nodos a los que puedes conectar el bloqueo. Esa funcionalidad de BLUEnet depende de la licencia. See Lockdown areas for more information. También puedes elegir la opción Habilitar actualización de llave para trabajar con SVN-Flex. Esto permite que las llaves se actualicen en los bloqueos BLUEnet en línea, de forma similar a las capacidades de actualización de llaves de los dispositivos CU. Para que esta funcionalidad funcione, debes actualizar el firmware de los bloqueos a la última versión. |
| BAS en línea | The RF functionality is license-dependent. Antes de seleccionar esta opción, comprueba que tu integración BAS se haya configurado completamente en las Opciones generales de Space. Consulta la pestaña BAS en Opciones generales para obtener más información. Cuando seleccionas esta opción, se muestra un panel de área de bloqueo en la pantalla de información de la Puerta. The RF functionality is license-dependent. That BLUEnet functionality is license-dependent. See Lockdown areas for more information. |
Modos de apertura y períodos programados
Consulta Modos de apertura para obtener información sobre los modos de apertura. Consulta Períodos programados para obtener información sobre los períodos programados.
Tiempos de apertura
El panel Tiempo de apertura define cuánto tiempo permanece abierta una puerta después de haber sido desbloqueada.
En la siguiente tabla se describen las diferentes opciones de tiempo de apertura de la puerta:
| Opción | Descripción |
|---|---|
| Tiempo de apertura | Define cuánto tiempo permanece activa la manija. La puerta se bloquea tan pronto como se suelta la manija, incluso si no se alcanza el valor de tiempo. El valor de tiempo predeterminado es de seis segundos. El valor se puede aumentar o disminuir en el rango de 0 a 255 segundos. |
| Tiempo de apertura aumentado | Define un tiempo de apertura más largo. Esta opción está diseñada para usuarios discapacitados o con 'manos llenas'. El valor de tiempo predeterminado es de 20 segundos. El valor se puede aumentar o disminuir en el rango de 0 a 255 segundos. Debes habilitar esta opción en el perfil del usuario. Consulta Opciones de clave para obtener más información. |
Calendarios y zonas horarias
La funcionalidad de calendarios define el calendario laboral de tu organización. Por ejemplo, puedes definir días festivos, vacaciones de la empresa y cierres de la empresa. Si tu organización consta de varios sitios que operan de acuerdo con diferentes calendarios de días laborables, se puede crear un calendario separado para cada sitio. Se pueden configurar hasta 255 calendarios en el sistema Salto Space.
La lista desplegable Calendario define qué calendario se aplica a la puerta. Consulta Calendarios para obtener más información.
El panel Zona horaria define cuál de las zonas horarias del sistema se utiliza para la puerta. Debes habilitar la funcionalidad de múltiples zonas horarias en Sistema > Opciones generales para mostrar este panel en Space. Consulta Activar múltiples zonas horarias y Zonas horarias para obtener más información.
Opciones de puerta
El panel Opciones de puerta define cómo se audita la actividad de la puerta. En la siguiente tabla se describen.
| Opción | Descripción |
|---|---|
| Auditoría en llaves | Permite supervisar cuándo y dónde se utilizan las llaves. Debes habilitar esta función tanto en el punto de acceso como en la llave del usuario. Cuando se selecciona esta opción, la puerta está habilitada para escribir o estampar la auditoría en la llave siempre y cuando la memoria de la llave no esté llena. Además, la casilla de verificación Auditar aperturas en la llave está habilitada en la pantalla de información del usuario. Si seleccionas un tipo de conexión en línea en el panel Tipo de conexión, la casilla de verificación Auditoría en llaves aparece atenuada. Esto se debe a que las puertas en línea están conectadas al sistema y pueden enviar información de auditoría directamente a él. |
| Detección de llave IButton: modo pulsado | Reduce el consumo de batería y el riesgo de óxido en los contactos del lector IButton, ya que la detección de la llave se realiza en modo pulsado en lugar de continuo. Para activar esta opción, debes habilitar el parámetro SHOW_KEY_DETECT_MODE en Space Opciones generales. Consulta la pestaña Avanzado para obtener más información. Esta opción solo es compatible con los PPD que tienen la versión de firmware 1.02 o superior. |
| Auditoría de apertura de la manilla interior | Permite supervisar cuándo un usuario sale por una puerta. Para las puertas RF, estos datos se transfieren automáticamente y se muestran en el registro de auditoría. |
| Admitir llaves caducadas | Permite el acceso a los usuarios que tienen llaves caducadas durante un número de días especificado. El rango de tiempo es de 0 a 255 días. Se puede aplicar a las puertas offline de baja seguridad situadas antes de un lector de pared SVN. Permite a los usuarios acceder al lector de pared SVN para actualizar sus llaves. Si la opción se activa con el valor "0", las llaves caducadas tendrán acceso a la puerta hasta las 24.00 horas del día en que hayan caducado. |
| Inhibir el registro de auditoría | Garantiza que la cerradura no memorice las aperturas en su registro de auditoría. Sin embargo, la cerradura todavía puede escribir información en la llave. Para activar esta opción, debes seleccionar la casilla de verificación Permitir la inhibición del registro de auditoría en la pestaña Sistema > Opciones generales > Puntos de acceso. |
| Limitar el acceso de los usuarios | Limita el acceso al número de usuarios que se muestra en el campo Limitar el acceso de los usuarios. Si seleccionas 5 en el campo Limitar el acceso de los usuarios, por ejemplo, no puedes conceder acceso a la puerta a más de cinco usuarios individuales. Esta restricción no se aplica a los usuarios de un nivel de acceso asociado a la puerta, ni a los usuarios que tienen acceso a una zona con la que está asociada la puerta. Para activar esta opción, debes habilitar el parámetro LIMITED_USER_ACCESS en Opciones generales de Space. Consulta la pestaña Avanzado para obtener más información. |
| Fuera del sitio | Permite que las llaves se invaliden (pero no se cancelen) cuando se presentan en los lectores de pared de salida SVN y establece un período de caducidad predeterminado corto para la revalidación de las llaves al volver a entrar. This option only applies to online IP (CU50xx) and online IP (CU42xx) doors that have two readers. In this case, access permissions are also removed from keys when they are presented at SVN exit wall readers. To activate this option, you must select the Enable 'out of site' mode checkbox in System > General options > Access points. When you select this checkbox, you can also enable Strict 'out of site' mode. Consulta la pestaña Puntos de acceso para obtener más información. |
Habilitación de antipassback
Si seleccionas la casilla de verificación Habilitar antipassback en el panel Antipassback, te aseguras de que un usuario no pueda entrar por la misma puerta varias veces hasta que haya salido primero por la puerta (o hasta que haya transcurrido un período de tiempo específico). Esto es para evitar que una llave sea utilizada por varios usuarios diferentes, por ejemplo, sería útil en un gimnasio para garantizar que todos los que entran en el gimnasio son miembros del mismo.
La funcionalidad antipassback depende de la licencia. Consulta Registrar y licenciar Space para obtener más información.
Si la puerta es una unidad offline, debes seleccionar la dirección del control antipassback de las dos opciones proporcionadas:
De fuera hacia dentro
De dentro hacia fuera
Si utilizas una CU50xx, no necesitas seleccionar la dirección del control antipassback para una CU, ya que tienen dos lectores: lector 1 y lector 2. El lector 1 siempre es de dentro hacia fuera y el lector 2 siempre es de fuera hacia dentro. Las puertas autónomas solo tienen un lector.
Para habilitar completamente la funcionalidad antipassback, debes seleccionar esta opción al crear y configurar un usuario en la pantalla Información del usuario. Consulta Creación de usuarios para obtener más información.
También puedes habilitar una funcionalidad antipassback 'estricta', si es necesario. Utiliza esto cuando quieras que el sistema impida que un usuario salga cuando no hay ningún registro de que haya entrado previamente. Para habilitar esta funcionalidad, debes seleccionar la casilla de verificación Habilitar antipassback estricto en Sistemas > Opciones generales > Puntos de acceso.
Para que esta funcionalidad funcione con puertas online, debe haber un lector de pared de entrada y un lector de pared de salida. Para las puertas offline, debes seleccionar la dirección del control antipassback de las dos opciones proporcionadas:
- De fuera hacia dentro
- De dentro hacia fuera
For online doors, only Online IP (CU42xx), you can also activate antipassback in third-party readers. Esta lógica solo se puede aplicar a las puertas relacionadas con los puntos de acceso conectados al uso de lectores de terceros integrados con el CU42X0 en línea.
Esta lógica no está relacionada con nuestro sistema SVN estándar, pero la gestiona la base de datos. Las puertas deben estar online para poder gestionar esta función de permiso de acceso.
Para habilitar esta funcionalidad, debes seleccionar la casilla de verificación Habilitar antipassback en lectores de terceros en Sistemas > Opciones generales > Puntos de acceso. Consulta la pestaña Puntos de acceso para obtener más información.
Añadir/cambiar modos de apertura
Para añadir o cambiar un modo de apertura de puerta, sigue los pasos que se indican a continuación:
- Selecciona Puntos de acceso > Puertas. Se muestra la pantalla Puertas.
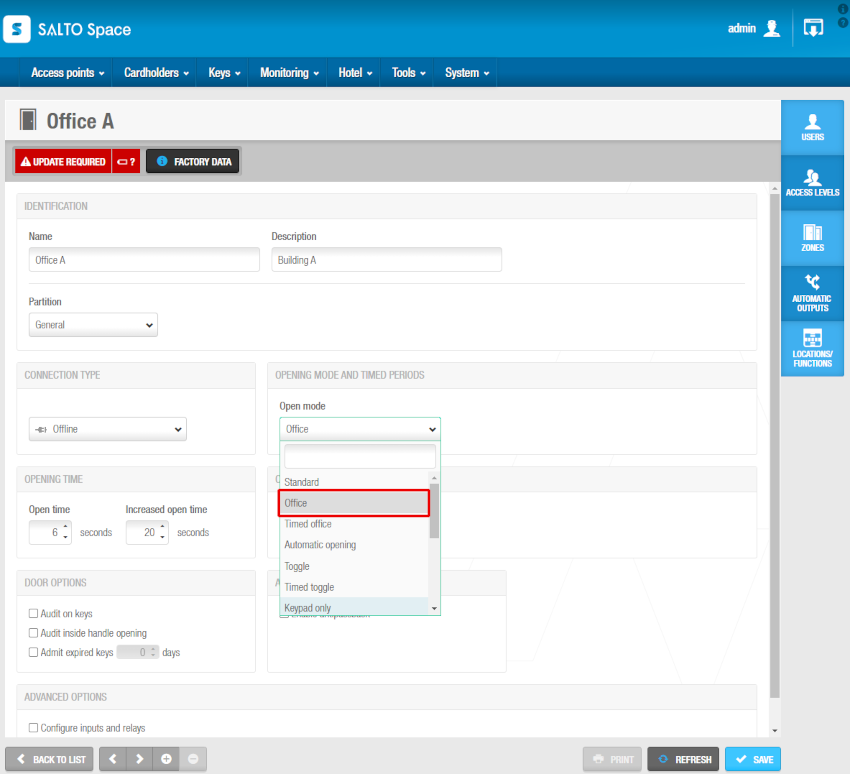 Pantalla de información de la puerta
Haz clic en la puerta requerida. Se muestra la pantalla de información de la Puerta.
Selecciona el modo requerido de la lista desplegable Modo de apertura.
Haz clic en Guardar.
En el ejemplo anterior, el cuadro de advertencia Actualización requerida es rojo porque la puerta offline debe actualizarse mediante un PPD. Las puertas online se actualizan automáticamente. Consulta PPD para obtener más información.
El botón Datos de fábrica se muestra después de crear y guardar una entrada de puerta. Los datos de fábrica se refieren a información específica de la fabricación, como la fecha de fabricación y la versión del firmware. Este botón solo se activa cuando conectas un PPD a tu PC después de que el PPD se haya conectado a una cerradura y se haya transferido información.
CU4200 autónomo
Para configurar una CU4200 como autónoma, habilitando así la programación de salidas y entradas de la unidad de control, sigue estos pasos:
- Configura la Tipo de conexión de la puerta como "Offline".
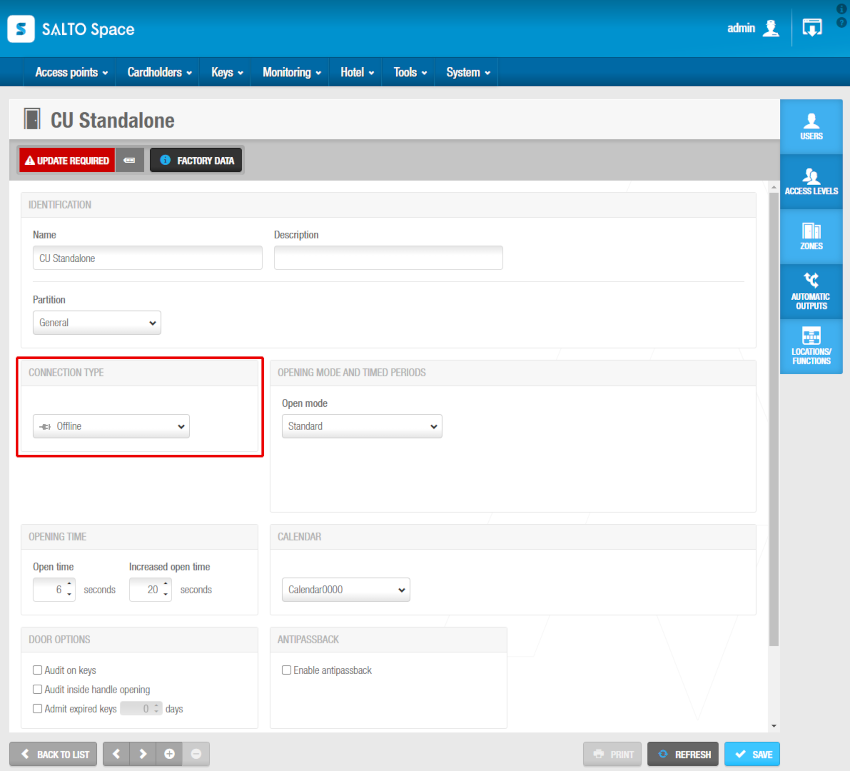 Configuración CU autónoma
- En Opciones avanzadas, haz clic en la casilla de verificación Configurar entradas y relés. Ahora puedes configurar las entradas y salidas de la CU.
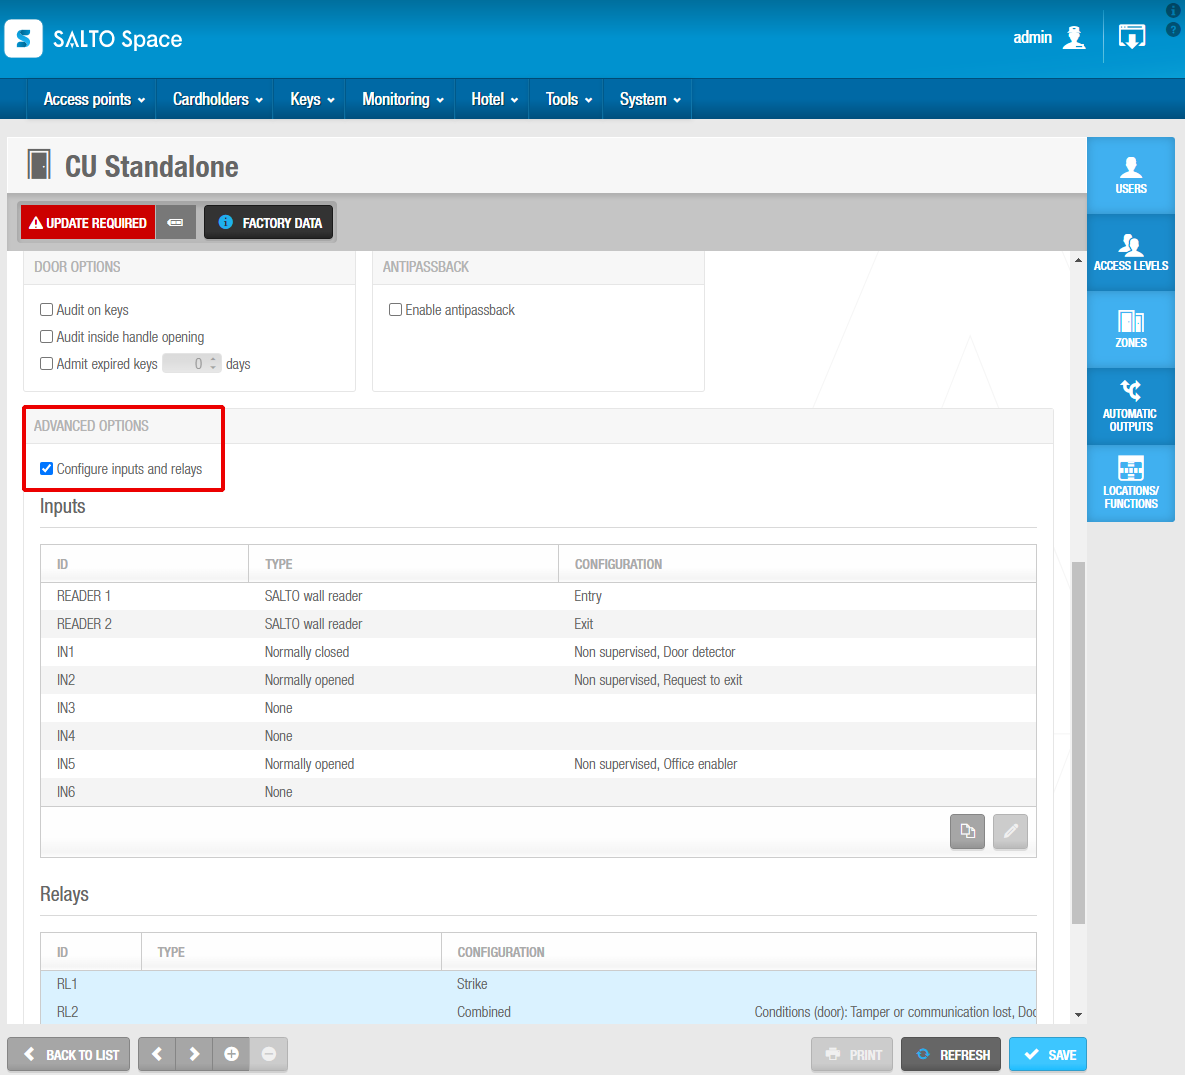 Configuración de entradas y relés de CU
- Inicializa la CU con el PPD en Sistema > PPD. Consulta PPD para obtener más información sobre la inicialización de PPD.
BLUENet Door Controller
BLUENet Door Controller devices are configured in a similar manner to CU4200 standalone devices. You do not add BLUENet controller devices to the Salto Network. Instead, you need to add them as either Online BLUEnet or Offline doors. As with CU4200 devices, the key difference from regular doors is the ability to manage inputs and relays with these controllers.
How to add a BLUEnet Door Controller
- On the door configuration screen, set the connection type to either Online BLUEnet for an online device or Offline if it is to be a standalone device.
- For online devices, you can assign the BLUEnet Controller to a node or repeater by clicking on the + Configure button in the Connection type panel. To configure inputs and relays, scroll down to Advanced options and check the box labeled Configure inputs and relays. This will display new sections for configuring the inputs and relays for the door.
- Configure the components. For a main CUC1B0 unit only, you can configure READER 1, IN1, IN2, RL1, and RL2. If you add a secondary CUCEB122 unit, you will then also configure READER 2, IN3, IN4, RL3, and RL4 for the same logical door.
- Configure the relays (CUCEB004). The relays on these extension boards function as Card output. Their numbering is configured physically using the DIP switch on the device.
- Apply configuration changes. For offline devices, you must transfer the new configuration to the door using a PPD. For online BLUEnet devices, configuration changes are propagated automatically over the network.
See also the section on using inputs and relays for more information.
Asociación de puertas
Después de haber creado y configurado una puerta, debes asociar usuarios, niveles de acceso, zonas y salidas automáticas y/o ubicaciones/funciones con esa puerta. Las siguientes secciones describen cómo asociar puertas con los distintos componentes.
Debes seleccionar un horario y un período de tiempo del punto de acceso para cada puerta. Consulta Horarios de los titulares de tarjetas y Períodos de tiempo para obtener más información.
Usuarios
Para permitir el acceso a una puerta, debes asociar la puerta a un usuario. Consulta Usuarios para obtener información sobre la creación de usuarios.
Para asociar un usuario a una puerta, sigue los pasos que se indican a continuación:
Selecciona Puntos de acceso > Puertas. Se muestra la pantalla Puertas. Haz clic en la puerta que quieres asociar a un usuario. Esto significa que estás asignando permisos de acceso de usuario para esa puerta. Se muestra la pantalla de información de la Puerta.
Haz clic en Usuarios en la barra lateral. Se muestra el cuadro de diálogo Usuarios. Ten en cuenta que el cuadro de diálogo estará en blanco si aún no has asociado un usuario a esta puerta en particular.
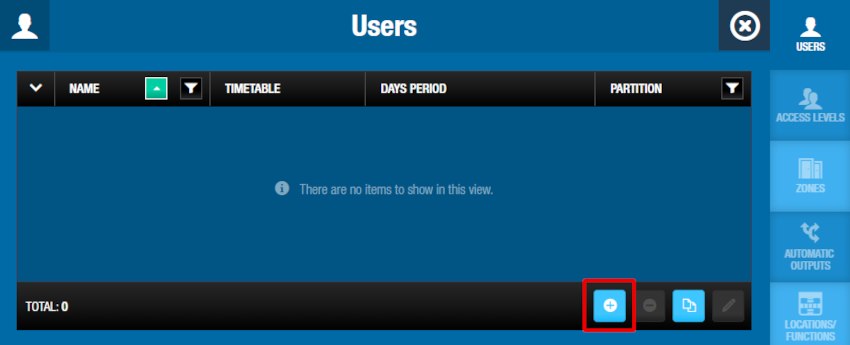 Cuadro de diálogo Usuarios
- Haz clic en Añadir. Se muestra el cuadro de diálogo Añadir, que muestra una lista de usuarios.
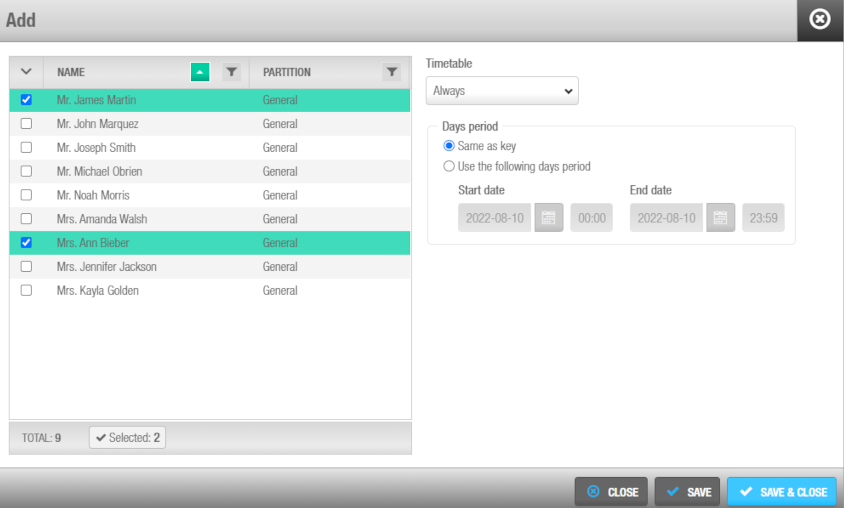 Cuadro de diálogo Añadir
Selecciona los usuarios requeridos.
Selecciona el Horario adecuado mediante la lista desplegable y el Período de días. También puedes seleccionar la opción de horario de la lista desplegable Siempre o Nunca. La opción Siempre está seleccionada de forma predeterminada. Esto significa que los usuarios siempre tienen acceso a la puerta, ya que no has especificado un horario.
Ten en cuenta que los calendarios del sistema no se aplican si se selecciona la opción Siempre. Si seleccionas Nunca, no tendrán acceso a la puerta en ningún momento. Consulta Horarios de los titulares de tarjeta para obtener más información.
- Haz clic en Guardar y cerrar. Los usuarios seleccionados ahora tienen permisos de acceso para esa puerta.
Para modificar el Horario o el Período de días del titular de la tarjeta de un usuario de una puerta específica, desde el cuadro de diálogo Usuarios, haz lo siguiente:
- Selecciona el usuario que quieres editar y, a continuación, haz clic en Editar.
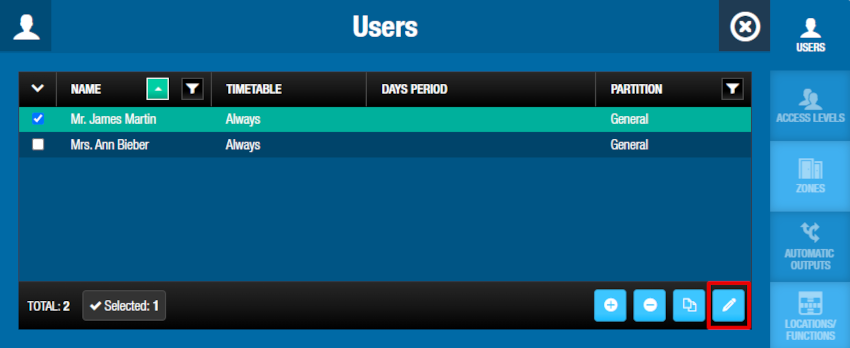 Botón Editar
- Modifica la selección de Horario y Periodo de días y guarda los cambios.
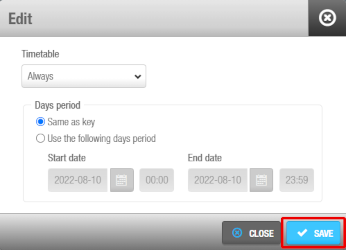 Cuadro de diálogo Editar
Para disociar a un usuario de una puerta, desde el cuadro de diálogo Usuarios de la puerta específica, sigue los pasos que se indican a continuación:
Select the user to be dissociated.
Haz clic en Eliminar y confirma la acción en el cuadro de diálogo Advertencia.
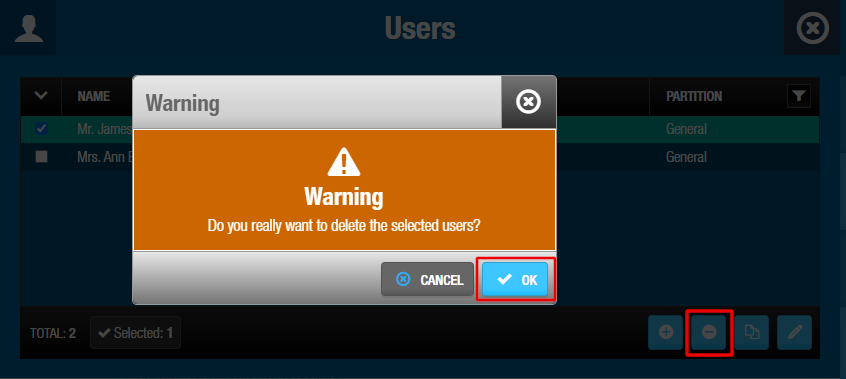 Botón Eliminar
Niveles de acceso
Consulta Niveles de acceso de usuario, Niveles de acceso de visitante y Niveles de acceso de invitado para obtener información sobre cómo crear y configurar niveles de acceso.
Para asociar una puerta con un nivel de acceso, haz lo siguiente:
Selecciona Puntos de acceso > Puertas. Se muestra la pantalla Puertas.
Haz clic en la puerta que quieres asociar a un nivel de acceso. Se muestra la pantalla de información de la Puerta.
Haz clic en Niveles de acceso en la barra lateral. Se muestra el cuadro de diálogo Niveles de acceso. Ten en cuenta que el cuadro de diálogo estará en blanco si aún no has asociado un nivel de acceso a esta puerta en particular.
Haz clic en Añadir. Se muestra el cuadro de diálogo Añadir, que muestra una lista de niveles de acceso.
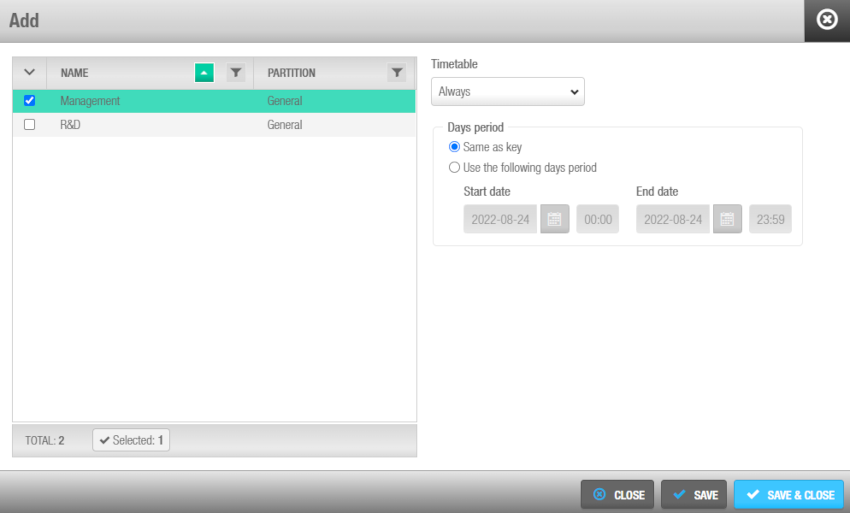 Cuadro de diálogo Añadir
Selecciona el nivel de acceso necesario en el panel izquierdo y el horario en la lista desplegable de la derecha.
Haz clic en Guardar y cerrar. La puerta ahora está asociada al nivel de acceso.
Para modificar un horario o período de días de nivel de acceso de un punto de acceso específico, desde el cuadro de diálogo Niveles de acceso de la puerta específica, sigue los pasos que se indican a continuación:
Selecciona el nivel de acceso que quieres editar y, a continuación, haz clic en Editar.
Modifica la selección de Horario y Periodo de días y guarda los cambios.
Para disociar un nivel de acceso de una puerta, desde el cuadro de diálogo Niveles de acceso de la puerta específica, sigue los pasos que se indican a continuación:
Select the access level to be dissociated.
Click on Delete and confirm the action in the Warning dialog box.
Zonas
Consulta Zonas para obtener información sobre cómo crear y configurar una zona.
Para asociar una puerta con una zona, haz lo siguiente:
Select Access points > Doors. The Doors screen is displayed.
Haz clic en la puerta que quieres asociar a una zona. The Door information screen is displayed.
Haz clic en Zonas en la barra lateral. Se muestra el cuadro de diálogo Zonas.
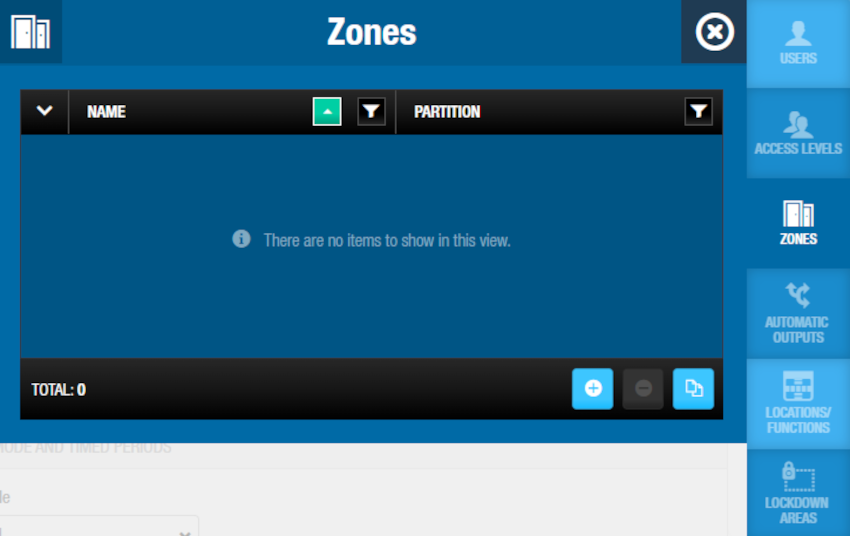 Cuadro de diálogo Zonas
Ten en cuenta que el cuadro de diálogo estará en blanco si aún no has asociado una zona a esta puerta en particular.
Haz clic en Añadir. Se muestra el cuadro de diálogo Añadir, que muestra una lista de zonas.
Selecciona la zona necesaria y haz clic en Guardar y cerrar. La puerta ahora está asociada a la zona.
Para disociar una puerta de una zona, desde el cuadro de diálogo Zona de la puerta específica, sigue los pasos que se indican a continuación:
Select the zone to be dissociated.
Haz clic en Eliminar y confirma la acción en el cuadro de diálogo Advertencia.
Salidas automáticas
Consulta Salidas para obtener una definición e información sobre cómo crear y configurar una salida automática.
Para asociar una puerta con una salida automática, sigue los pasos que se indican a continuación:
Selecciona Puntos de acceso > Puertas. Se muestra la pantalla Puertas.
Haz clic en la puerta que quieres asociar a una salida automática. Se muestra la pantalla de información de la Puerta.
Haz clic en Salidas automáticas en la barra lateral. Se muestra el cuadro de diálogo Salidas automáticas. Ten en cuenta que el cuadro de diálogo estará en blanco si aún no has asociado una salida a esta puerta en particular.
Haz clic en Añadir. Se muestra el cuadro de diálogo Añadir, que muestra una lista de salidas automáticas.
Selecciona las salidas automáticas necesarias en el panel izquierdo y el período de tiempo del punto de acceso en la lista desplegable de la derecha. La puerta seleccionada ahora está asociada a la salida automática. Consulta Períodos de tiempo para obtener más información.
Haz clic en Guardar y cerrar.
Para modificar el Período de tiempo de una salida automática, desde el cuadro de diálogo Salidas automáticas, haz lo siguiente:
Selecciona la salida automática que quieres editar y, a continuación, haz clic en Editar.
Modifica el Periodo de tiempo y guarda los cambios.
Para disociar una salida automática de una puerta, desde el cuadro de diálogo Salidas automáticas, haz lo siguiente:
Select the automatic output to be dissociated.
Haz clic en Eliminar y confirma la acción en el cuadro de diálogo Advertencia.
Áreas de bloqueo
Consulta Áreas de bloqueo para obtener una definición e información sobre cómo crear y asociar un área de bloqueo.
La función Áreas de bloqueo depende de la licencia. Consulta Registrar y licenciar Space para obtener más información.
Para asociar una puerta con un área de bloqueo, haz lo siguiente:
Selecciona Puntos de acceso > Puertas. Se muestra la pantalla Puertas. Haz clic en la puerta que quieres asociar a un área de bloqueo. Se muestra la pantalla de información de la Puerta.
Haz clic en Áreas de bloqueo en la barra lateral. Se muestra el cuadro de diálogo Área de bloqueo.
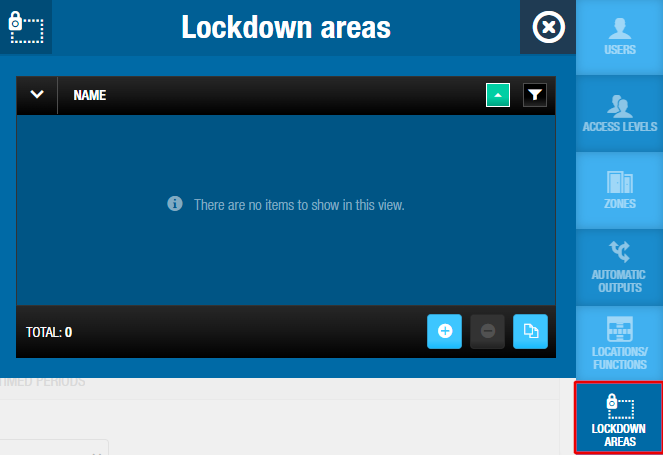 Cuadro de diálogo Áreas de confinamiento
El cuadro de diálogo estará en blanco si aún no has creado un área de bloqueo. Consulta Áreas de bloqueo para obtener información sobre cómo crear y asociar un área de bloqueo.
- Selecciona la ubicación necesaria en el panel Áreas de bloqueo del cuadro de diálogo. La puerta ahora está asociada al área de bloqueo (una puerta podría pertenecer a más de un área de bloqueo).
Para los sistemas con un gran número de áreas de bloqueo, es posible filtrar por área de bloqueo.
- Haz clic en Guardar y cerrar.
Para disociar un área de bloqueo de una puerta, desde el cuadro de diálogo Áreas de bloqueo, sigue los pasos que se indican a continuación:
Select the lockdown area to be dissociated.
Haz clic en Eliminar y confirma la acción en el cuadro de diálogo Advertencia.
Ubicaciones/Funciones
Note that the partitions functionality is license-dependent. Consulta Registrar y licenciar Space para obtener más información.
Para asociar una puerta con una ubicación/función, sigue los pasos que se indican a continuación:
Selecciona Puntos de acceso > Puertas. Se muestra la pantalla Puertas.
Haz clic en la puerta que quieres asociar a una ubicación/función. Se muestra la pantalla de información de la Puerta.
Haz clic en Ubicaciones/Funciones en la barra lateral. Se muestra el cuadro de diálogo Ubicaciones/Funciones.
Ten en cuenta que el cuadro de diálogo estará en blanco si aún no has creado una ubicación o una función. Consulta Ubicaciones y Funciones para obtener información sobre cómo crear y asociar una ubicación y una función.
Consulta la pestaña Ubicaciones/Funciones para obtener información sobre cómo añadir agrupaciones para ubicaciones y funciones.
Selecciona la ubicación necesaria en el panel Ubicaciones del cuadro de diálogo. La puerta ahora está asociada con la ubicación.
Selecciona la función requerida en el panel Funciones del cuadro de diálogo. La puerta ahora está asociada con la función.
Para los sistemas con muchas funciones y/o ubicaciones, es posible filtrar por el nombre de la Ubicación o la Función y también por el estado "Seleccionado" o "No seleccionado".
Estado de la puerta
En la siguiente tabla se muestran los diferentes estados, como Batería baja o Actualización necesaria, que tus puertas pueden indicar en un momento dado. Estos estados se muestran en la pantalla Puertas.
| Icono | Descripción |
|---|---|
| Actualización necesaria | Indica que una puerta necesita ser actualizada. Este icono se muestra en la columna Actualización necesaria. |
| Desconocido | Indica que se desconoce el estado de la batería de una puerta. Este icono se muestra en la columna Batería. |
| Estado de la batería | Indica el estado de la batería de una puerta. Puede ser normal, bajo o agotado. |
Imprimir
Puedes descargar la información de la puerta haciendo clic en el botón Imprimir. Una vez que el documento se guarda en uno de los diferentes formatos disponibles (PDF y Excel), puedes imprimir una copia física del mismo.
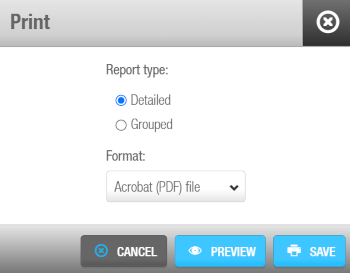 Cuadro de diálogo Imprimir
Hay 2 tipos diferentes de informes: Agrupado y Detallado. Ambos informes muestran la información de la puerta, como su identificación, opciones de puerta, tipo de conexión, estado de bloqueo, modo de apertura y períodos programados.
Agrupado muestra una lista de Zonas en las que se incluye la puerta, una lista de Titulares de tarjeta que tienen acceso directo a la puerta, una lista de Niveles de acceso de los que son miembros las puertas, etc. Las tablas de titulares de tarjetas y niveles de acceso muestran los horarios, el período de días y la partición.
Detallado muestra una lista de Zonas en las que se incluye la puerta, una lista de Titulares de tarjeta que tienen acceso directo a la puerta, salidas automáticas, etc. Under Timetable, you can see the cardholder timetable and under Days period, the days the access to the door is permitted for the cardholder.
The Cardholders table displays a list of users that have access to the door through the access levels and zones shown in the table.
 Atrás
Atrás
