Creating installation users in Homelok
Overview
In Salto Homelok there are generally two types of users:
- Users who require access to and within an installation or unit
- Users with management roles who have permissions to manage other users and other aspects of the system
Typically, users are keyholders who gain access using a key (physical or digital).
The ability to manage other users depends on the management role you grant to that user. Users with management roles can manage different elements of the software like other users, their keys and access schedules, for example. Users with management roles can also be keyholders.
In Homelok, there are three types of users with management roles:
This section relates mainly to creating users at the installation level. To create unit-specific users, you need to select the Units section from the main menu of Homelok.
As an owner or a property manager, it's generally expected that you will create users who are unit managers. Once you've created units, you can then create the unit managers for each unit, within those units, invite them to their specific unit, and handover the management of the unit to them.
Nevertheless, property managers and owners can also create users at the installation level. In general, these users will be other property managers who will manage the entire installation. You can also create installation keyholders but they will generally be users who only have access to the installation doors.
These keyholders tend to be maintenance staff or cleaners, for example, who perhaps only need access to the main entrances of a property, as well as other areas like the gym or swimming pool. They would not generally have access to the individual units, i.e.: the apartments or homes which are managed by unit managers. However, as a property manager, you can assign these keyholders access to unit doors if required. This might be required in emergency situations, or where maintenance teams need access to specific unit doors.
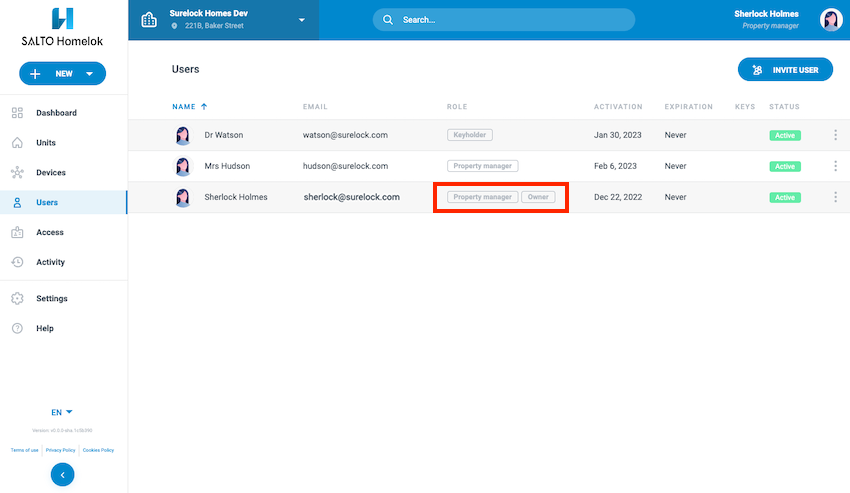
Selecting Users on the left menu bar lists the users who have been created within the current installation. If no users are listed already you can create new users as detailed below.
 Users at the installation level can either be property managers or keyholders
Create a user
Before you can invite a user to your installation, you first have to create the user. Once you've created the user, by adding the user's personal details (name, email, etc.), you can then indicate the access you want to give them. In the final step, you can assign their keys.
To create a user, do the following:
- Choose Users from the left-hand menu
- The Users menu is displayed
- Select New user and fill out the fields as detailed below
You can also use the shortcut menu at the top left of any section to create a new user.
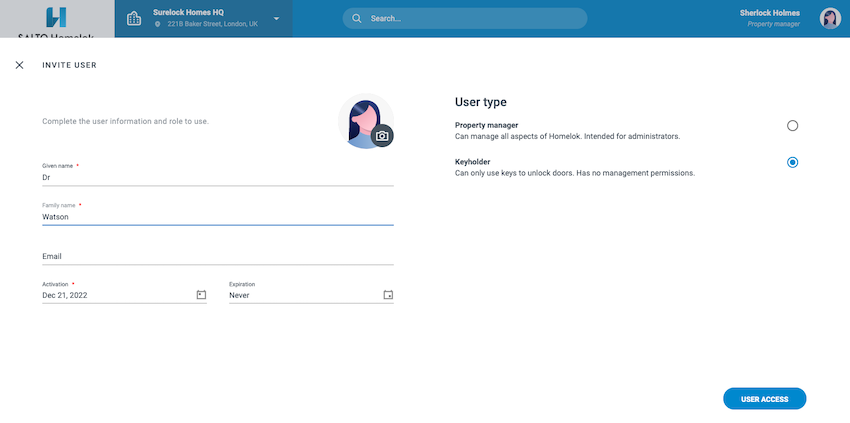
Name
The name is composed of two fields: Given name and Family name.
The Given name is the user's personal name, forename or "first" name. This field can also contain a middle name.
The Family name is the user's surname or "last" name. This field can also contain more than one surname.
When naming users bear in mind you can't use names that already exist in your installation. If you try to create a user with an existing name, then the error message There is already a user with that full name will display.
This field is only required if the user being created is another property manager, or will receive an app key via the Homelok app.
An email address is asked for when issuing an app key because the system sends an email notification to the user so they can receive the key via the app on their phone. If the user is a keyholder being assigned a physical key such as a card or fob, you do not need to add their email address.
Email addresses must be unique per installation or unit. That's to say, you can't have more than one user with the same email address in an installation or unit.
Activation and expiration
You can give users time-limited access to the system. You can delay the time when a user becomes activated by setting the activation time to a future date. You can also set an expiration date for the user or set the user to never expire.
Note that users remain valid until midnight on the day specified in the Expiration field. Once midnight passes, they will no longer be able to use keys to access to your installation.
User types
This section relates to user types that are available at the installation level. It does not contemplate user types at the unit level.
You can add or modify a user's management role by selecting the user type on the user information screen. The following user types are available at the installation level:
Property managers
When creating other property managers, you don't need to assign them keys or access to the installation, although you can do so if necessary.
You must make sure, however, that you add a valid email address because property managers need to use their email address to sign in to Homelok.
Keyholders
Keyholders at the installation level tend to be maintenance staff or cleaners, for example. As previously explained, you wouldn't generally give keyholders at the installation level access to unlock unit doors. However, in emergency situations or to carry out maintenance work, you can give installation keyholders access to specific unit doors, if required.
Owners
Owners cannot be created using the regular user creation flow. A user with the owner role is instead created automatically at the same time as the installation is created.
The role of owner is the most powerful role in Homelok. It's similar to the property manager role, but has two major differences. A property manager cannot delete or transfer installations whereas an owner can.
The owner role can also be transferred from one user to another using the transfer installation ownership functionality.
 Owners cannot be created in the regular user creation flow, they are instead created automatically the first time an installation is created.
Here are some considerations for the owner role:
- There can be one user in an installation at any time with the owner role.
- The owner role can only be acquired when creating a new installation or by receiving the ownership of the installation from another user in a transfer.
- A user who has the owner role cannot be deleted.
- A user who has the owner role cannot be blocked.
- There must always be one owner in an installation.
Profile photo
You can also upload a photo of the user at the same time as you're creating them. If you don't upload a photo, an avatar is automatically generated.
Select the avatar beside the user's name and chose an existing image that you already have on your device or computer.
If you use the Homelok app to create the user, you can take a picture using your phone or upload an existing one.
User profile photos must have the following attributes:
- Minimum size of 400×400px
- Maximum weight of 10 MB
- Either JPEG or PNG format
