Assigning keys to users in Homelok
Overview
Salto Homelok supports multiple types of contactless key technologies. In addition to physical keys such as fobs or keycards, you can also assign digital keys to users for them to use on their mobile devices.
Each key, whether physical or digital, securely encodes the same access that is specific to each user and is configured under the corresponding user profile in Homelok.
Supported key types
You can assign the following types of keys to your users:
| Type | Description |
|---|---|
| App key | A digital key residing in the Salto Homelok mobile app on an iOS or Android phone. |
| Key | A physical contactless key such as a fob or keycard. |
| Apple Wallet key | A digital key residing in Apple Wallet, on either an iPhone or an Apple Watch. |
| Passcode | A numeric code that allows users to gain access via locks that are equipped with keypads. |
Apple Wallet keys are license-dependent and only available on iOS devices. Please contact sales for more details.
Assigning keys
Once you've configured the user's access, you can assign keys using the Manage keys panel.
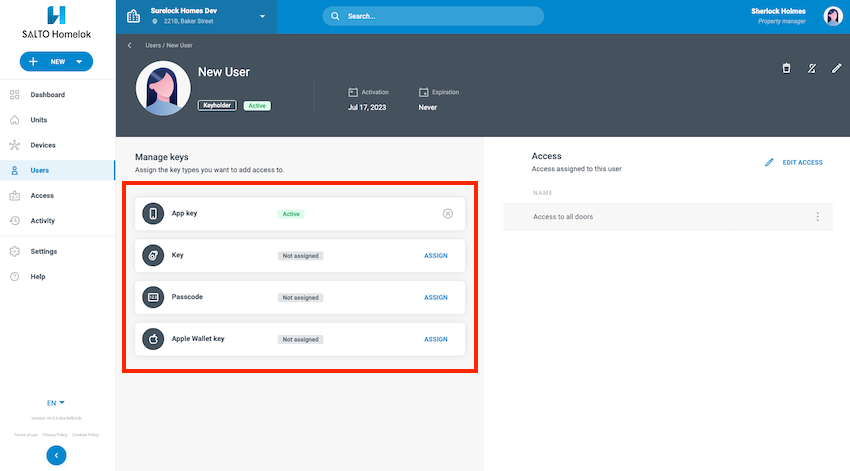 Use the 'manage keys' panel to assign keys to users
App keys
The Salto Homelok app allows users to use their iOS or Android phones as their key, by opening the app and presenting their device to the electronic locks in an installation.
To assign an app key to a user, click Assign beside the App key option. Upon clicking the button, the user will receive an email with instructions on how to download the app and activate their app key.
The user must have a valid email address in order to be assigned an app key. If no email address is set up in the user profile, selecting this option opens a dialog box prompting for an email address when you assign the key.
Keys
You can assign different types of physical keys to your users such as fobs or keycards.
There are 2 ways in Homelok to assign physical keys:
- Auto-assign: keys are automatically assigned to users by presenting them to an online lock.
- Using an encoder device.
These are described in more detail below:
Auto-assign
To auto-assign a physical key, click Assign beside the Key option. In the Auto-assign tab enter the UID or serial number printed on the fob or keycard in the UID field.
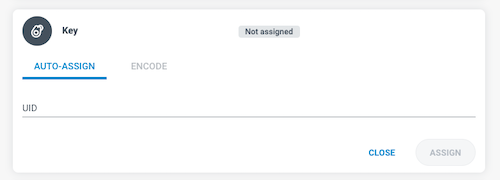 Enter the UID or serial number in the 'UID' field
Once you've entered the UID, and pressed Assign again, the key is marked as Pending activation in the user's profile. The key will be automatically activated when it's presented to an online electronic lock for the first time.
 Auto-assigned keys are marked as 'Pending activation' until they are presented at an online lock for the first time
Make sure you use the correct 14-digit hexadecimal UID when auto-assigning a physical key. If you enter an incorrect 14-digit code, you may see that the key is marked as Pending activation. However, if the code is incorrect, when the user presents their key to an online lock it will not be activated.
In the same way, if you enter a UID that is already being used by another key, an error message displays indicating that the key cannot be assigned.
Note that if you use the auto-assign feature and you have an encoder set up in the installation, you can also activate the key by placing it on the encoder and pressing the Update button. This option only displays if there's an active encoder in the system.
 If there's an encoder in the installation you can use the 'Update' button to activate the key.
Encode
The Encode option allows you to assign a physical key using an encoder device like the Salto NCoder.
Before you can assign keys using an encoder, you must first set up and configure the encoder. The Encode option only displays if you have one or more encoders created in your installation.
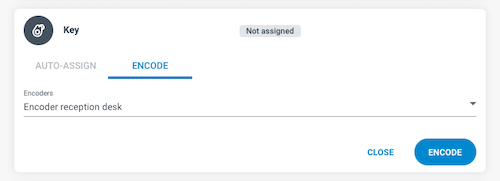 You need to connect an encoder device for the 'Encode' option to display
See also the section on creating encoders for more details on how to set up an encoder.
Once your encoder is configured correctly, it will display in the Encoders list in the Encode tab.
To assign a key using the encoder do the following:
- Select the correct encoder
- Place the user's key on top of the encoder
- Press Encode
Note that keys assigned using an encoder become Active from that moment onwards. Unlike with the Auto-assign option, the user does not need to present the key at an online lock to activate it.
Once a user's key has been encoded, the UID of that key will display in the activity section in the event detail, as below:
 An encoded key displays the UID in the activity section
Passcodes
Passcodes are intended to be used with locks that have keypads, for example the Salto DBolt Touch, where a user inputs a numeric code to gain access.
Passcodes in Homelok are six-digit codes that are randomly generated by the software. You cannot enter a custom code in the Passcode field.
To generate a new passcode, press the Assign button beside the Passcode option. A six-figure code displays in the Passcode field.
Using the Copy passcode option, you can then share the code with the user via your preferred secure channel (email, WhatsApp, etc.).
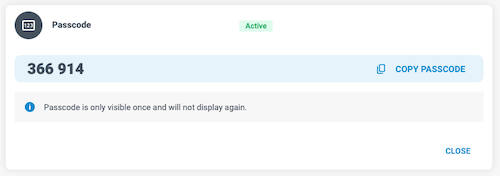 Passcodes are only visible once and do not display again once you move away from the user's profile screen.
Note that the number displayed in the Passcode field is only visible once. If you navigate away from the user profile page and come back to it, the number will no longer be shown.
If a user forgets their passcode, or their passcode is compromised, you need to generate a new one using the Assign button. By doing so, the previous passcode that was assigned to the user becomes invalid for that user.
Keypad disabling
For electronic locks equipped with keypads, like the DBolt Touch, the keypad is disabled for a specified amount of time if the user enters an incorrect passcode. In Homelok, by default, keypads are disabled for 90 seconds after 3 incorrect passcode attempts.
Once 90 seconds have passed, the keypad is again disabled with each incorrect attempt until a valid passcode is entered.
When the keypad is disabled, the LED of the lock blinks red and emits a short beep.
Apple Wallet keys
This feature is only available on iOS devices. Please contact sales for more details.
Salto Homelok integrates with Apple Wallet to offer a seamless digital key experience on iPhone and Apple Watch. Apple Wallet keys allow users to use their iPhone or Apple Watch as a key to unlock electronic locks, in a similar manner as with a contactless fob or keycard without the need to download a specific app.
To assign an Apple Wallet key to a user, select the Apple Wallet key option. When you click Assign, a link will be displayed so you can share the Apple Wallet key with the designated user via your preferred secure channel.
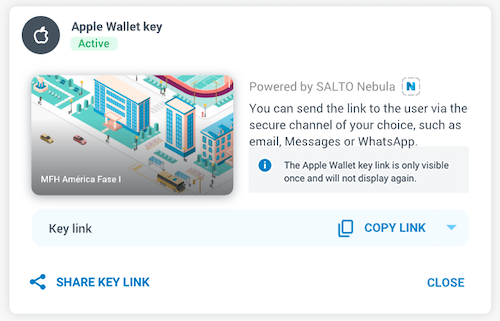 By default, you can either copy the Apple Wallet key link or send it via email.
The below sharing options are available:
- Copy link
This option copies a link to the user's key to the clipboard. You can then send the link to the user via the secure channel of your choice, such as email, Messages or WhatsApp, by composing a new message and pasting the link in the body of the message.
You can use this option if you don't have a default email application set up on the device you use to manage Homelok, for example.
- Share key link
A message containing a link to the key is automatically created and can be shared using a messaging application installed on the device you use to manage Homelok. For example, this might be Mail if you use a Mac. It could also be Messages or WhatsApp, depending on the applications you have installed.
Check that the recipients's contact details are correct before sharing the key link.
Sending a link to an Apple Wallet key via Messages or WhatsApp may cause the link not to be clickable on the recipient's device, if the phone number used to send the link is unknown by the device (that's to say, it's not in the user's contacts). To ensure the best user experience, we recommend sharing the link via email.
Apple Wallet key sharing
Keyholders can share their own Apple Wallet keys with other users directly from the Apple Wallet key itself using the sharing option. They do not need access to the Homelok web or app interface to be able to do this. See the section on Apple Wallet key sharing for more details.
Canceling keys
You can cancel any type of key at any time in order to prevent it from being further used to access an installation.
Examples of cases where you should consider canceling a key include:
- A user loses a physical key or a mobile device that holds an app key or an Apple Wallet key, or reports either as stolen.
- A user reports that they did not receive the link to obtain an Apple Wallet key, or is unable to add the key to Apple Wallet from the link they received.
To cancel a key, use the Manage keys panel to disable the key in the user's profile.
 Use the 'Cancel key' option to cancel any type of user key.
- Canceling any type of key causes the key to no longer grant access to any electronic locks on the installation.
- When you cancel any type of key, the key is no longer active in the user's profile page.
- When you cancel an Apple Wallet key, the user receives a notification from Apple Wallet indicating that the key has been disabled.
 Back
Back
