Electronic locks in Homelok
Overview
An electronic lock is a physical electronic locking device such as an electronic escutcheon, cylinder or motorized lock. It differs from a door in that an electronic lock is a specific model of a device like a Salto Neo cylinder or an XS4 escutcheon.
Doors, meanwhile, like apartment doors, lockers, turnstiles, car park barriers or any point of entry or exit, are the logical entities that manage the physical devices. Doors must always be associated with at least one electronic lock.
In Homelok, you use doors to manage the behavior of electronic locks within your installation's access plan. That's to say who enters where and when. A door can either represent one individual electronic lock or a collection of devices capable of granting or denying access to a user.
You manage electronic locks and their associated doors via Devices and by selecting Electronic locks in the Device type list when creating a new device.
Creating electronic locks
When you create an electronic lock, you are also creating the door which manages the access plan of that specific electronic lock.
Go to Devices > New device and select Electronic lock from the Device type drop-down menu.
Note while you can create doors and their associated electronic locks in Homelok web, you set up and configure the physical electronic lock devices using the Nebula mobile app.
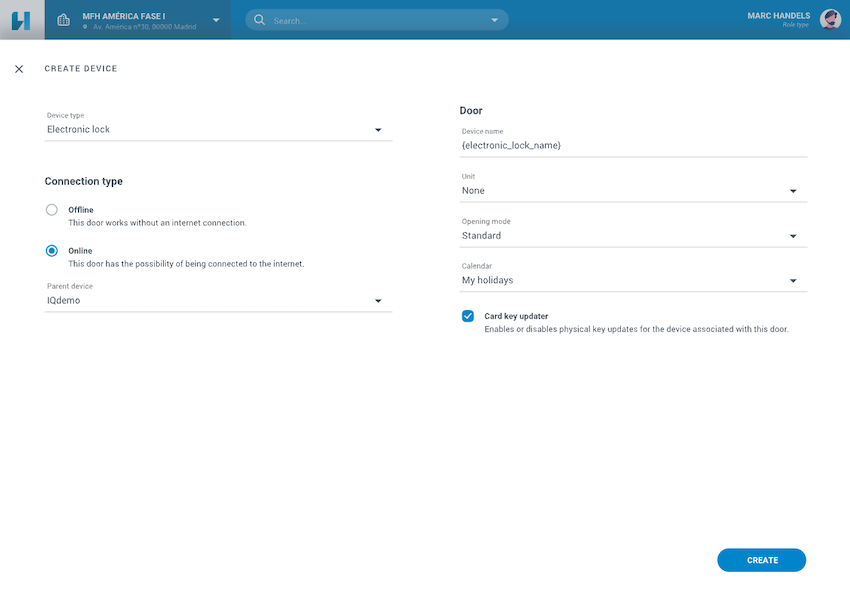 Creating an electronic lock in Homelok web
Connection type
Connection type is a property that applies specifically to the electronic lock associated with the door. In Homelok, electronic locks can have two connection types, online or offline.
Online
Online electronic locks can be either hardwired to the Salto network or wireless. If an electronic lock is online, then it needs a parent device, generally a gateway, like the IQ3 or IQ3 Mini. If you're creating an online electronic lock, select Online in the connection type. This activates a pop-up Select parent device window with a list of previously created parent devices.
It's recommended that you create the parent device in the Devices section before creating the electronic lock that you want to associate with it.
Offline
Offline electronic locks are not connected to the Salto network and you need to update them using the Nebula app if you want to make a change to them like a firmware update, for example. An offline electronic lock does not need a parent device. See the electronic lock status section for more information on connection statuses.
Name
You should give your doors a unique name and use a coherent naming pattern so you can find them in your installation. Note that when you give your door a name in the Name field, it automatically applies the same name to its associated electronic lock. This means when you view a list of doors in Homelok, for example, they will have the same names as the electronic locks in the Devices section.
Unit
If your installation contains units, a list of units will display in the Unit field when you're creating an electronic lock. This allows you to create doors at the unit level and associate them with a specific unit.
Opening modes
You can add a custom opening mode to a door to define how you want the electronic lock to behave. The following opening modes are available in Homelok:
- Autolock (formerly standard)
- Office
- Toggle
An opening mode can either be applied to an electronic lock 24/7, or you can schedule opening modes to allow the lock to behave in different ways across specific times and days of the week. If you want to use opening mode schedules, you must first set them up in Settings > Opening mode schedules.
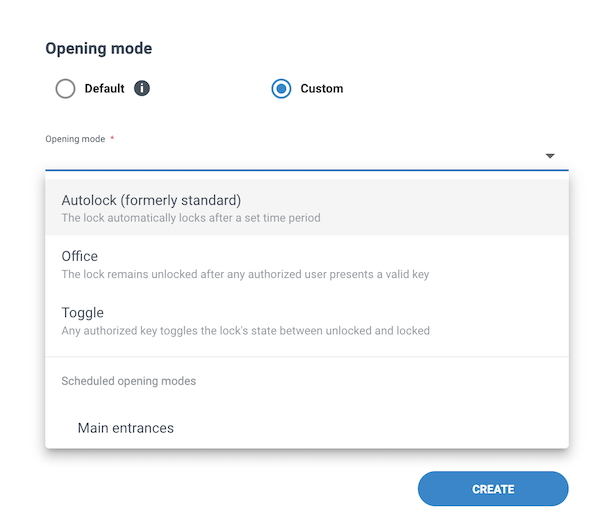 You apply the door's opening mode in the 'Opening mode' section of the associated electronic lock
If you do not define a custom opening mode, the lock will remain in default or factory mode. Default can vary depending on the type of lock. For example, a cylinder like the Salto Neo, or an XS4 One escutcheon, automatically lock ten seconds after they are unlocked. The lock will be in default unless the installer indicated otherwise when configuring the device.
Also note that the opening mode options can change once the device is configured. The options displayed here can vary from allowing you to choose custom or just the modes applicable for the specific device that has been configured.
You should check with your usual Salto contact if you're not sure which is the default mode of your lock.
To use opening mode schedules, you must first set them up in Settings > Opening mode schedules.
See the section on opening modes for a full description of this feature and how to set up opening mode schedules.
Calendars
You can add a calendar to a door to indicate days such as public holidays, company holidays or company shutdowns that are specific to your installation. You can mark these days as either Holidays or Other days. The calendars that you create are then applicable across the entire installation.
To select a calendar and apply it to a door you need to first create the calendar in Settings > Calendars. See the Calendars section of the documentation for more information.
Card key updater
Card key updater is an option that can be enabled or disabled on specific access points in the system. It refers to SVN-Flex updates that are activated by an electronic lock when a user presents a physical key like a keycard, fob or wristband. The Card key updater option is enabled by default in Homelok for all online access points.
See also the section on expiration and validity for more information.
Firmware
Once an electronic lock has been configured by the Nebula app, you can see the firmware number and version of the device in the Firmware section of the side panel.
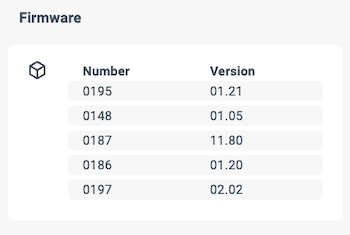 Example of how firmware numbers and versions are displayed
See also the section on updating firmware for more information about firmware updates.
Remote unlocking and locking
You can lock or unlock online doors "remotely", i.e.: directly from Homelok web, rather than using a key at the door. This might be useful if you want to give immediate access to a user who has lost their key, or doesn't have one. You can also lock a door remotely if you want to ensure that it is secure.
Only users with the role of owner and property manager can lock or unlock doors remotely, provided they have the correct access to the door in question.
To remotely unlock or lock a door go to Devices > Electronic locks and click on the name of the door. An Unlock and/or Lock option will display in the side panel.
For unlocking this option is only available for online and connected doors. To lock a door remotely, as well as being online and connected, the door must have a motorized lock attached to it.
See the section on motorized for more details about motorized locks and their capabilities.
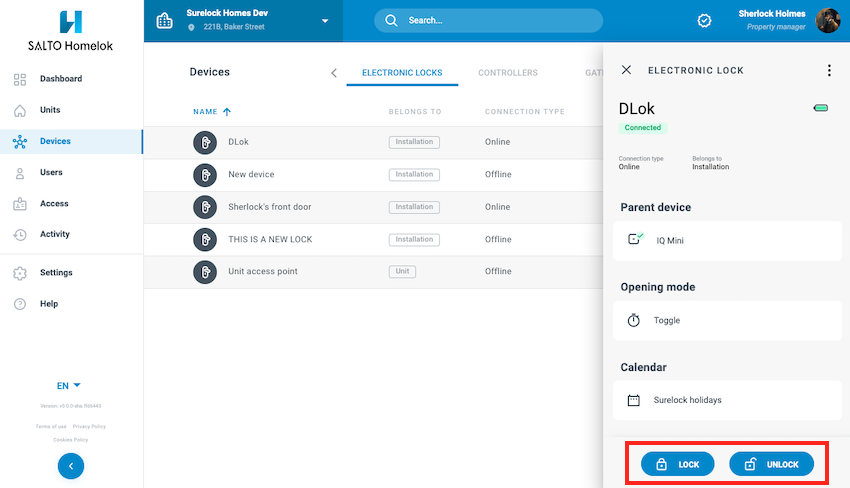 Remote locking or unlocking is only available if the lock is online and connected
You can also use the three-dot menu in the list view of electronic locks to lock or unlock a door remotely.
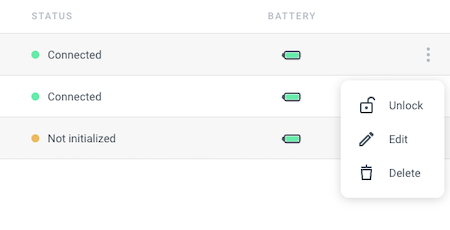 You can remote unlock using the three-dot menu
Note that remote locking and unlocking options are only available for online and connected doors. The feature is also available in the Devices section of the Homelok app.
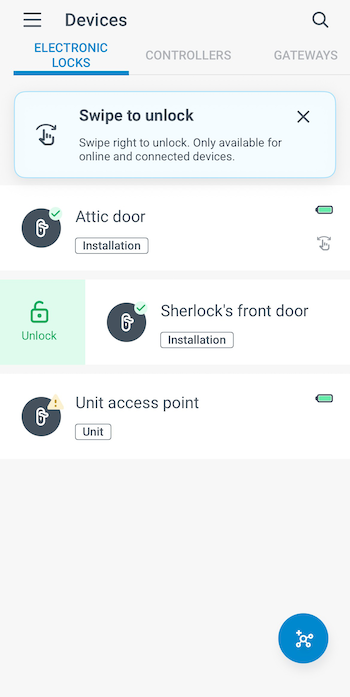 Owners and property managers can also unlock remotely using the slider functionality in the Homelok app
Electronic lock status
Once you've created electronic locks and their associated doors, the Electronic locks tab of the Devices section details a list of all the electronic locks in your installation. The name of the electronic lock displayed in this list is the same name you've given to its corresponding door in the previous step. The list also indicates whether the door belongs to the installation or a unit.
This section also displays the different statuses such as Low battery or Update required that your electronic locks may indicate at any given moment. See the following table for a description of electronic lock statuses.
Status descriptions
| Status | Description |
|---|---|
| Not initialized | Indicates that although the lock has been created, it is not yet ready for use until it's configured using the app. This status is also reported if a previously-configured lock is reset. Note that the Not initialized status implicitly indicates that the lock is also Not connected. |
| Not connected | Indicates if an online electronic lock is not connected to the internet. |
| Low battery | The battery status of an electronic lock can be either normal (green) or low (red). If the Low battery status is indicated you should change the lock's batteries. Low battery is also indicated on the physical device when a user unlocks it. The device's LED will blink red 4 times before blinking green (permission granted). Note that if the lock's batteries are flat, the status prior to flat will display. |
| Update required | Indicates that an update is required because of some change in the system, like a modification to a schedule, for example. Note: these updates are generally carried out automatically for online locks. |
| Left open | Indicates that a door has been left open. By default this status is indicated if the door has been open for more than 30 seconds. Note that for this status to be detected, the door has to have a physical sensor fitted. |
| Forced open | Indicates that a door has been forced open. That's to say, the door has been unlocked without using a valid key. Note that for this status to be detected, the door has to have a physical sensor fitted. This status only displays in the activity section of Homelok. |
| Closed | This event is not triggered by all door closures, only with those that happen after events such as left open or forced open. Note that for this status to be detected, the door has to have a physical sensor fitted. This status only displays in the activity section of Homelok. |
Physical contact sensors (also known as door detectors) can be fitted by default to a range of locks such as mortise locks (for example, XS4 One, XS4 Original +, XS4 Mini,…) or the DBolt. However, these lock types can also be ordered without door detectors. If you're unsure if your lock is fitted with a door detector, check with your usual Salto contact.
If you replace an electronic lock's batteries, you need to reconfigure the device using the Nebula app to ensure the lock reports the correct battery status. See also the section on changing batteries for more information.
Door groups
Door groups are a specified collection of doors and their associated electronic locks that are grouped together to make them easier to manage.
You create door groups from the Settings > Door groups section of Homelok. You do not manage them from the Devices screen. For more information on door groups, see the dedicated section in the user guide.
 Back
Back
