Creating access in Homelok
Overview
The Access feature in Homelok simplifies the management of access permissions for large sets of users with similar access profiles. Access determines who can enter where, and when. You can add multiple doors to an access and one custom schedule.
Once you create an access, you can then assign it to a user in the Users section.
See also the user access section of the user guide.
Before creating access, you should first create electronic locks and their associated doors to make them available to select in the All doors available section.
Create access
To create an access do the following:
- Choose Access from the left-hand menu
- The Access menu is displayed
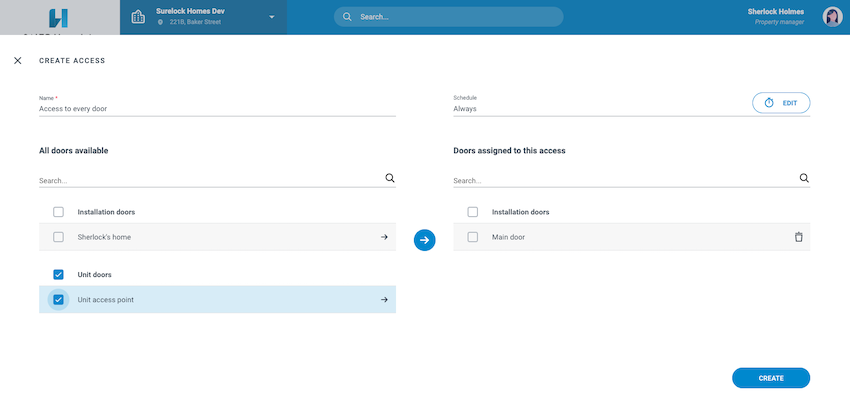
- Select New access and fill out the fields as detailed below
 To add doors to an access, you must previously create the doors and their associated electronic locks in the 'Devices' section
Access name
You must give your access right a unique name, for example "Access to all perimeter doors" or "Access to main door and car park". While it's possible to rename an access, we recommend that you create a coherent naming system within your installation.
Adding doors to an access
Once you've named your access you can add doors to it from the list of All doors available. You cannot create an access that contains zero doors.
Select the doors you want to be available in the access and click on the arrow to move them into the Doors assigned to this access section. You can also search for doors if you can't see them on the list.
Installation and unit doors
The doors available can either be installation doors or unit doors, depending on how their associated electronic lock was created. See also the section on creating doors and their associated electronic locks.
Property managers and owners can create and assign access to both unit and installation doors at the installation level. This is because they may need to create users who have access to specific unit doors. For example, emergency services, or facility services (maintenance people, dog walkers, etc.).
See also the section on user types.
Door groups
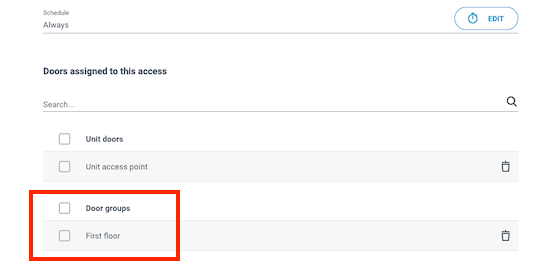
As well as adding individual doors, you can also add door groups to access rights. To do so, you must first create the access point group in Settings > Door groups.
 Example of adding a door group to an access
See also the section on door groups for more information.
There are some limitations regarding the amount of doors that can be added to an access, as well as the amount of sets of access that can be assigned to a user. See the section on system limitations for more information.
If you add multiple doors to an access in one go, the activity section will only reflect the number of doors added to the access. You will not see an event for each individual door that's been added.
See also the section about activity.
Schedule
The Schedule option allows you to add specific days and times to an access. You can either give all day, every day access to the doors you've added, or create a custom schedule. See access schedules for more details.
Unit access
Unit access is managed in the Units section of Homelok via the Access tab for each specific unit. See the section on unit access in the user guide for more information.
Delete an access
You can only delete an access if that access is not already assigned to a user. If you want to delete an access from the system entirely, make sure that you first remove the access from the users who have it assigned to them. Deleting an access is not the same as removing it from a user. If you remove the access from a user it will remain in the system and can be assigned to other users.
