Managing users, access and keys in Homelok
Overview
As a unit manager in Salto Homelok, you can create two types of users:
Other unit managers: These are users who don't see any elements of the property at the installation level. Instead, they manage their own unit, mainly by allowing access to other users. There are two types of unit manager:
- Unit managers who can create other unit managers.
- Unit managers who cannot create other unit managers.
The type of unit manager you are, and as a result, the type of unit manager you can create, depends on the role that a property manager assigned you when the unit was set up. For example, if you can only create keyholders and not other unit managers, it means that the property manager has not granted you permission to create other unit managers.
See also the property manager section for more info about unit roles.
- Keyholders: A user who is only a keyholder in Homelok. They do not have a management role.
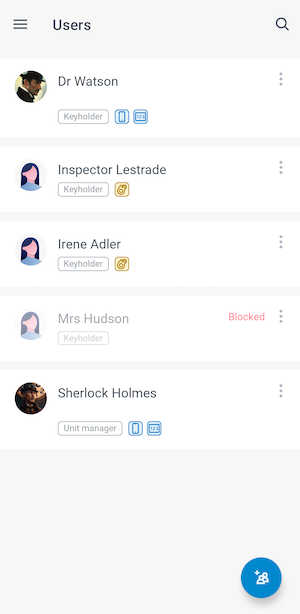 An example of a list of users in the Homelok app
Typically, unit users are keyholders who gain access using a key (physical or digital).
Meanwhile, unit managers can manage different elements of the software, like other users, their access and keys. Unit managers can also be keyholders.
As a unit manager, it's generally expected that you will create users who are keyholders. You may, however, create other unit managers if you have been granted those permissions.
For example, in a household made up of a family of two parents and two children, the parents could be unit managers whereas the children could be keyholders. Other keyholders could be maintenance workers like plumbers or electricians, or perhaps household cleaners who only need limited access to the unit.
A property manager always creates the first unit manager in a unit. Generally, the property manager will then handover the management of the unit to that unit manager. See the users section of the user guide for property managers for more details.
Selecting Users on the left menu bar of the app lists the users who have been created within the current unit.
Create a user
To create a new user, do the following:
- Choose Users from the left-hand menu
- Select the Create user icon and fill out the fields as detailed below
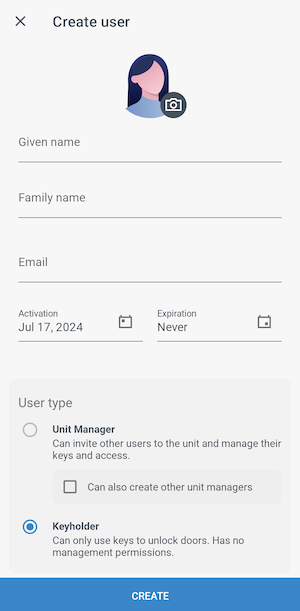 Fill out the user's details before assigning them access and keys
Name
The name is composed of two fields: Given name and Family name.
The Given name is the user's personal name, forename or "first" name. This field can also contain a middle name.
The Family name is the user's surname or "last" name. This field can also contain more than one surname.
When naming users bear in mind you can't use names that already exist in your unit. If you try to create a user with an existing name, then the error message There is already a user with that full name will display.
This field is only required if the user you're creating is another unit manager, or will receive an app key via the Homelok app.
An email address is required when issuing an app key because the system sends an email notification to the user so they can receive the key via the app on their phone. If the user is a keyholder being assigned a physical key such as a card or fob, you do not need to add their email address.
Note: email addresses must be unique per unit. i.e.: you can't have more than one user with the same email address in your unit.
Activation and expiration
You can give users time-limited access to the system. You can delay the time when a user becomes activated by setting the activation time to a future date. You can also set an expiration date for the user or set the user to never expire.
Note that users remain valid until midnight on the day specified in the Expiration field. Once midnight passes, they will no longer be able to use keys to access to your unit.
User types
This section relates to user types that are available at the unit level. It does not contemplate user types at the installation level.
Unit managers
When creating other unit managers, you don't need to assign them keys or access to the unit, although it's expected that you would.
There are two types of unit manager:
- Unit managers who can create other unit managers.
- Unit managers who cannot create other unit managers.
You must always make sure that unit managers have a valid email address added to their profile. This is because unit managers need to use their email address to sign in to Homelok.
Keyholders
A keyholder can be any type of user who accesses your unit using keys that you've assigned to them.
Profile photo
You can also upload an image of the user at the same time as you're creating them. If you don't upload a photo, an avatar is automatically generated.
Press on the avatar image above the user's name and choose an existing image or take a picture using your phone.
User profile photos must have the following attributes:
- Minimum size of 400×400px
- Maximum weight of 10 MB
- Either JPEG or PNG format
User access
Once you've added the user's details, press the Create button and on the following screen you can indicate the access you want to give the user using the Add access option.
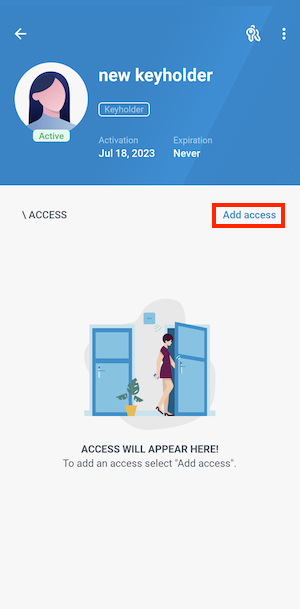 Use the 'Add access' option to assign users access to doors.
Assigning access
Press the blue Add (+) button to view the different sets of access that are available to assign to users in your specific unit.
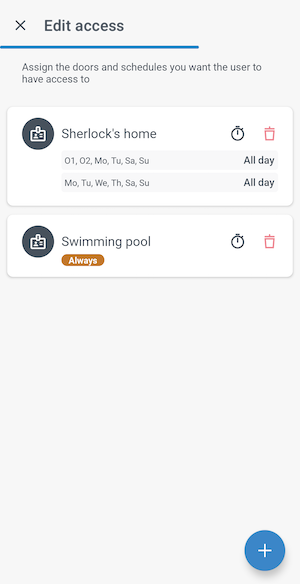 Available access will only display if a property manager has assigned access to the unit.
A property manager must first create the access and the doors it includes before you can assign that specific access to a user. If you don't see any sets of access when you select the Add (+) button in the User access section, contact the person who manages your property.
Access schedule
In a unit, you can either assign the same level of access that's been created for the unit or a more reduced version of that access. To adjust the schedule, press the schedule icon and modify the days and times according to your requirements.
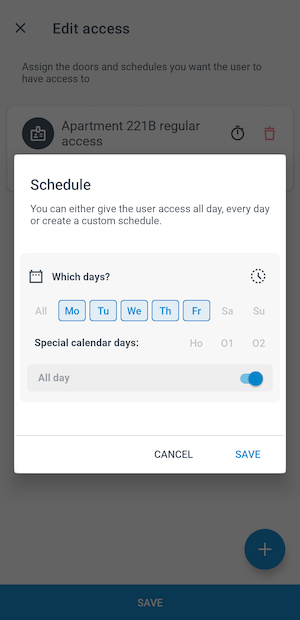 You can either assign the same level of access that's been created for the unit or a more reduced version.
If the schedule is set to Always, it means that the access to that door, or collection of doors included in the access, is valid 24 hours a day, 7 days a week.
As a unit manager, you can only modify one schedule per access.
Once you save the access, a message displays which enables you to assign them a key.
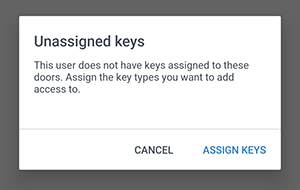 You can assign keys using the 'Assign keys' option.
User keys
Salto Homelok supports multiple types of contactless key technologies. In addition to physical keys such as fobs or keycards you can also assign digital keys to users for them to use on their mobile devices.
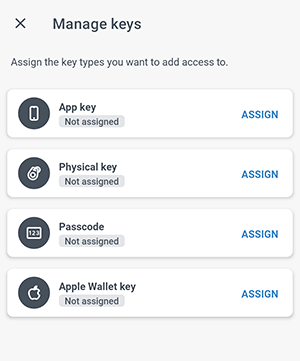 Keys types available in the Homelok app.
Each key, whether physical or digital, securely encodes the same access that is specific to each user and configured under the corresponding user profile in Homelok.
Supported key types
You can assign four different types of keys to your users:
| Type | Description |
|---|---|
| App key | A digital key residing in the Salto Homelok mobile app on an iOS or Android phone. |
| Key | A physical contactless key such as a fob or keycard. |
| Apple Wallet key | A digital key residing in Apple Wallet, on either an iPhone or an Apple Watch. |
| Passcode | A numeric code that allows users to gain access via locks that are equipped with keypads (can only currently be assigned by property managers). |
Apple Wallet keys are license-dependent and only available on iOS devices. Please contact sales for more details.
Assigning keys
Once you've configured the user's access, tap on Assign keys to view the list of available key types. The following section details the different key types.
App keys
The Salto Homelok app allows users to use their iOS or Android phones as their key, by opening the app and presenting their device to the electronic locks in your unit.
To assign an app key to a user, press Assign beside the App key option. The user will receive an email with instructions on how to download the app and activate their app key.
The user must have a valid email address in order to be assigned an app key. If no email address is set up in the user profile, selecting this option opens a dialog box prompting for an email address when you save the information.
Keys
Auto-assign
You can assign different types of physical keys to your users such as fobs and keycards. To assign a physical key, press Assign and enter the UID or serial number printed on the fob or card in the UID field. This field only displays if you select the Key option.
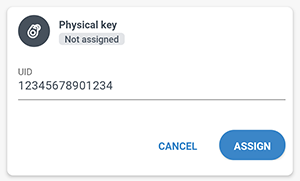 Make sure the UID is correct when assigning a physical key
The key will be automatically activated when it's presented to an online electronic lock for the first time.
Make sure you use the correct 14-digit hexadecimal UID when assigning a physical key. If you enter an incorrect 14-digit code, you may see that the key is marked as Pending activation. However, if the code is incorrect, when the user presents their key to an online lock it will not be activated.
Encode
You cannot encode keys using the Homelok iOS or Android app. You can only encode keys using the Homelok web application.
The Encode option allows you to assign a physical key using an encoder device like the Salto NCoder. However, as a unit manager, it's not expected that you would encode keys using an encoder. This is an action reserved for property managers.
See the section in the property manager guide for more information on encoding keys with an encoder.
Passcodes
Passcodes are intended to be used with locks that have keypads, where a user inputs a numeric code to gain access.
Passcodes can currently not be assigned by unit managers in Homelok. If you want to assign a passcode to a user because your unit contains locks with a numeric keypad, check first with your property manager.
See the property manager guide for more information about passcodes.
Apple Wallet keys
Apple Wallet keys are not currently available in Homelok. Check with your usual Salto contact for more information.
This feature is only available on iOS devices. Please contact sales for more details.
Salto Homelok integrates with Apple Wallet to offer a seamless digital key experience on iPhone and Apple Watch. Apple Wallet keys allow users to use their iPhone or Apple Watch as a key to unlock electronic locks, in a similar manner as with a contactless fob or keycard without the need to download a specific app.
 The Apple Wallet key feature is license-dependent.
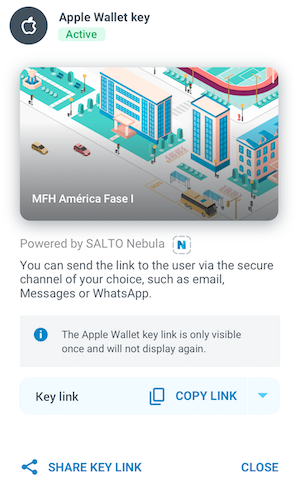
To assign an Apple Wallet key to a unit user, select the Assign button beside the Apple Wallet key option. A link will be displayed so you can share the Apple Wallet key via your preferred secure channel using the Copy link option.
You can also share the link directly using email, WhatsApp, Messages, or whichever messaging service you have set up on your device, by tapping on the Share key link option.
Sending a link to an Apple Wallet key via Messages or WhatsApp may cause the link not to be clickable on the recipient's device, if the phone number used to send the link is unknown by the device (that's to say, it's not in the user's contacts). To ensure the best user experience, we recommend sharing the link via email.
Apple Wallet key sharing
Keyholders can share their own Apple Wallet keys with other users directly from the Apple Wallet key itself using the sharing option. They do not need access to the Homelok app interface to be able to do this. See the section on Apple Wallet key sharing for more details.
Canceling keys
You can cancel any type of key at any time in order to prevent it from being further used to access an installation.
Examples of cases where you should consider canceling a key include:
- A user loses a physical key or a mobile device that holds an app key or an Apple Wallet key, or reports either as stolen.
- A user reports that they did not receive the link to obtain an Apple Wallet key, or is unable to add the key to Apple Wallet from the link they received.
To cancel a key, use the Manage keys option and disable the key in the user's profile by pressing the x icon beside the key type.
- Canceling any type of key causes the key to no longer grant access to any electronic locks on the installation.
- When you cancel any type of key, the key is no longer active in the user's profile page.
- When you cancel an Apple Wallet key, the user receives a notification from Apple Wallet indicating that the key has been disabled.
Blocking users
You can block users from accessing any part of your unit by temporarily invalidating the user, their access and the keys they use in one action.
This might be useful if, for example, you want to block a regular user like a dog walker or a cleaner, while they're away on vacation. Unblocking the user when they return from vacation restores their original access and makes their key valid to unlock doors again.
Although the user's access is removed from their key when they are blocked, the access they already have remains associated with that user. This means it's still possible to modify a user's access while that same user is blocked.
Blocking users is different from canceling keys. A user's key can be canceled, for example, if a user loses their key. See canceling keys for more information.
Block/Unblock
You can block or unblock a user by doing the following:
- From a list of users, select the Block/Unblock option that displays when selecting the three vertical dots menu to the right of the user's name.
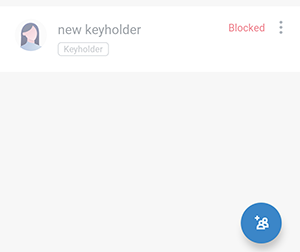 Example of a blocked user in a list of unit users
Blocking other unit managers
If you block another unit manager, they will not be able to access Homelok until you unblock them.
In a similar way to blocking and unblocking keyholders, unit managers can be blocked if they are on vacation, for example. If the user with a management role is also a keyholder, blocking them means they will also be unable to use their keys.
If there is only one unit manager in the unit, they cannot be blocked.
 Back
Back
