Space-OnGuard mapping
Introducción
This section relates to mapping elements of the OnGuard software to those in Space.
Credentials
Credentials (the term used in OnGuard), like the user's name or their Badge ID (Ext ID in Space) are created in OnGuard and transferred to Space.
 First, create the user in OnGuard
 The user is then automatically transferred to Space
Access levels
In the below example, you can see three user access levels created in OnGuard:
- "Access Level Staff"
- "access level test"
- "new access level test 2"
 Creating access levels in OnGuard
These user access levels are then transferred to Space into zones. These are defined in the description as OnGuard access levels:
 The OnGuard access levels are defined in the description field in Space
Inside each zone, you can find the specified doors (access points) for the OnGuard access level.
 You can see the associated access points inside each zone
The zones are only synchronized when the timezones of the readers inside them are all the same. If one reader's timezone is not aligned with the others, the zone will not be synchronized.
 Make sure you align the timezones of the readers inside the zones
Mapping users and access levels
In the OnGuard Credentials section, you assign an access level to users:
 OnGuard access levels
Then the user is then mapped to that access level in Space.
 Access level mapped in Space
Creating doors
First you have to create an Access Panel in OnGuard:
 Creating an 'Access Panel' in OnGuard
The equivalent of an Access Panel in Space is a group of doors (not a zone). Here you can also define if the door is to be online or offline.
See the below Salto IN example. Once created, in the Reader and Doors menu of OnGuard, all the online doors and related information have to be added to the different panels.
 'Readers and Doors' option in OnGuard
Note: Card format can be any of the options, as can ports and addresses.
Once you save this, the doors are then synchronized to the Space Doors section.
 Doors are synchronized to the Space 'Doors' section
Initially, all doors are synchronized as offline.
 Doors are synchronized as offline to start with
You have to then manually define them as either online or offline in the drop-down Connection type option of Space, as indicated below.
 Doors have to be manually defined as online
Mapping doors and access levels
In OnGuard, in "Access Level Staff" you can see the doors created (For example, Lenel S2 Reader, TEST YSA, XS4 Mini - Meeting Room, XS4 Original+). (Note that in OnGuard a "reader" is the equivalent to a "door" in Space.)
 Mapping doors and access levels
This is then transferred to the Space Zones > Access points section:
 Space access points
Timezones
You can create custom access timezones in OnGuard that are then transferred to Space as cardholder timetables.
 OnGuard timezones
 Space cardholder timetables
Door timezones can then be moved from Always to a custom timezone.
 OnGuard timezones set as 'Always'
 Custom OnGuard timezones
These custom OnGuard timezones are then transferred to the Space cardholder timetables section.
 Custom OnGuard timezones transferred to the Space cardholder timetables section
Only the OnGuard access levels (zones in Space) are synchronized with doors that have the same timetable. If one of the individual doors has a different timetable from the others, the zone will not be transferred to space.
Events, status and monitoring
In the OnGuard Alarm monitoring section, you can see the systems status for door monitoring and the main alarm monitor which displays events that have been collected in Space.
 Alarm monitoring in OnGuard
From BlueConn version 2.5.2 onwards, new events are also added to the connector such as "Door left open" and "Intrusion alarm". This means these alarms will be mapped from Space to OnGuard. In the below example, "Door Forced Open" is the equivalent to "Intrusion alarm" in Space.
 'Door Forced Open' in OnGuard is the equivalent to 'Intrusion alarm' in Space
And "Door Held Open Restored" is the equivalent to "DLO (Door Left Open)" in Space.
 'Door Held Open Restored' event in OnGuard
These following events are also transferred to the door status in OnGuard alarm monitoring.
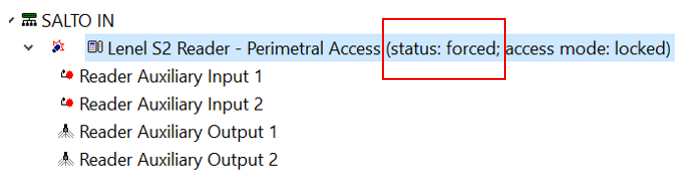
Intrusion
This intrusion of an online door in Space is displayed in OnGuard as "forced" in alarm monitoring in real time.
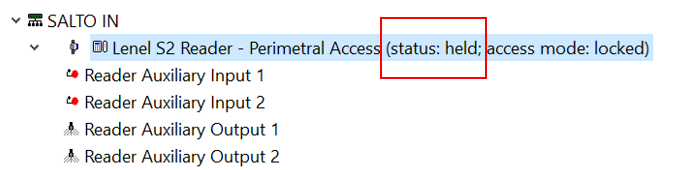
Door left open
The "Door left open" event of an online door in Space is displayed in OnGuard as "held" in alarm monitoring in real time.
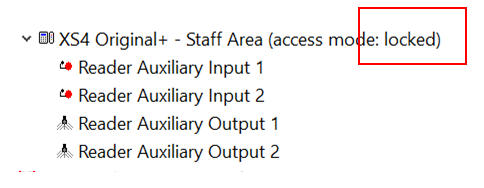
Locked
In standard mode, if the lock is online (communicating) and locked, the status "locked" is displayed in OnGuard.
Only events from doors synchronized between OnGuard and Space are synchronized. If the event related to the door is not linked with a user synchronized between OnGuard and Space, the event is sent without a cardholder (empty).
Doors marked as yellow are online doors which are not communicating temporarily.
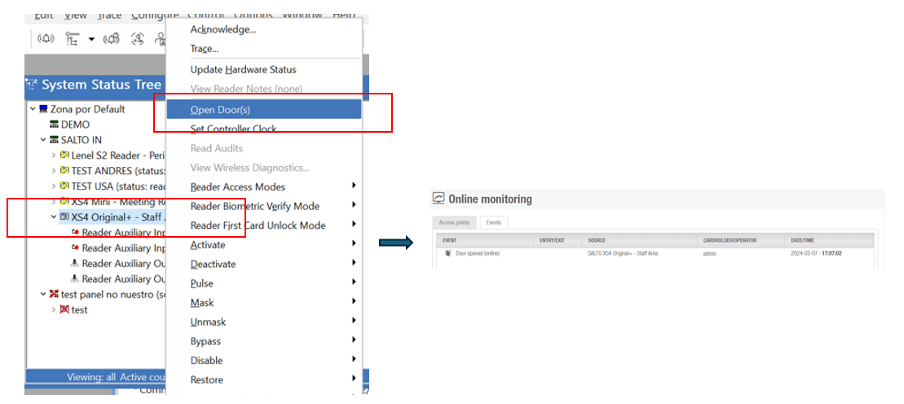
Remote opening
You can carry out remote openings in OnGuard for the corresponding doors in Space. See the below example for where to find this option in the OnGuard interface.