Checking Space configuration
Introducción
After you've installed the Space software, you must check its configuration settings. It has to be done from the tabs available in the ProAccess Space Configurator:
- Service properties
- Service ports
- Database
- Advanced
Checking configuration
To check the configuration settings for Space, do the following:
Ensure that the appropriate database has been set up in Space.
Double-click the ProAccess Space Configurator icon on your desktop. The ProAccess Space Configurator launches.
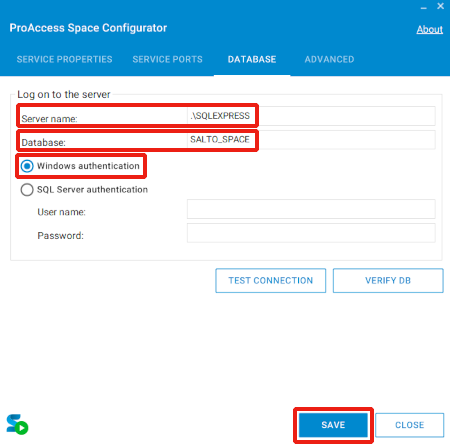
Select the Database tab.
 'Database' tab
Ensure the server name in the Server name field is correct. You can verify the data in Microsoft SQL Server Management Studio (SSMS), if installed.
Ensure the database name in the Database field is correct. You can verify the data in Microsoft SQL Server Management Studio (SSMS), if installed.
Ensure the Windows authentication option is selected if you are working in a Windows domain. If you are not working in a Windows domain, select the SQL Server authentication option. You must enter the appropriate SQL Server username and password.
Click Save. Note that the Space service must be stopped to save any change on the ProAccess Space Configurator and then restarted. Remember that Space will not work unless you restart the Space service.
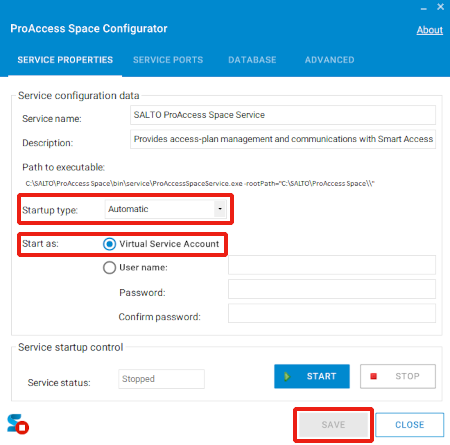
Click the Service properties tab.
 'Service properties' tab
Ensure that Automatic is selected as the Startup type option. This value is selected so that when the PC reboots, the Space service starts automatically.
Ensure that Virtual Service Account is selected. If this option is selected, it means that the Space service starts with all the permissions of the machine's user. If you select the User option, the Space service starts with particular and selected user's permissions.
Click Save.
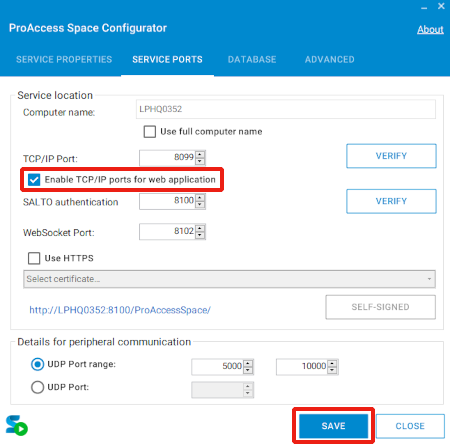
Click the Service ports tab.
 'Service ports' tab
- Select the Enable TCP/IP ports for web application checkbox. The default ports can be changed in accordance with your requirements. In the case of UDP ports, Space selects a random free port in a given range by default but ports can be also limited to one rather than a range. See also the dedicated section on connectivity considerations. To use the secure version of HTTP (namely HTTPS), you will first need to specify a valid certificate (use the ProAccess Space Configurator to select one among the registered certificates within the server machine). For security reasons, we highly recommend that you use HTTPS instead of HTTP. Note that the selected certificate must also be valid in the client machines in order to:
- Avoid the "untrusted connection" warning message shown by the browser
- Allow browsers to receive real-time notifications (such as door openings) from the server.
Space supports the TLS 1.2 protocol. Note: this protocol can be defined at PC server level and not in the Space service. See more info on security protocols.
- Click Save. The link to open Space that displays on this tab should now become active.
See Logging in for information about how to log in to Space and set up bookmarks in your browser for easy access.
Log files tracing level
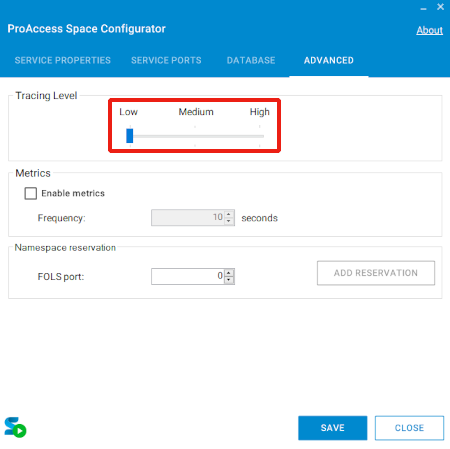
The Tracing level panel in the ProAccess Space configurator Advanced tab deals with the registration level of software logs. From this tab you can manage the tracing level, which can be set to Low, Medium, or High.
The default tracing level is Low.
Leave the tracing level at Low unless your Salto technical support contact recommends that you change it.
The tracing should only be set to High during troubleshooting, for example, and reset to Low afterwards. If the tracing level is set to High, this creates a more detailed report but the log file increases in size, which could cause the service to slow down.
 Tracing level in the 'Advanced' tab
 Atrás
Atrás
