Configuring gateways in Nebula Beta
Overview
Gateways are hardware devices intended to be used with electronic locks where online connectivity is needed. Gateways connect to electronic escutcheons and cylinders enabling offline electronic locks to become connected devices. This allows functionality such as auto-assigning fobs, keycards and wristbands as well as the monitoring of activity within your installation.
Gateways can connect to the internet in two ways: via an Ethernet cable and via Wi-Fi. The way you connect will depend on the model you're configuring as well as your specific use case, or even your own preferences. For example, in some cases an Ethernet connection may not be possible, so the recommended connection would be via Wi-Fi. In other cases you may want to configure Ethernet as the default connection and Wi-Fi as the fallback one.
The IQ in Salto Nebula
The IQ is a specific model of a gateway that acts as the link between the Salto Nebula cloud-based access control software and the wireless access points. This gateway acts as a bridge transferring information using end-to-end encryption to and from the devices behind it to the software. It provides updates to the electronic locks, and real-time information such as battery status and activity. You configure the IQ using the Nebula app with a Bluetooth link.
The following process refers to the configuration of the IQ3 and the IQ3 Mini. Both models have similar characteristics, with the following differences:
| Model | Description |
|---|---|
 IQ3 | Can support Wi-Fi and Ethernet. |
 IQ3 Mini | Only supports Wi-Fi. |
For the purposes of this section the catch-all term "gateway" will be used to refer to this type of network device.
Configuring gateways
Create and configure gateways before you set up the electronic locks that lie beneath them.
To set up and configure a gateway you need to use the Salto Nebula app.
When setting up a gateway for the first time you can either:
Create the gateway in Nebula web first, then configure it via the app. Or…
Use the app to create and configure it.
The way you set up and configure gateways depends on your specific use case. In the majority of cases, and specifically in larger installations, you will set up gateways using Nebula web first. In smaller installations you may find you will use the app to create and configure gateways.
In both cases, an installer, who is aware of the names and locations of the gateways, will go through the installation setting up the physical devices, phone in hand.
You can also create gateways and configure them before installing them.
For a situation where you're updating firmware or resetting already-configured gateways, see resetting devices or updating firmware.
Select installation
Before configuring a gateway, you need to ensure you're operating within the correct installation. This could be your office building, for example.
You can view which installations you have access to, or select one if you have access to multiple installations, using the top left menu selector of the app.
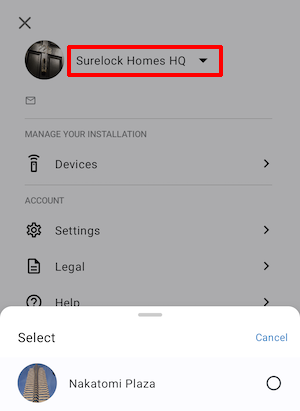 Check you're operating in the correct installation before configuring devices
If you don't have access to manage installations, this screen is not available. See user roles and permissions for more details.
Start configuring
To start configuring a gateway, navigate to the Devices section of the app.
The app uses Bluetooth Low Energy technology to connect to the gateway. If you're using an Android phone with Android version 6.0 or above, you also need to make sure you enable and give permissions to location services on your phone. This is because from Android version 6.0 onwards, Android apps require location permission to be able to scan for Bluetooth LE devices. Salto does not use this information in any way. See error handling for more information.
- Select Configure in the Devices section of the app. The app begins to look for devices.
- Hold your phone close to the gateway you're configuring and keep it close.
- Once the gateway has established a connection with your phone, the red light blinks green then turns to solid green.
- The app asks you if the light came on. If it did, select Yes to continue and go to the section "Select existing gateway".
You can press the CLR button on the device to initiate the "advertising" process of the gateway. However, this is not required to establish a connection with your phone for gateway devices that are in factory mode.
If you do use the CLR button, ensure you only make a short press to initiate the "advertising" process. A long press of the button can put the device back into factory mode. This is not recommended and you should only use the app to reset by following the instructions on resetting gateways.
If no devices are found
The Bluetooth scanning process has a timeout of 10 seconds to look for and connect to a device. If the scanning process does not find any nearby devices after that period, a "No device found" alert displays in the app and you can retry the search. If no device is found try moving your phone closer to the gateway before retrying.
Select existing gateway
This step applies to gateways that have already been created in Nebula web or via the app. If you want to create gateways via the app go to the "Create new gateway" step.
On the Which device are you configuring? screen, you'll see a list of gateways which are pending configuration. This option will only display if there are previously created gateways.
The drop-down menu shows a list of names of gateways which have been created already. You can then assign the physical gateway device you're configuring to its corresponding gateway in the list of names. If you can't see your gateway in the list you can use the search function.
Create new gateway
This step applies to gateways that have not already been created.
Give your gateway a name making sure you use a coherent naming system.
You cannot have more than one gateway with the same name in your installation.
Connect gateway to the internet
Once you've created or selected your gateway, you can then configure its internet connection settings. Note that if the gateway is already hardwired via an Ethernet cable, it will automatically be online. You can adjust the internet settings post creation of the gateway by selecting Configure again in the Devices section of the app.
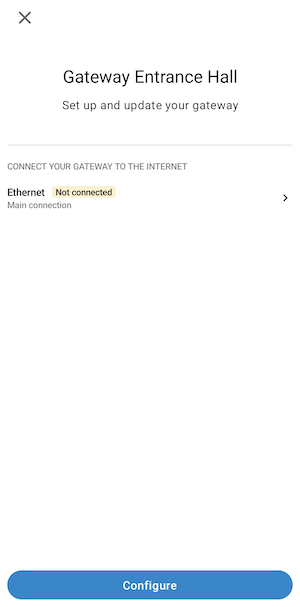 Gateways connect by default to the internet via Ethernet
Ethernet
By default, the protocol that a gateway uses to connect to the internet and therefore to Nebula is Ethernet. The gateway is automatically online if it is already hardwired via an Ethernet cable. To adjust the device's internet settings, once you've created the gateway, select Configure once more in the Devices section of the app. The Ethernet option appears as Connected if the gateway has already been hardwired to an Ethernet network.
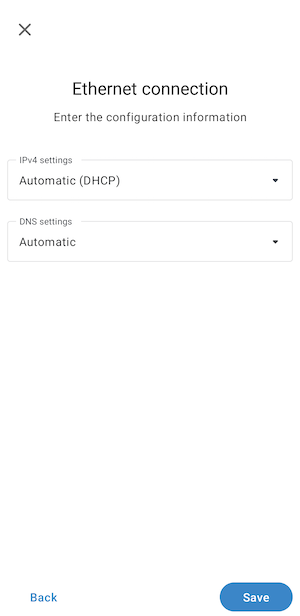 You can adjust the internet settings via the 'Ethernet connection' screen
If you want to configure the IP (internet protocol) settings of the gateway you can do so by selecting the Ethernet connection option. This takes you to the Ethernet configuration screen in the app.
Here you can configure the IP settings of the gateway by either automatically assigning it a dynamic IP address using the DCHP protocol or by manually inputting a static IP address.
Wi-Fi
For models that support Wi-Fi, this option will be displayed as follows once a Wi-Fi connection has been detected.
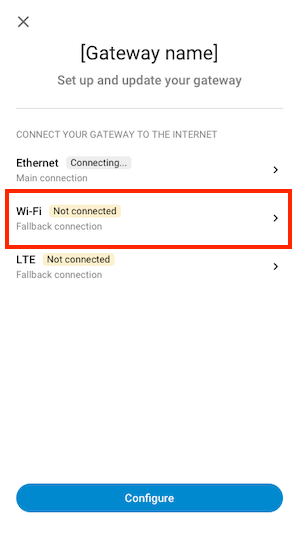 Example of a Wi-Fi network option
First, you need to select the Wi-Fi network you want the gateway to be connected to. If there are multiple Wi-Fi networks, a list of all possible connections will display.
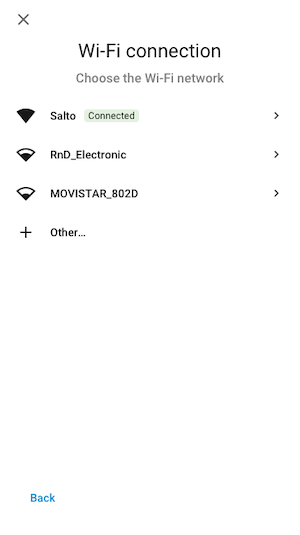 Example of a list of possible Wi-Fi networks to connect to
Next, enter the password of the Wi-Fi network.
By default, the Wi-Fi network is set as a fallback connection if your main gateway connection is via Ethernet. If your gateway is not connected via Ethernet, it will only use the Wi-Fi connection.
As with the Ethernet connection, if you want to configure the IP settings of the gateway, you can do so by selecting the Wi-Fi connection configuration option.
Firmware update
If the app detects that a new firmware version is available while you're configuring a gateway, it automatically downloads the firmware to the device during the configuration process. The app displays the message "Updating firmware" if this is the case. If there is no new firmware available then you won't see this message. For more information about firmware, see updating firmware.
Finish configuring
Once the configuration process has completed, you'll see a notification like "IQ X is ready!". This means that the IQ is now correctly configured and ready for use!
Once your gateway is ready, you can exit the device configuration process by selecting Finish.
IQ status light
The following table is a guide to the LED status light which you can see on the front of the IQ. This is helpful to understand the different statuses of this type of gateway as you carry out the configuration process.
| Light | Status |
|---|---|
| Solid red | IQ is plugged in to a power source but not configured. Device in factory mode and "advertising" (awaiting configuration). |
| Short blinking green | Waiting to establish a connection with a phone. This status is initiated when you plug the device in to a power source, or by pressing the CLR button on the IQ. |
| Short red blink (3 secs) | Connection to a phone has been established and the IQ is aware it belongs to an installation. This signal lasts 3 seconds. |
| Solid green | Connection between the IQ and a phone has been established. |
| Solid blue | IQ is configured and online (communicating correctly with the software). |
| Blinking yellow/red | Hardware error. |
| Short blinking yellow | Device not communicating with the software. |