How to set up Spaxx
Before setting up Spaxx, you should first set up the Salto Host Interface Protocol (SHIP) connection in Salto Space and the JSON interface in eLoxx Relaxx. Even though Spaxx uses the SHIP connection, the full SHIP license option is not required. The license option SPACE-OPT-0039 (Spaxx Connector feature) does not enable full SHIP connectivity for other applications. SPACE-OPT-0039 will only enable connection to the endpoints used for the Space-Relaxx synchronization.
Space set up
SHIP connection set up
To configure the SHIP connection in Space, go to System > General options > SHIP.
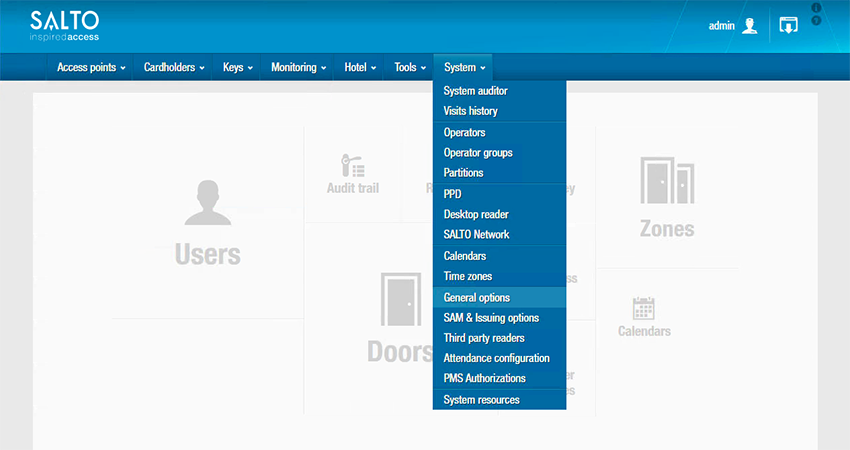 Space general options menu
You will need to set up the Salto SHIP Server option with the correct settings. See the section on SHIP for more information.
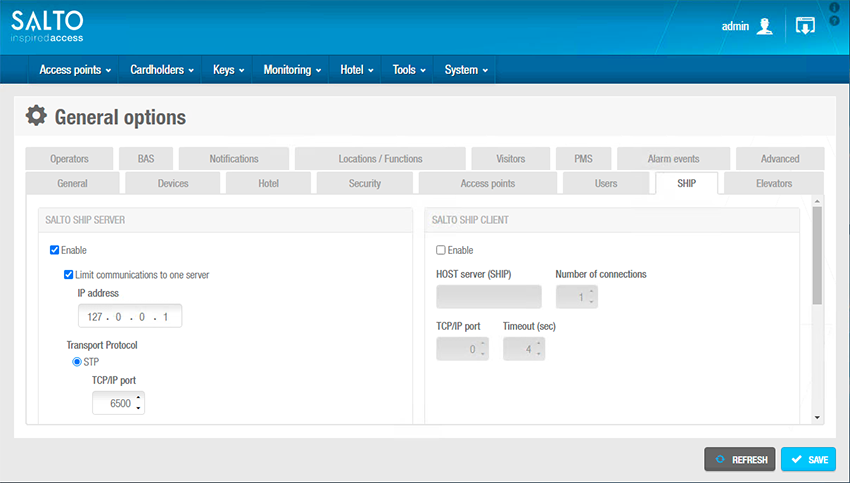 Space SHIP configuration screen
Spaxx allows for a secured SHIP connection to be used. You can use either Basic (HTTP), secured by a user log in and password to authenticate the connection, or Custom (HTTPS), which uses a server certificate to authenticate the communication. By choosing HTTP transport protocol, in Space you will need to change the port to the one selected to manage those communications.
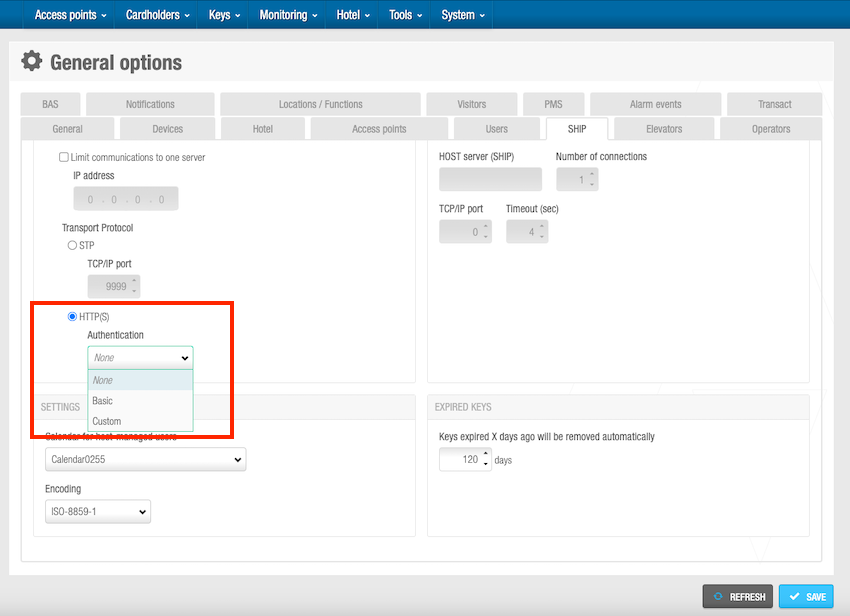 Spaxx allows a secure SHIP connection to be used
For more information on how to use secured connections please contact your Salto technical support team.
User identification set up
Spaxx allows you to use either the card's UID or specific data stored on a third party sector of the card (data in memory) to identify the user when they present a key to a Gantner locker.
Credential UID
By default, Spaxx uses the UID to identify the user who presents their RFID credential to the locker and then sends the UID to Relaxx via the controller.
The set up in Space does not require any specific setting.
While the set up in Relaxx doesn't require any specific setting either, the controller or GT7 has to be configured to read the UID as explained in the section on controllers.
Data in memory
Data in memory user identification mode (In-memory code) requires to have on the RFID credential a specific sector (not a Salto sector) with its own SAM Keys, and a decimal and unique number to identify each user.
By presenting this credential on an encoder or through automatic key assignment, Salto devices will read this identification number and associate it to the user in the Space database which will then share it through Spaxx to Relaxx.
The usage of this features requires a specific set up in Space.
In System > General Options > Access points > Key UID type for Gantner lockers has to be selected.
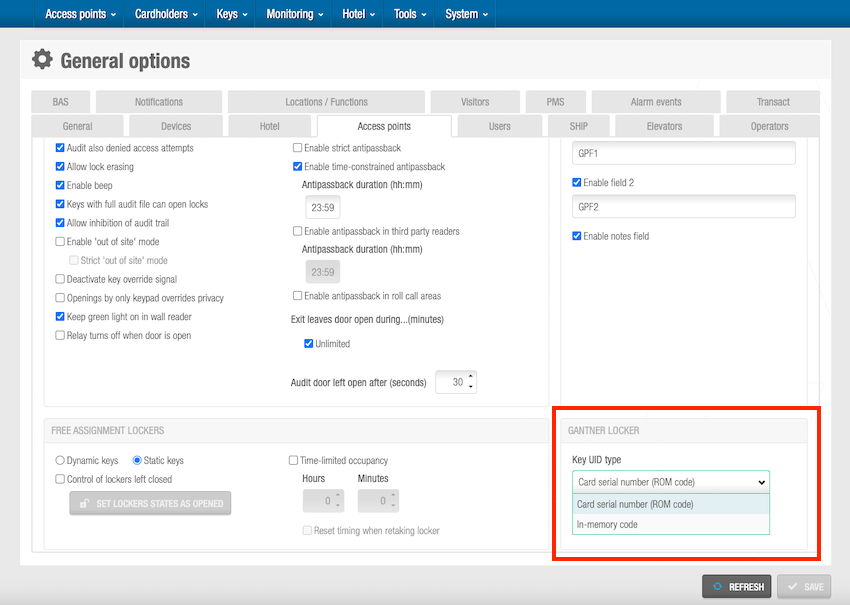 'Key UID type' for Gantner lockers
In System > SAM & Issuing options you will need to set up an In-memory code with the values to read correctly the sector where the ID of the user is stored.
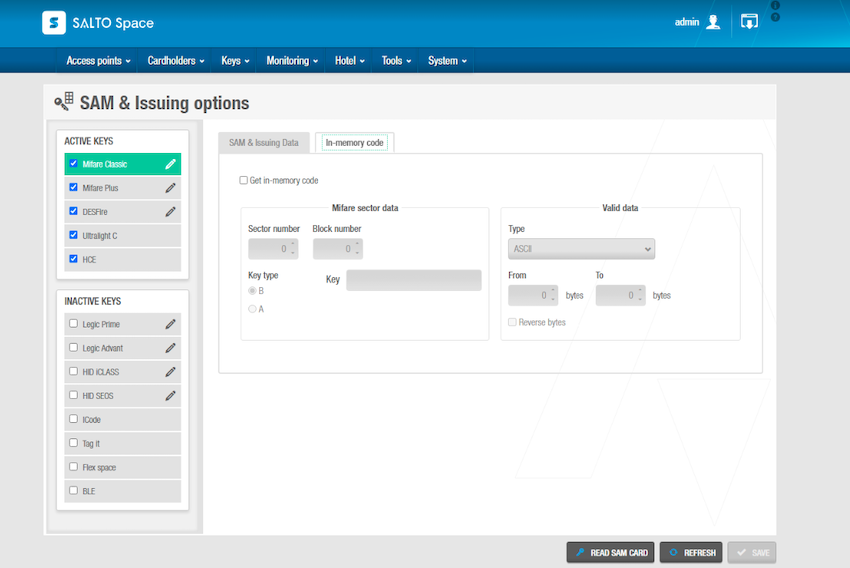 'SAM & issuing options' in Space
Space access levels set up
The Space-Relaxx connector is based on synchronizing user, guest and visitor access levels with access rights within the Relaxx system. That's why you need to create the same amount of access levels as authorization groups that you have in Relaxx to ensure the correct mapping and to allow for users to be created in Space.
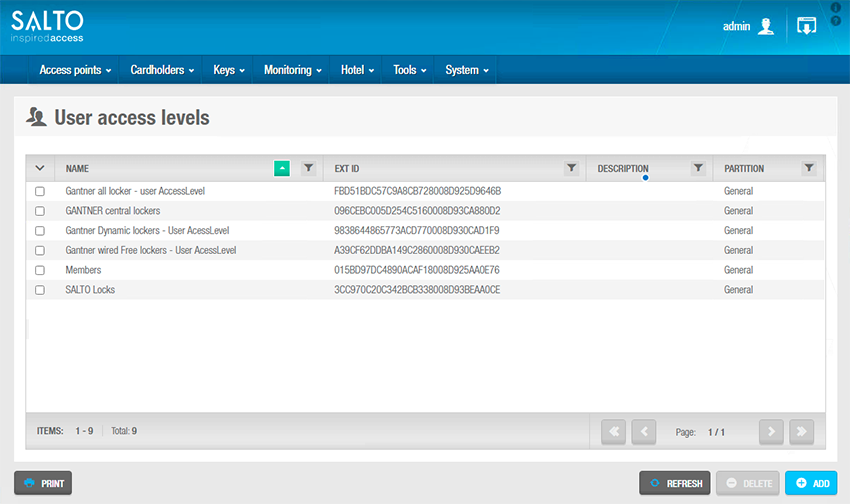 List of user access levels in Space
The same principle applies to guest and visitor access levels. The Spaxx connector allows the synchronization of guest access levels for guest rooms and visitor access levels, to allow both guests and visitors to use the Gantner GAT NET. Locks.
Relaxx permits users, guests or visitors to belong to only one authorization group. That's why on the user access plan, users should have only one access level related to each Gantner authorization group. If a user needs to have access to several locker groups, you will need to create an authorization group that has access to several locker groups.
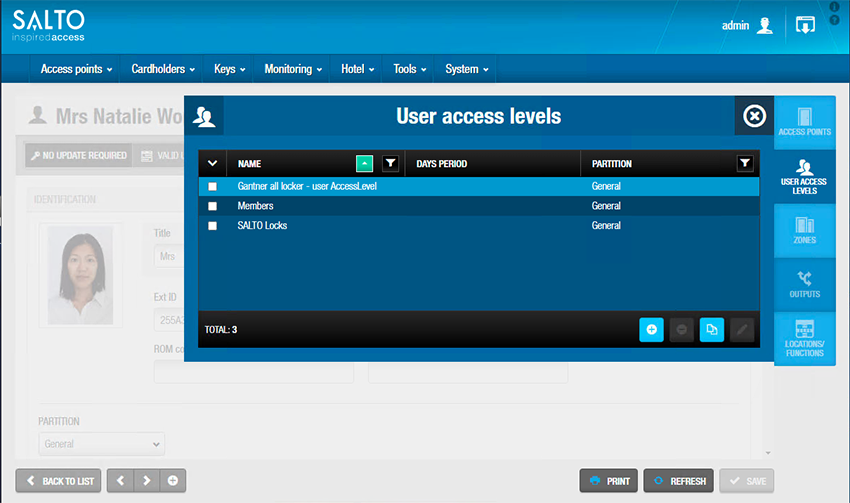 Space user access levels option for individual user
eLoxx Relaxx set up
To use the Space-Relaxx connector, you need to use the enterprise version of eLoxx Relaxx that allows the JSON interface integration. Make sure the Relaxx license you have is the correct one so you can connect the different systems.
Relaxx JSON interface setup
To set up the JSON Interface you need to access the Relaxx desktop client. The Relaxx web interface does not permit the configuration of any set up. It is only designed for locker management.
Access the general options in Relaxx and select the following JSON options:
- Use access tokens
- Use ASCII password encoding
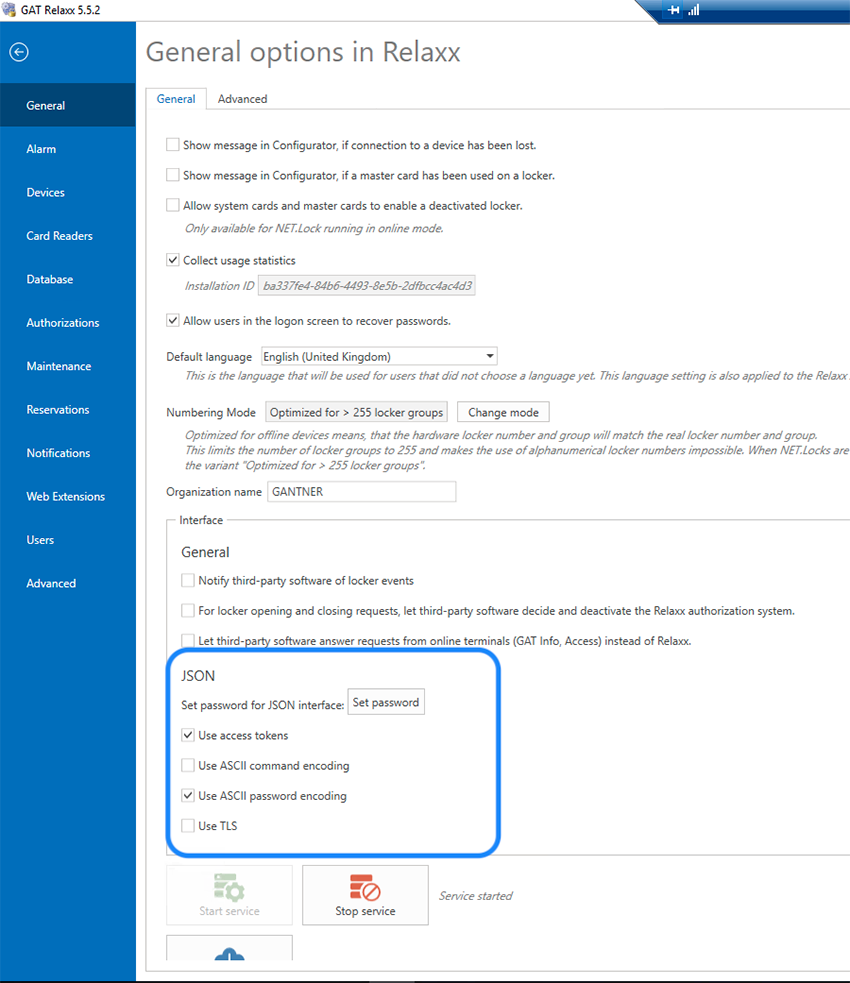 Relaxx general options: JSON settings
Relaxx set up
In Relaxx you need to create the lockers groups that will be assigned to the authorization groups. The authorization groups are the elements that will be mapped through Space-Relaxx and will grant users access to the correct lockers.
In the Authorizations tab > Authorization groups option you can create the different authorization groups and include the locker groups that those authorization groups will have access to.
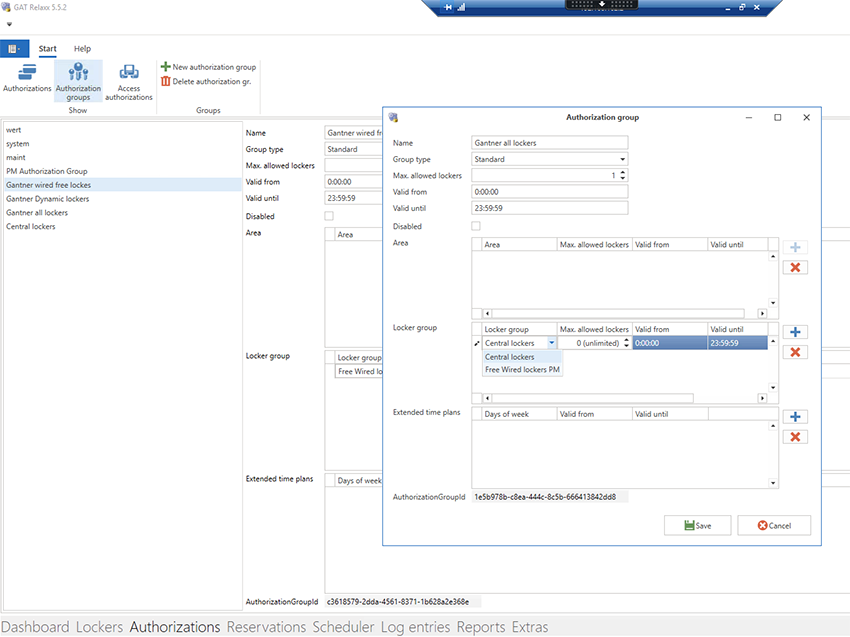 Relaxx authorization groups
To make the mapping easier, we recommend using the same naming for both the Space access levels and the Relaxx authorization groups.
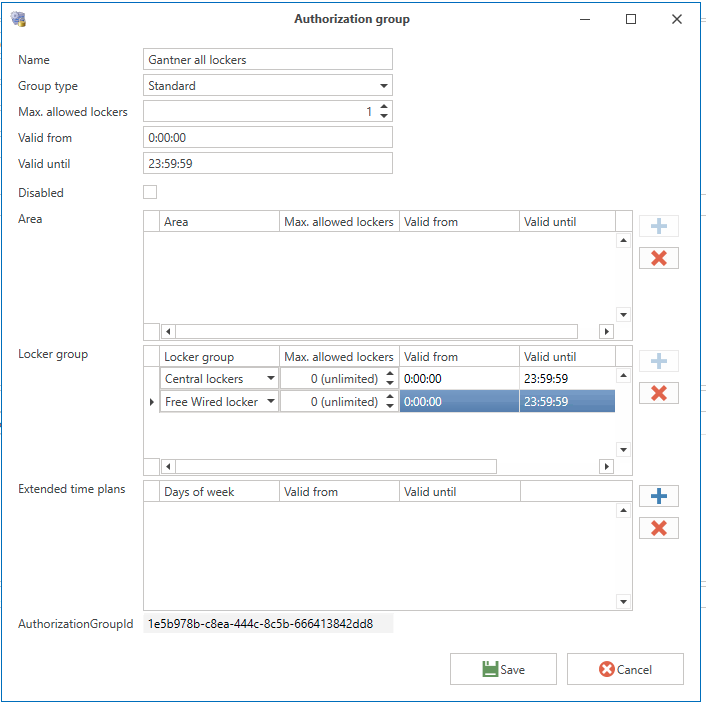 Relaxx authorization group example
Relaxx only allows users to belong to one authorization group. If you need some users to have access to different locker groups, we recommend creating authorization groups that include the different locker groups.
Gantner controllers set up
To allow the GAT NET. Locks to read Salto SVN Cards, the controllers or the GT7 terminal have to be set up with a specific setting that allows the usage of third party non-coded cards to correctly read the UID of the cards.
GAT Net sub controllers
In advanced configuration, enter the following parameters in Segment configuration:
- SubFID=0
- SegID = NOT_USED
- SendToHost = Disabled
- HandleLockerGroupId = 0
- KeySet = 00000000000000000000000000000000000000000000000000000000000000000000
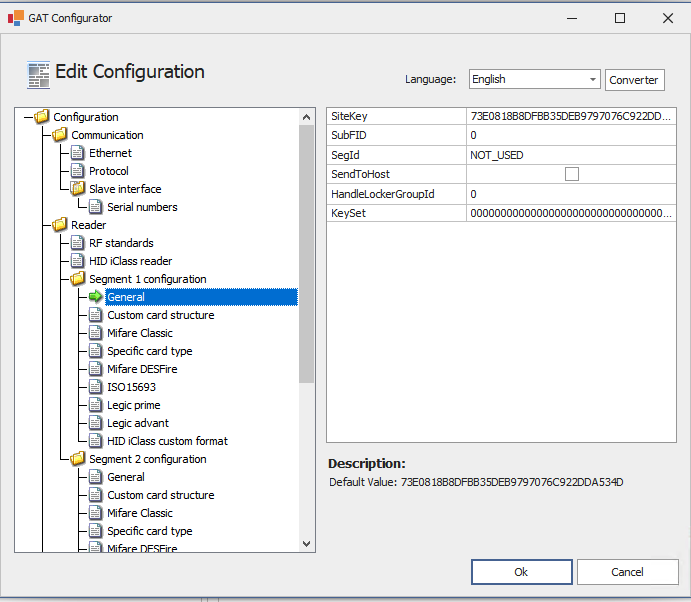 GAT configurator segment configuration
GT7 as main controller
Data carrier values on the GT7
The GT7 can be used as a main controller. A specific configuration is also needed to allow Salto cards to be used on this set up. Make sure that the field Check certificate is unchecked in the data carrier type (e.g.: Mifare classic or Mifare DESFire) that you're using in the installation.
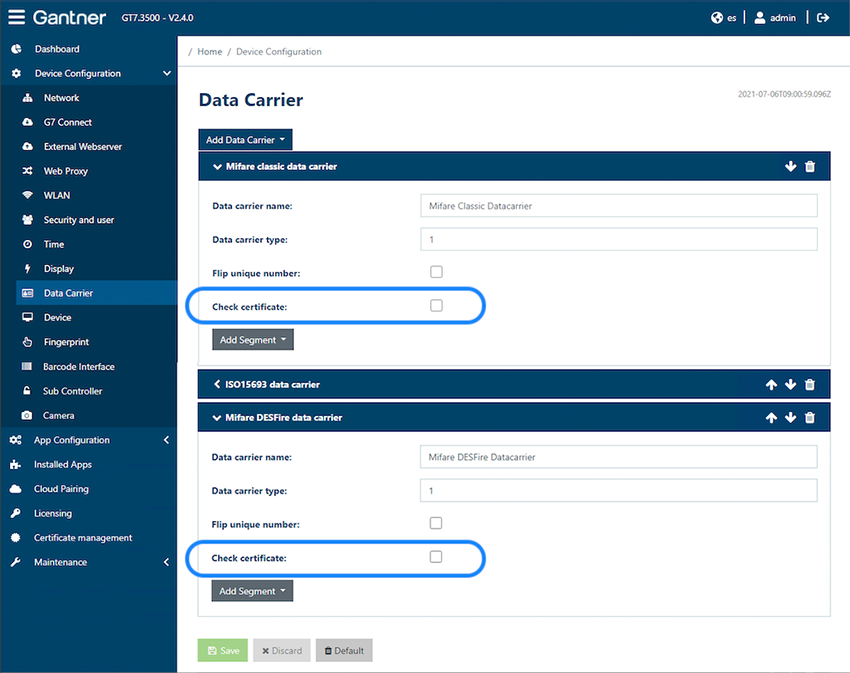 Data carrier check certificate field
Sub controller RFID setting
To use a Salto card on a sub controller that's managed by a GT7, you need to specify the values so the locker locks can read Salto RFID cards. These settings can be programmed via the G7 Connect cloud interface or by accessing the GT7 web browser interface.
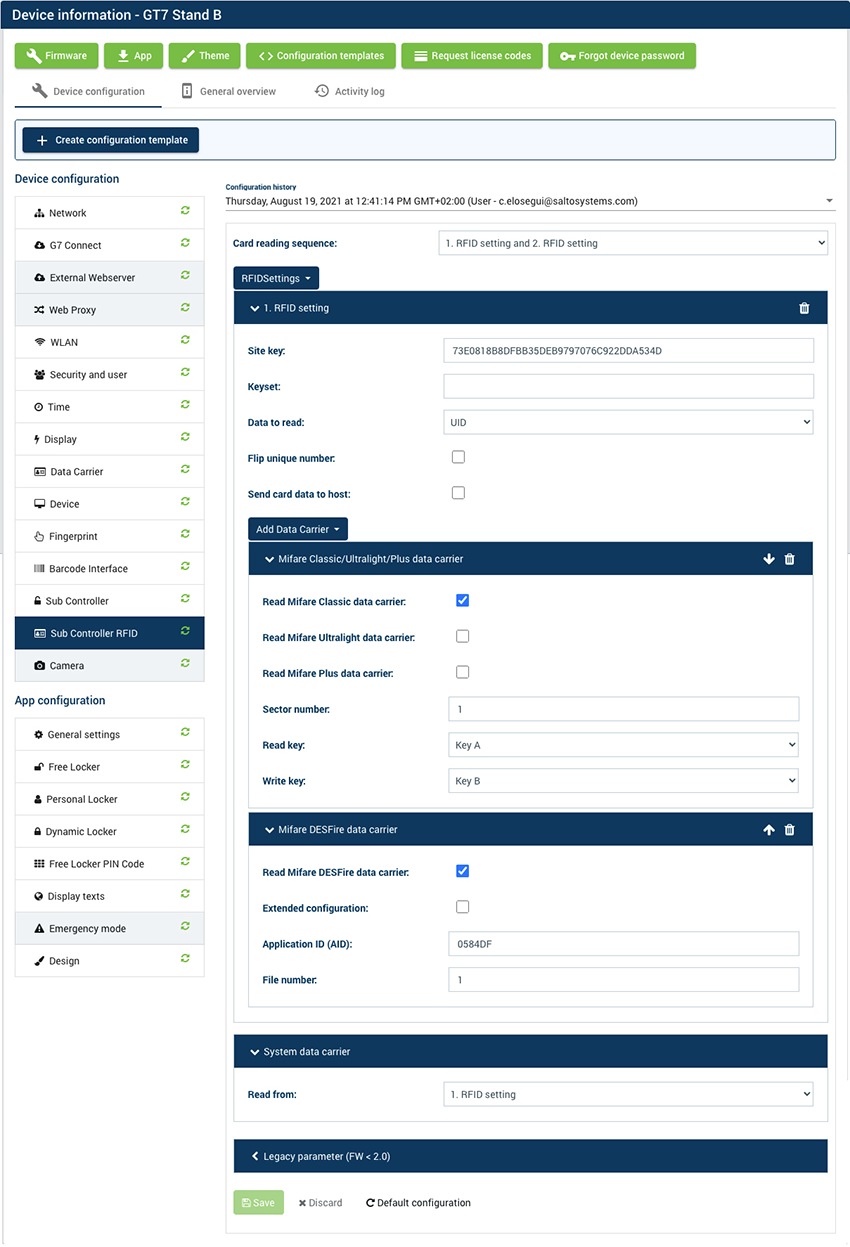 Specify the values so the locker locks can read Salto RFID cards
Spaxx set up
To set up Spaxx, bear in mind that previously you should have set up the SHIP connection in Space and the JSON interface in Relaxx.
Spaxx login and default password
To access the Spaxx user interface you need to enter a valid username and password.
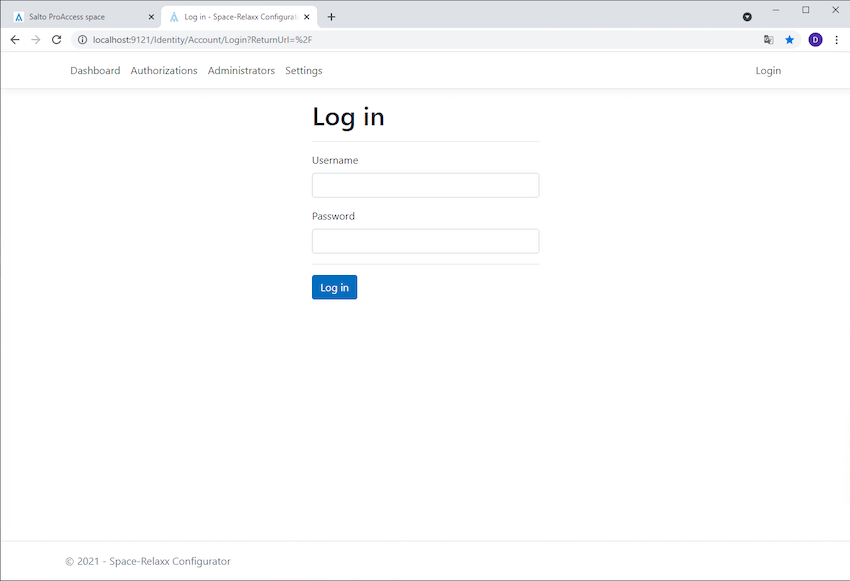 Spaxx login screen
The default username and password are:
- Username: admin
- Password: SpaceGat
You need to change these after you log in for the first time.
Make sure that the Space Relaxx SyncAgent is stopped before setting up the Spaxx connector.
Setup screen
To enable Spaxx to synchronize between Salto Space and eLoxx Relaxx, access the Settings section and set up the configuration for Space Host Interface Protocol (SHIP), Relaxx REST API, and the settings for the Spaxx SyncAgent.
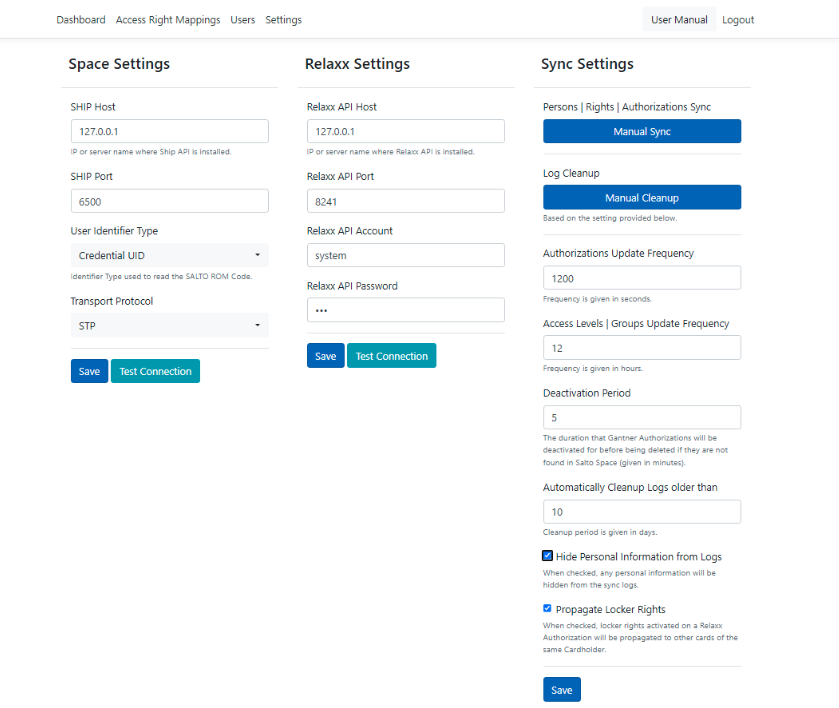 Spaxx settings screen
Space settings
On the Space settings screen in Spaxx, you need to add the same values as the SHIP connection settings in Space. These indicate the IP of the SHIP host and the port for the communication.
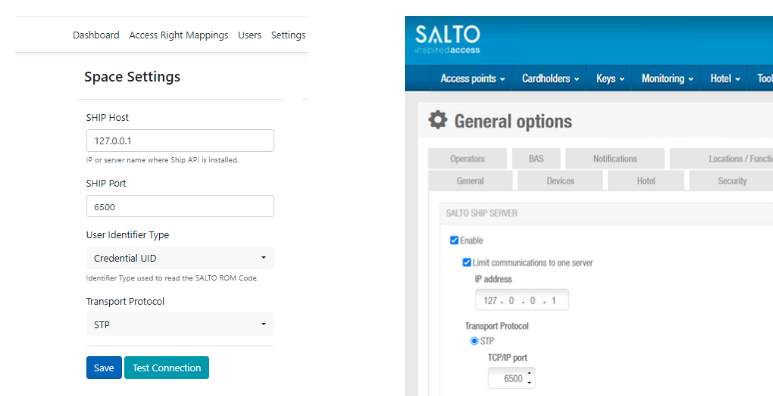 SHIP settings in Spaxx and Space
The Spaxx connector allows you to check if the connection with the SHIP host has been correctly established. After entering the values and saving, click on the Test Connection button to verify that the connection has been established correctly, as shown below.
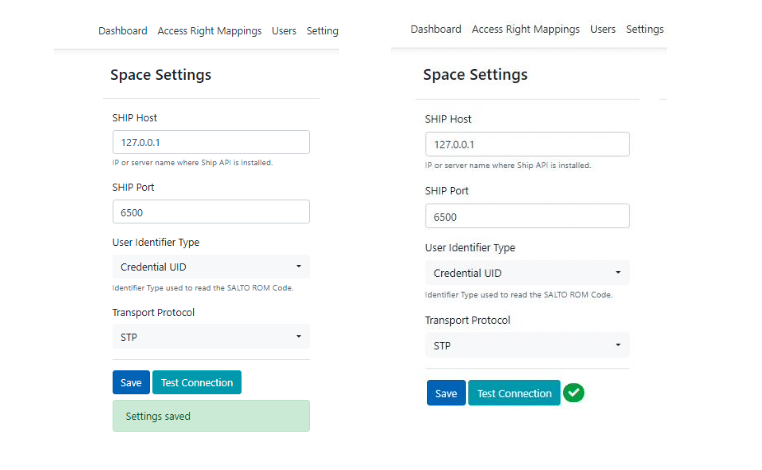 Test connection successful
Spaxx allows you to use either the card's UID or specific data stored on a third party sector of the card (data in memory) to identify the user when they present a key to a Gantner locker. Depending on the option you want to use, make sure that the Space setting is configured correctly.
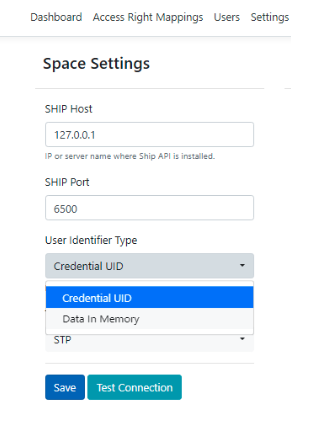 User identifier type
Spaxx allows for a secured SHIP connection to be used. You can use either Basic (HTTP), secured by a user log in and password to authenticate the connection, or Custom (HTTPS), which uses a server certificate to authenticate the communication. Depending on the option you want to use, make sure that the Space setting is configured correctly.
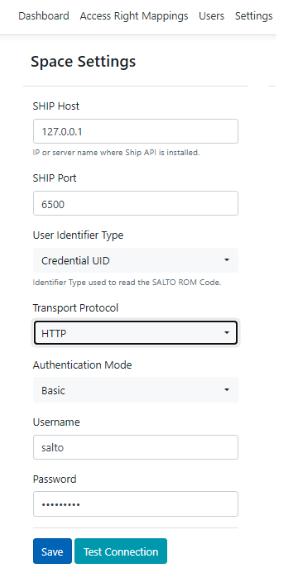 SHIP connection options
Test connection troubleshooting
The connection may fail if the correct Space license feature SPACE-OPT-0039 is not activated. In this case, a message like the below would display:
 Connection error due to unsupported license
Relaxx settings
In the Relaxx settings section in Spaxx you need to use the same values as the ones used in the Relaxx software.
This means including the following information:
- Relaxx API Host: IP or server name where the eLoxx Relaxx Service is installed.
- Relaxx API Port: 8241 (Relaxx REST interface default port)
- Relaxx API Account: Relaxx user that will perform the changes. It's recommended to use the
systemdefault user (default user with management capabilities). - Relaxx API Password: Password for the user who will perform the changes.
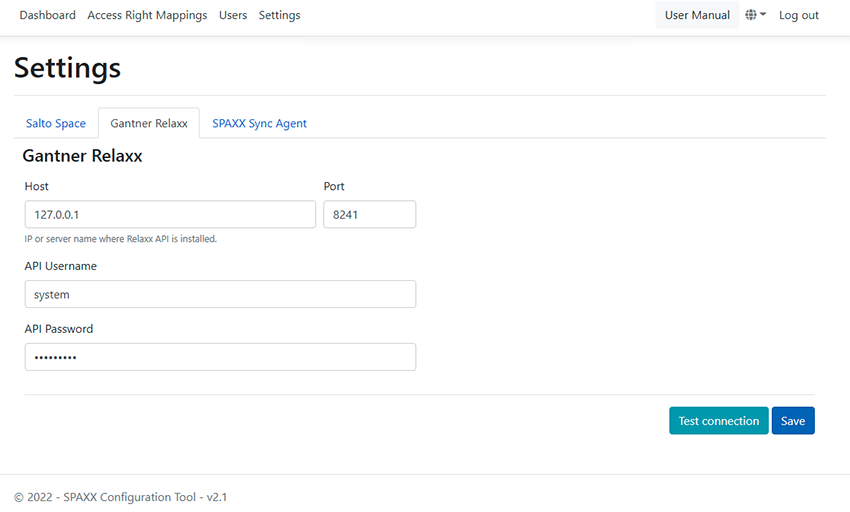 Relaxx settings section in Spaxx
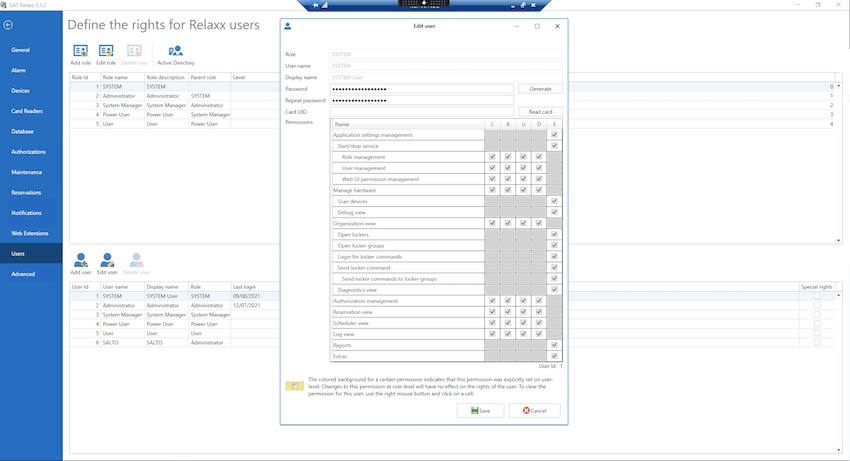 Relaxx settings
The Spaxx connector allows you to check if the connection with the SHIP host has been correctly established. After entering the values and saving, click on the Test Connection button to verify that the connection has been established correctly.
If the connection is not properly established, please check that the username and password for the Relaxx API Account are correct.
Next, access the folder C:\Program Files (x86)\GAT\GAT Relaxx\ApplicationLogger.log4net, and change the level value to "ALL" on the line <root> <level value “/> and on the line logger name=”relaxxbasicinterfaceconfiguration”.
See the screenshot below for more details:
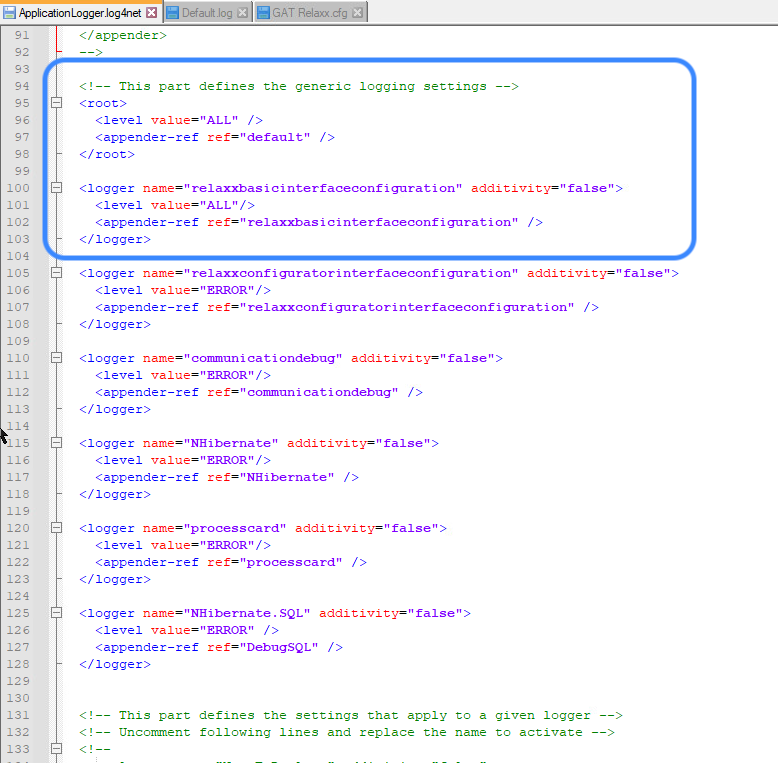 ApplicationLogger settings
If the connection is not established, make sure that the SQL server authentication allows logins via SQL Server and Windows Authentication mode as shown in the screenshot below.
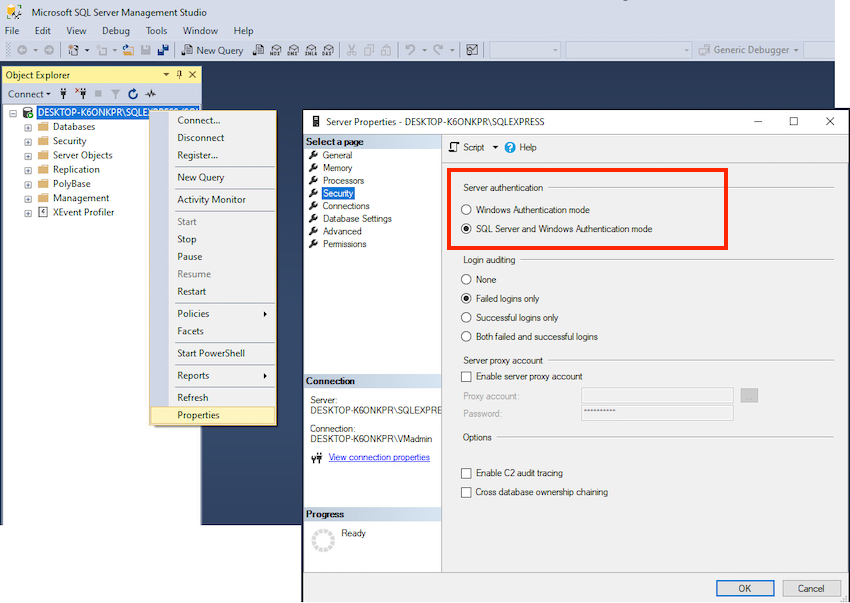 Allow logins via SQL Server and Windows Authentication mode
Sync settings
Synchronization settings permit the customization of the values that will define the performance of the synchronization of users and access levels between Space and Relaxx.
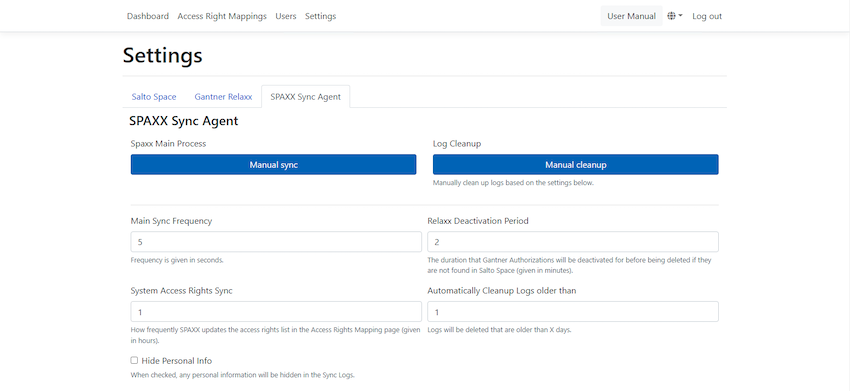 Spaxx sync settings
Manual sync
This option allows you to run a manual and immediate synchronization.
- Click on the Manual sync button.
- The users and the access rights synchronization will be forced.
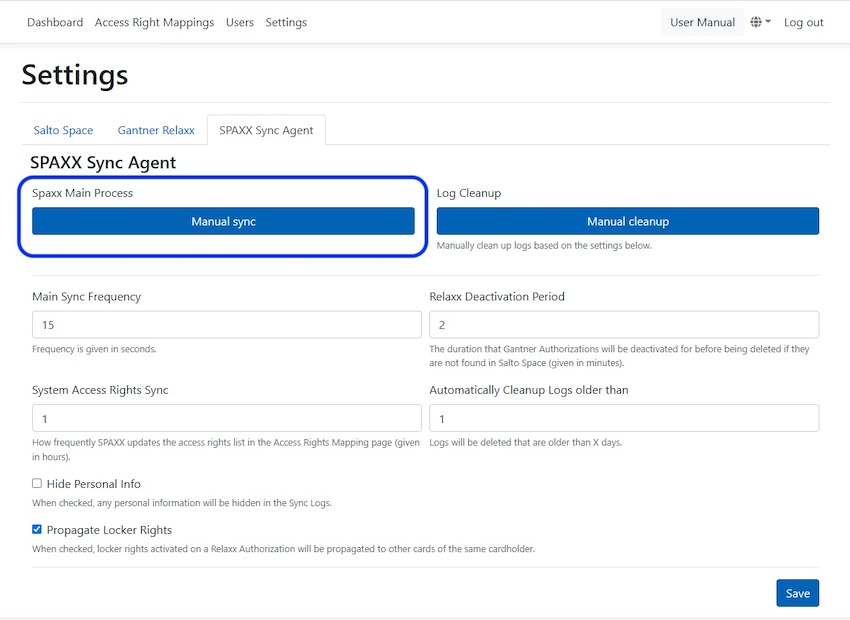 Spaxx manual sync option
Automatically cleanup logs
This option permits purging the record of the logs generated during each synchronization for logs that are older than the specified number of days.
Depending on the number of users and transactions you have in Space, the size of the log file can grow - possibly requiring more hard drive space. A periodic purge could be required for hard drive memory optimization.
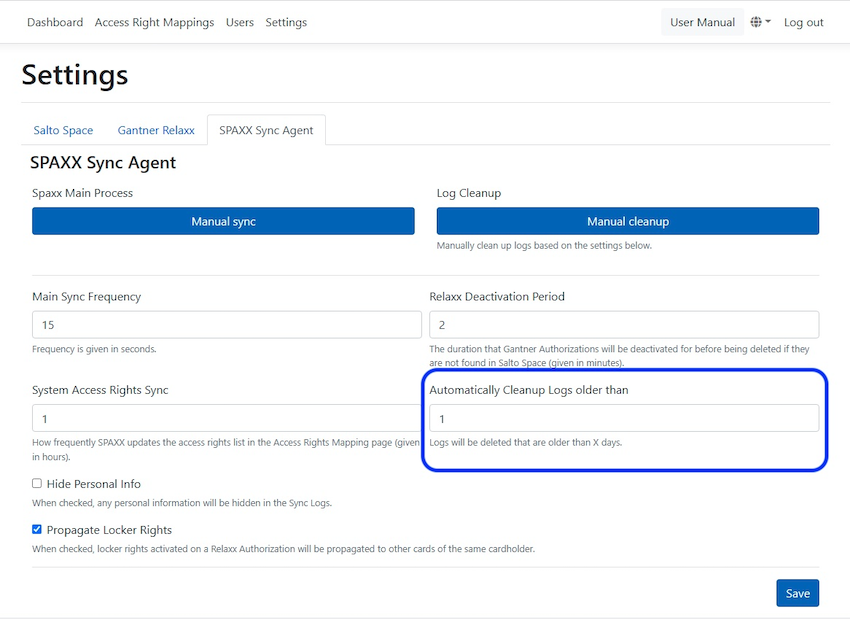 Automatically cleanup logs option
You can configure Spaxx to automatically clean up the log files after a specific period of time defined in days.
You can also force an immediate clean up by clicking on the Manual cleanup button. The most recent logs will be erased based on the frequency period defined.
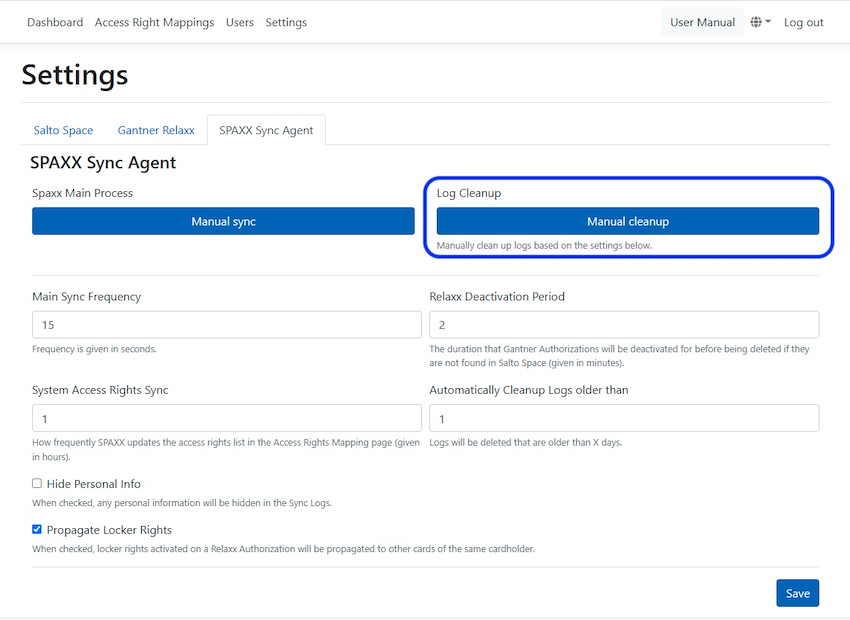 Manual logs cleanup option
Authorizations update frequency
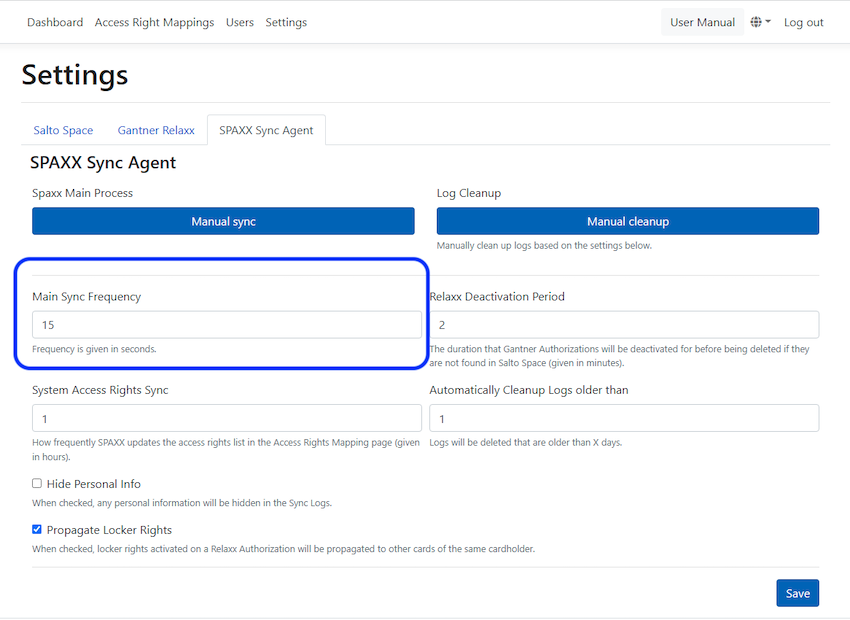 Authorizations update frequency
Defines the frequency of the synchronization of users. Value defined in seconds.
A short frequency could require more system resources for large installations and could overburden the system resulting in a degradation in performance. For large installations we recommend using a value of 1200 seconds.
Access levels / Groups update frequency
Defines how frequently the creation or deletion of access levels and authorization groups is updated. Used for configuration purposes.
Value defined in hours.
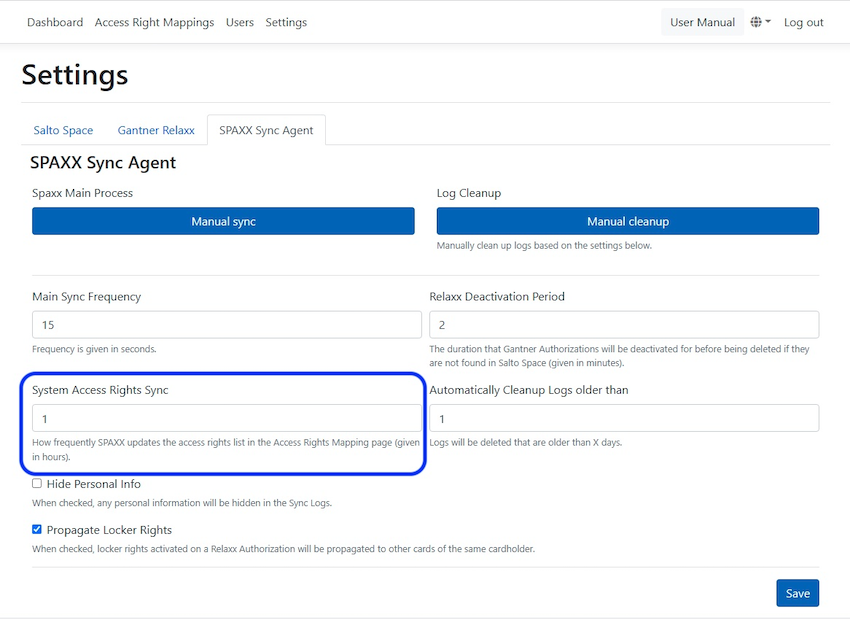 System access rights sync
Deactivation period
Defines the duration that Gantner authorizations will be deactivated for prior to deletion if they're not found in Space.
 Relaxx deactivation period
This is used to define the time period that a deleted card in Space will maintain the authorization active in Relaxx. This means that if a new card has to be issued, the user will still be able to keep the locker occupied.
If a user has already captured or been assigned a locker, and the card is lost, the deactivation period will maintain the authorization disabled in Space, but still available in Relaxx, during this period. Value defined in minutes.
If a new card is issued during this period of time, the user will be able to access their locker with the new card.
If a new card is issued after this period of time the user will not be able to open their locker with the new card. The assistance of the Relaxx administrator will be required either by opening the locker remotely or with a master card.
Hide personal information from logs
By enabling this option, the logs generated on the Spaxx dashboard will hide any personal user data.
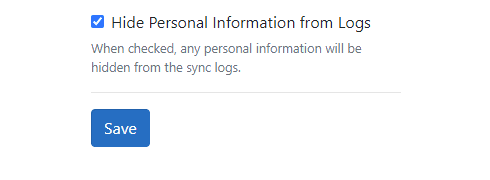 Hide personal information checkbox
Personal data not hidden
 Log example when checkbox is not checked
Personal data hidden
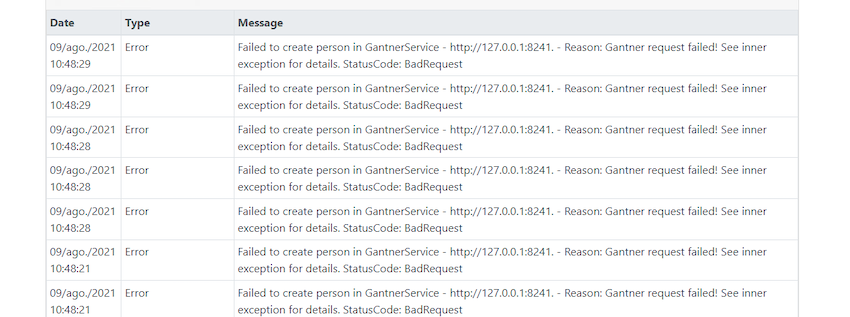 Log example when checkbox is checked
Propagate locker rights
By enabling this option on dynamic lockers, guests with card copies will be able to access the same locker (Family option).
As soon as any guest copies access to a locker, Spaxx will assign the same locker to the rest of the guest card copies.
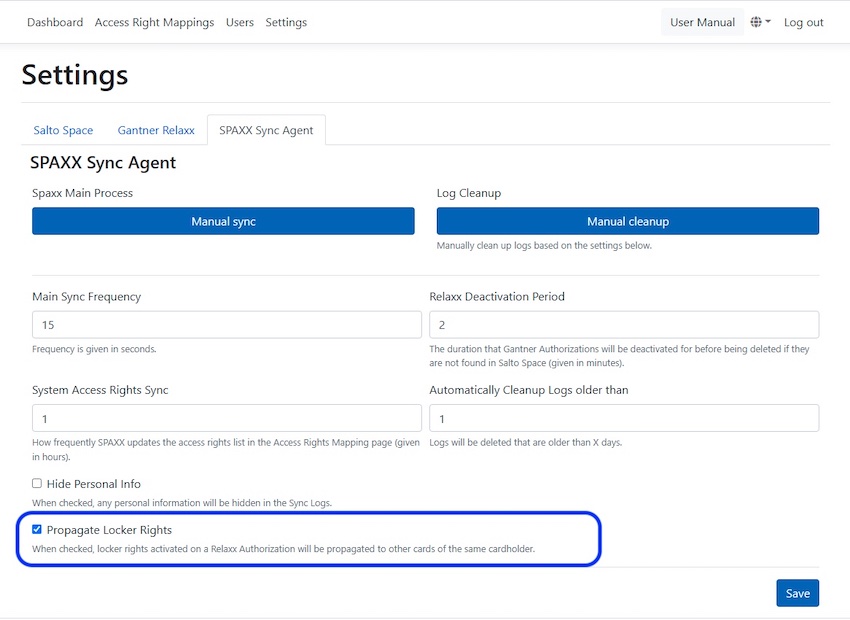 Propagate locker rights option
 Atrás
Atrás
